Tuesday, March 31, 2009

Mung Bean Curry ~ Whole Moong Curry

Every where I see these days, the signs of spring are there. The grass all around my area is getting greener , trees with fresh new leaves, birds are out chirping and the days are  longer ....yep spring is definitely here. The only downside, rains!  We have been having one storm system after another dumping rain on us continuously for the last couple of weeks and it is enough to make me look at the sky each morning hoping for some sunshine.  The weirdest part about rains this past couple of weeks has been that  all weekend it rains, ruining any chances of outdoor activities and on Monday morning the sun finally makes an appearance when we are not able to enjoy it. A couple of days of some sun shine and right around the time the weekend is on the horizon so are the clouds, and we are faced with yet another wet weekend. Just when the weather's getting warmer and we are looking forward to spending time outdoors we are forced to stay indoors because of the rains. I am keeping my fingers crossed for this weekend, hope the trend changes from the last two weeks :-) 

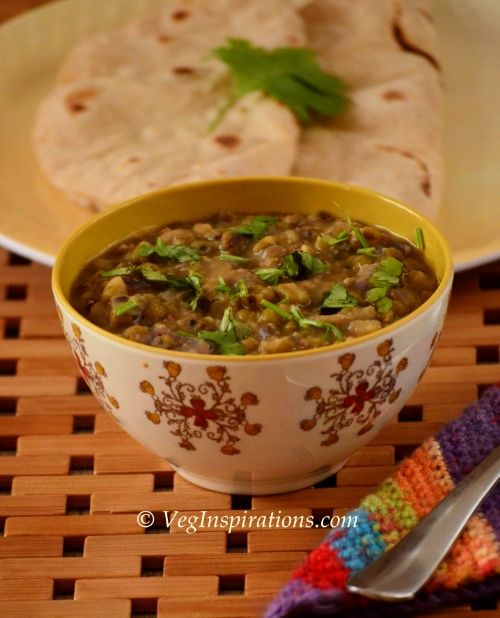
Moving on,I make this style of  mung bean curry when I am looking for a change from the dhal/ usal type preparation using mung beans. This curry works as a great side dish with both roti and steamed rice. You can even use it as a filling in sandwiches or wraps.  The cinnamon, fennel and cardamom impart such a sweet and fresh flavor to the curry and the green chillies impart just the right heat. Try this when you are looking for a quick, healthy and low fat protein dish with a difference. 


Mung Bean Curry~Whole moong curry 

  
Click here for a printable view of this recipe 

Ingredients and method to make Mung bean curry
1 cup dry mung beans/moong beans(Green gram/pachai payaru) soaked in sufficient water for at least 4 to 6 hours
1 medium red onion cut fine
salt to taste 

1/4 tsp red chilli powder (optional, or to taste) 
1 tsp sugar handful cilantro for garnish (cut fine) 

Masala Paste 
1/2 tsp fennel seeds (saunf/sombu) 
1/2 tsp cumin seeds (jeera/jeeragam) 
1/2 tsp coriander seeds (dhania) 
1/4 tsp cardamom seeds (choti elaichi/ellakkai) 
1 inch piece of cinnamon (dalchini/pattai) 
1/2 tsp chopped ginger (adrak/inji) 
2 Thai or Indian variety green chillies (hara mirch/pachai molagai) (or according to taste) 
1 dry red chili (lal mirch/molagai vathal) (optional, or to taste) 

 For seasoning 
1 Tbsp oil 
1 tsp mustard seeds (sarson/rai/kadagu) 
1 tsp cumin seeds (jeera/ jeeragam) 

Soak the dry mung beans in sufficient water for 4 to 6 hours.  Drain the mung beans completely,wash once with fresh water and place in a container with just enough water as to cover the beans and pressure cook until soft but not mushy. (usually takes me about 2 whistles in the pressure cooker) 

Alternatively you can cook it on the stove top with sufficient water on medium heat until it is soft but not mushy. Keep the cooked beans aside. 

Grind together the dry ingredients mentioned in the masala paste first in a small spice grinder until it is fine. Then add ginger and green chillies, and a little water and grind together until it becomes a fine paste. Keep this ground mixture aside. 

 Heat oil in a heavy bottomed pan. Add the mustard seeds, when the seeds begin to splutter, add cumin seeds. When cumin sizzles, add onions and saute until onions are translucent. 

Add the cooked beans, salt to taste, sugar and red chilli powder (if using ) and mix together gently. Add the ground mixture to this and stir until it mixes well with the beans. If you plan to use this curry in a wrap or want it to be on the drier side, do not add any water to this curry at this stage, just mix all the ingredients, garnish as below. If you plan to use this curry as a side dish for phulkas or chapathis/Indian flat bread, add water as required to achieve required consistency and simmer for a few minutes until all the flavors mingle.

Garnish with finely cut cilantro and serve hot with rotis/ phulkas/ chapathis or rice or use it as a filling in wraps or enjoy a bowl of this curry just on its own :)
Read more ...

Thursday, March 26, 2009

Baked Falafel

Do you use brown sugar ? If yes, then you know that brown sugar shows a marked tendency to turn lumpy and a little hard. I use only brown sugar and find myself trying to break out the lumps in them with the back of a spoon before measuring it out for either tea or other cooking. I came across this tip recently in a book (I cannot remember which one ) which has now made this struggle with brown sugar a thing of the past for me. The book suggested that to break up the sugar we should place the sugar in a microwave safe bowl and place it in the microwave beside a mug filled with water and zap it for about 2 minutes on high heat. I tried this, a little nervously initially, since I had this fear that heating the sugar would cause it to start melting. But I was wrong, in a couple of minutes the hardest lumps from the sugar disintegrated. So try this if you are having problems with your brown sugar forming lumps, only do remember to cool the sugar to room temperature before storing it back in an airtight container.

Moving on, falafel is a fried ball or patty made out of spiced chickpeas. Wikipedia classifies falafel as a fast food from the middle east.  For those of you who have not tried this but are familiar with Indian cuisine, this dish may remind you a little of masala vadai. Falafel though classified as a fast food can be quite healthy except for the fact that it is fried. So when I came across this recipe on Kalyn's site, the idea of baking the falafel appealed to me a great deal. I tried it and was really glad I did, the falafel turned out crunchy on the outside and soft on the inside, just the way I like it. 


Ingredients and Method to make the baked Falafel

1 cup dry chickpeas (kabuli channa) soaked in sufficient water with 1/8 tsp of baking soda for 8 hours (the soda is optional)
1 small yellow onion (cut fine)
half a handful of parsley (cut fine)
half a handful of cilantro (cut fine)
1 tsp cumin powder
2 tsp minced garlic
1 1/2 tsp salt (or according to taste)
1 tsp baking powder
All Purpose Flour (Maida) as required to bind (it took me about 4 to 5 tsp all purpose flour)
1 tbsp crushed red pepper

about 1 tsp of oil to brush on top of the falafel (optional)


Soak the dry chickpeas in sufficient water with 1/8 tsp of baking soda (the soda is optional ) for about 8 hours or overnight.

Drain the soaked chickpeas well.

Place the soaked chickpeas along with cut onions, parsley, cilantro, cumin powder, minced garlic, crushed red pepper,cumin powder, baking powder and salt in a  food processor and grind to get a coarse thick bread crumb like texture.

Add the all purpose flour and use the pulse feature on the food processor until it binds together slightly.

Add more flour if the mixture does not seem to bind. If you take the mixture in your palm and make a fist, the mixture should hold together.

Chill this mixture in the refrigerator for about 2 to 3 hours ( I placed this mixture in the refrigerator overnight and made the falafel patty the next day)

Preheat oven to 400 deg F. Line a baking sheet with parchment paper.

Form the mixture into lemon sized balls and flatten it a little and place it on the lined baking sheet about half an inch apart. If you plan to use oil you can brush a little on each patty at this point.

Bake about 20 to 30 minutes turning once in between.

Remove from the oven and serve hot with any yogurt dip of choice, or use in a wrap or for some fusion use this patty in a burger.

The number of patties will depend on the size of each of them.

Notes

I tried one batch with oil and one without oil and frankly did not see the oil enhancing the taste very much, so you can easily skip this if you wish.

It is important that the chickpeas are drained thoroughly before being placed in the food processor. If the water is not drained then the chick peas may turn a little mushy and may need more flour to bind. 


Read more ...

Monday, March 23, 2009

Cabbage Poricha Kozhambu (Cabbage in coconut lentil gravy)


Recently, my  uncle S did a very sweet thing and gave our entire family an incredible gift. He uploaded some really old and rare pictures on the internet and sent us all a link to it, enabling  us to get a glimpse into a world and a time that we have never experienced. I looked at these rare pictures, and it seemed to me like discovering a treasure, each picture was so enthralling that I spent a lot of time going over them again and again. 

As I was looking at those sepia toned pictures, I wondered how life would have been in those days. No televisions, no cell phones, no telephones, definitely seemed a lot more simpler. R is absolutely convinced that life in those days was much simpler and much better than our current times. I am a little ambiguous about this, though I realize that life seemed simpler those days and now it seems like a fast paced race, there are some aspects of our times that I cannot imagine living without. For example, telephones and cell phones can be a pain at times,but it keeps me connected with my family, no matter where they are at the moment, at the touch of a button. Only the existence of internet made it possible for my uncle to send us these pictures and for me to communicate with all of you :-) I also sincerely believe that although those days seem simple and uncomplicated, even then, people had their own challenges to overcome, just as we do now. To all of my readers,I would love to hear your opinion on this subject, so do share your thoughts on this, do you think you would have preferred life in "those" days, pre television and pre telephone or are you happy with the modern "conveniences" and cannot live without them.

Now moving on from pictures of an earlier time to a recipe that has been handed down through time, a traditional southern Indian recipe called Cabbage poricha kozhambu which means cabbage in coconut lentil gravy. This simple, humble, wholesome and tasty dish is versatile enough to be used as a curry to go with Indian flat breads (Rotis/Phulkas) or as a dhal and served over rice or if you do not want to prepare anything else, just try this as a hearty soup, this dish will not disappoint. 


Ingredients and method to make cabbage poricha kozhambu
3/4 cup split pigeon peas /tur dhal (pressure cooked in 1 cup of water until soft)
4 cups finely cut cabbage
water as required to cook the cabbage and for the gravy.
1/4 tsp turmeric powder
1 1/2 tsp of salt or according to taste

Grind together
3 tbsp coconut freshly grated or frozen thawed to room temperature
1/2 tsp whole black pepper
1/2 tsp cumin seeds
2 dry red chillies (or according to taste)
8 large curry leaves (optional)

seasoning
2 tsp oil
1 tsp mustard seeds
1 tsp split black gram dhal (udad dhal)
pinch of asafoetida (hing) (optional)

Cook pigeon peas/ tur dhal in 1 cup of water in a pressure cooker until soft and mushy (usually takes me about 3 whistles) and keep it aside.

Place the finely cut cabbage along with turmeric powder and salt in a heavy bottomed water along with sufficient water and let the cabbage cook.

In the meanwhile grind together coconut, whole black pepper, cumin seeds, curry leaves and dry red chillies along with a little water to a fine paste.

When the cabbage is cooked, add the mashed cooked lentils and the ground coconut paste.

Add water to achieve required consistency. Allow this mixture to simmer for a few minutes so that the flavors get blended together.

Adjust salt to taste if required.

Heat oil and add mustard seeds and split black gram to it. When the mustard seeds splutter and the black gram lentil turns reddish, add a pinch of asafoetida (if using) and pour the oil + mustard seeds + black gram lentil mixture on the kozhambu and mix well. 

Serve hot with Indian Flat bread/ Roti or phulka or Plain rice with appalams/ papaddums or chips on the side.

Serves approximately 3-4

Notes 

You can also used the stove top to cook the lentils, just  cook it in a heavy bottomed pan with  sufficient water until soft and mushy.

This traditional South Indian favorite of mine is off to WYF : Cuisine Event being hosted by EC
Read more ...

Thursday, March 19, 2009

Flax Chutney Powder


Flax seeds are literally a kind of wonder food. These tiny seeds are said to have amazing capabilities like improving the immune system, decreasing risk of Alzheimer's, reducing cholesterol and high blood pressure and stabilizing blood sugar levels.  These seeds are also rich in omega-3 fatty acids and high in both soluble and insoluble fiber. 

Given that this is such a healthy food, it should be a no-brainer to include this in our diet. Having said that, actually including it in our diet has proven to be a little more challenging than I expected. I usually use flax seeds in my bakes as I did when I made these sweet potato rolls . But since I do not bake every day or even two or three times a week (though I would love to) just using them in bakes makes me feel like I am not using enough of it. So when I came across this recipe on Archy's site, I was thrilled with the idea of using flax seeds in a spice/ chutney powder. I adapted the recipe and added a few ingredients that I thought would enhance the taste.

This powder is very versatile and can be used to spice up yogurt to make an instant dip or used along with a few drops of sesame oil to make a chutney to go along with savory crepes/ dosai. You can add a little to cooked rice to make an instantly flavored rice. I have even used it to spice up my curries with thoroughly enjoyable results.


Ingredients and method to make Flax chutney powder

1/2 cup flax seed meal (also known as Alsi ) (see notes)
1/4 cup raw unsalted peanuts
1/4 cup unsalted split roasted chick pea (dalia/ pottu kadalai)
1/2 inch tamarind
1/2 tsp brown sugar
20 curry leaves
15 dry red chillies (or according to taste)
1/4 cup brown sesame seeds
1 1/4 tsp salt (or according to taste)

Dry roast flax seed meal, raw peanuts, curry leaves, dry red chillies and brown sesame seeds SEPARATELY and keep aside to cool.

Flax meal needs to be roasted until aroma arises from it, peanuts until they change color and lose rawness, curry leaves until they become dry and crisp.

Powder all the ingredients along with the tamarind, brown sugar, and roasted chick pea until mostly fine.

Add salt to taste and give it another turn in the spice grinder. 

Store this in an airtight container and use as required

This powder will stay for about a month or maybe more without any refrigeration.


Notes
Flax seed is known as Alsi in India. Flax seed meal is just powdered flax seeds, so if you have the seed you can powder it in your spice grinder.

Instead of raw unsalted peanuts you can use unsalted roasted peanuts too, if you use roasted peanuts you can skip roasting the peanuts step.

You can grind this powder to a very fine texture too if you like, I make it reasonably fine and allow a little coarseness because I like to taste the bite of some of the ingredients and it also gives me a more molaga podi  like texture this way

Read more ...

Tuesday, March 17, 2009

Pahakai Pitla Kozhambu.....

A complicated sounding name essentially meaning bitter gourd in tamarind lentil gravy. This dish from southern Indian cuisine resembles dhal more than curry and is served over rice with a dry curry on the side.Bitter gourd as the name suggests is a vegetable that is bitter, and looks like cucumber with a splotchy skin. Although bitter, this amazing vegetable is touted to be a fantastic health food. Its benefits are said to range from helping diabetics in reducing blood sugar to increasing blood circulation which in turn improves metabolism. It also helps in lowering blood pressure and is even said to improve eyesight.  

This vegetable, because of its bitterness, usually gets a bad reputation and you hear people claiming that they never touch this vegetable. But with the right spices and in the right dish, this vegetable can actually turn out very tasty. One such dish is the pahakai pitla kozhumbu which is a traditional south Indian dish that brilliantly incorporates this vegetable along with a mixture of spices in a manner that makes the most vehement critic of this vegetable, at the very least, rethink their criticism. 


Ingredients and method to make Pahakai Pitlai kozhumbu
3/4 cup Split Pigeon peas/tur dhal pressure cooked in 1 cup of water
small lime sized tamarind soaked in water and juice extracted (yielded about 2 1/4 cups of tamarind juice)
5 small bittergourd skinned, de-seeded and cut into thin 1/4 inch slices (yielded about 1/1/2 cups sliced gourd) (see notes)
salt to taste

Dry roast and grind
4 tsp split yellow chick peas/ chana dhal
2 tsp split black gram lentil/ udad dhal
3 tsp coriander seeds/ dhania
4 dry red chillies (or according to taste)

3/4 tsp cumin seeds (jeera) (optional)
1/4 tsp whole black pepper (optional)
2 tbsp freshly grated coconut (or frozen coconut thawed to room temperature) (optional)

seasoning
2 tsp oil
1 tsp mustard seeds
pinch of asafoetida (hing)(optional)

Pressure cook the lentils/ dhal in water until soft and mushy.Usually takes me 3 whistles in the pressure cooker. If using a stove top cook the lentils in sufficient water until the lentils are soft and mushy and keep aside.

Soak tamarind in water, enough to submerge the tamarind, for about 20 to 30 mins. In a hurry I soak the tamarind in enough water and heat it in the microwave for about 15 to 20 seconds.  Press the tamarind and extract the juice and strain and pour the juice in another bowl. Repeat the process with the tamarind again to extract all the juice from it. Discard the pulp and seeds of the tamarind.

Dry roast  each of the spices separately mentioned in dry roast and grind EXCEPT coconut. Powder together in the spice grinder until fairly fine, then add coconut (if using) and a few spoons of water and grind again to a fine paste. This way the lentils grind finely and will blend well with the kozhumbu

Heat oil in a large heavy bottomed pan, add mustard seeds to it, when the mustard seeds start spluttering add asafoetida.

Then add the tamarind juice and the sliced bitter gourd and salt to taste and allow it to boil until the bitter gourd is cooked and the tamarind loses its raw smell.

Add the cooked and mushed up lentils to this, mix well. Then add the coconut lentil paste to this and mix well.

Adjust water to achieve required consistency. Adjust salt to taste.

Bring to a boil and simmer for a minute or two. Serve hot with plain rice and dry curry on side or just with rice and appalam/ popadums

Serves approximately 4


Notes

While selecting bitter gourd select younger ones as the bitterness of the vegetable increases as it ripens. The vegetable has to be firm all over and a dark green with no yellowing.

When skinning bitter gourd use a potato peeler to remove the skin lightly, do not remove it all the way through until you get to the white part, leave a little green on the veggie.

After skinning it, cut it in half lengthwise and remove seeds and then proceed with slicing it.

I have made this numerous times without the coconut and it tastes just as good so the coconut is completely optional. 

This traditional dish is off to My Legume Love Affair-Ninth helping being hosted by Laurie originally started by Susan

Read more ...

Thursday, March 12, 2009

Spiced Sweet Potato Rolls

As I mentioned in my earlier post , sweet potatoes are power houses of nutrition and I try my level best to find new ways to include this wonderful food in our diet. Since the inclusion of sweet potato in Roti's (Indian flat bread) enhanced the softness and texture of the roti, I was very keen to try using sweet potato in a bread roll. I was curious to see if the sweet potato enhanced the softness and texture of bread too. When I found exactly two sweet potatoes left in my potato basket, I thought this would be a great way to use them up. 

So I started out on these rolls and was very pleased with the outcome. The bread was soft and chewy and the sweet potatoes did really seem to improve the texture of the bread, in addition, the inclusion of cumin, black pepper and red pepper saved the bread from turning bland and made it far more interesting. Though this bread tasted great in sandwiches and as a side for soups, I enjoyed it just on its own too, with nothing added to it. For some true fusion, try this with some hot and spicy chutney applied to it or use it instead of your regular burger buns.


Some more views of the rolls.......


Ingredients and Method to make the spiced sweet potato rolls

3/4 cup oat flour ( I processed rolled oats in the spice grinder to a fine powder, you can use store bought oat flour too)
1 cup whole wheat flour ( atta)
1/4 cup toasted wheat germ
1 1/2 tsp quick rise yeast ( See Notes)
2 tsp brown sugar 
1/2 cup warm water
2 medium sized sweet potatoes (yielded about 3/4 cup of cooked and mashed potatoes)
1 1/4 tsp salt
4 tsp flax seed meal ( see notes) (optional)
1/2 tsp dry crushed red pepper (or according to taste) (optional)
3 1/2 tbsp olive oil (or any other oil)

Dry grind
1 tsp cumin seeds
pinch of carom seeds (ajwain) (optional)
1/4 tsp whole black pepper

A little butter or smart balance for brushing on top (optional)

In a large bowl mix together oat flour, whole wheat flour, salt , wheat germ, flax seed meal and keep aside.

In the microwave, cook the sweet potatoes with the skin until soft and slightly shriveled ( I placed the sweet potatoes in a large microwave safe bowl with a little water and cooked on high for about 3 to 4 minutes turning the potatoes around every minute) Cool the sweet potatoes and remove the skin. Mash the potatoes and keep aside.

In the spice grinder or blender dry grind the cumin seeds, carom seeds ( if you are using it) and whole black pepper until powdered reasonably fine. You can grind it coarse if you like to taste the bite of the spices in your bread. Add the ground mixture into the bowl with the dry flours and mix well.

Add the crushed red pepper if you plan to use it to the dry flour mixture and mix well.

In a small bowl add warm water and mix in the sugar and yeast into the water and keep aside.

When the yeast froths up, usually takes about 5 minutes pour the water + yeast mixture into the bowl with all the dry ingredients. 

Add the cooked sweet potatoes to this mixture as well and knead well until the dough is soft, pliable and non sticky. (about 5 to 6  minutes)

Add olive oil (reserve 1/2 tbsp) and continue to knead the dough (for about 2 to 3 minutes)

Apply reserved 1/2 tbsp olive oil to the dough and keep the dough covered in a warm place to rise for an hour.

After an hour when the dough has doubled, gently flatten the dough, knead a few times and divide the dough into eight equal sections.

Line a baking sheet/ tray with parchment paper and keep aside.

Roll each of the eight sections of dough, slightly flatten it and place on the lined tray about an inch or more apart.

Cover the tray and place it in a warm place for about another hour or so.

Preheat oven at 375 deg F

Bake for 15 mins or until done. Remove from oven brush some butter or smart balance on top and bake again for another 2 minutes.

Serve hot with soup of choice, or use this bread to make sandwiches or burgers.

Refrigerate the balance and use within a couple of days. Warm the bread after removing from refrigerator before use

Yielded 8 rolls


Notes:

The sweet potatoes contain moisture too, so I have used only 1/2 cup warm water and between the two there was enough moisture to bind and form the dough.

I used quick rise yeast instead of active dry yeast since I ran out of active dry yeast.I have found rapid rise yeast to be more potent and much more stronger, so I used less of it. You can easily use active dry yeast in its place. Just use about 2 tsp of active dry yeast instead of rapid rise yeast for the above proportions and proceed with the rest of the steps given.

The flax seed meal is not used as a substitute for eggs in this recipe, just used to make the bread healthy ,so it can be omitted if you do not want to add it. 

The bread was very very mildly spiced, so if you like more heat then you can increase the quantity of whole black pepper or crushed red pepper according to taste.

These rolls are off to the Think Spice- Think Pepper event being hosted by Divya originally started by Sunita 

These rolls are also off to the Yeastspotting event being hosted by Susan


Read more ...

Tuesday, March 10, 2009

Vegetarian Minestrone Soup

Sometimes, even though I try and plan my meals around the vegetables I have on hand, I find that there are one or two veggies that go bad before I get to them. This frustrates and upsets me quite a bit because I feel guilty about the wastage. I try my level best to collect tips and tricks that increase the shelf life of veggies and fruits. I thought it may be useful to share some of these tips that I have picked up over time with my readers. In the interest of keeping this post to a reasonable length I am sharing just a few tips in this post, I will continue to share some more tips in my forthcoming posts. So here goes....

The best way to store celery is to remove it from plastic cover and firmly wrap it in aluminum foil and store in the refrigerator. I tried this one and the celery lasted a couple of weeks for me. I was not able to test it longer since I always tend to use up my celery in a couple of weeks time :-)

Honey dew and cantaloupe melons should always be stored separately as they react and rot faster if stored together. I realized when I came across this tip that I have never had a chance to put this one to test because I seem to purchase these melons one at a time and never together :-)

The third and last one is that leaving stalks on foods like tomatoes and strawberries lengthen their shelf life. I have tried this for tomatoes and it really does work. 

Another idea that works for me is to use up veggies that I have in small quantities in making soup. This way the veggies that are not sufficient for a stand alone dish gets used up along with a lot of others and helps clear out the refrigerator.It also helps that soups are one of my favorite foods, especially when the weather is cold. We had some really cold weather last week when a storm system dumped snow in our area.This turned out to be the perfect occasion for this minestrone soup which just happens to be one of my favorites. I have made this soup often since the first time I tasted this at a restaurant and decided I loved the soup enough to try and make it at home. The recipe has evolved over time and this is how I make this soup regularly now.

  photo cfecd181-04ab-404d-b64d-21ce15c5cb50_zps1590fbe0.jpg


Ingredients and Method to make Minestrone soup

1/2 cup dried cannelini or any other white beans soaked in water with a pinch of baking soda for about 6-8 hours (the soda is optional) (alternatively you can use equal quantity of red kidney bean (rajma) )
1/2 cup any small type dried pasta (I usually use multi grain shell or elbow pasta for this soup)
2 medium sized onions
2 medium carrots
4 stalks of celery (or 3 large zucchinis cut into 1/2 inch pieces)
3 very large tomatoes
1 tsp minced garlic
2 bay leaves
1 tsp Italian seasoning
freshly ground black pepper powder to taste (optional but recommended)
3 cups of water/ vegetable stock
2 tbsp oil
Garnish with crushed red pepper to taste (optional) 

Drain and rinse the soaked beans and place in a pot, cover with sufficient fresh water and let it simmer until the beans are cooked. ( I filled  water for about 1/2 an inch above the beans and it was sufficient for me until the beans were cooked.) Or for faster cooking, cook the beans in a pressure cooker until soft yet not mushy.Keep the cooked beans aside
In a heavy bottomed pan heat oil and add onions and saute until the onions are transparent.
Add minced garlic and saute for a minute.Add tomatoes and saute until the tomatoes are cooked and are soft and mushy.
The copyright of this content belongs to Veginspirations.com
Add carrots, celery if using or zucchini, Italian seasoning, salt to taste and about 3 cups of water or stock and let the vegetables cook.
When the vegetables are cooked and slightly soft, add the cooked beans and freshly ground black pepper powder and let it simmer for a few minutes (about 10 minutes) Add water to achieve required consistency
Add the dried pasta and cook for an additional 10 minutes until the pasta is cooked. 
Serve hot with any bread of choice. I usually serve this with wheat rosemary focaccia bread

Serves approximately 3 to 4


Read more ...

Sunday, March 8, 2009

Saffron and Cardamom flavored Almond milk (Masala Milk)

Masala milk is a kind of catchall phrase which is  used to describe flavored milk. The flavors usually include cardamom, sugar and any combination of pistachios, almonds and saffron. There are many variations of this milk that I have tasted and I enjoy most of them.I started making this particular version for the first time with a view to recreating masala milk that I had tasted during the brief time we spent in Bangalore. I remember each Saturday, R and I would set out after our breakfast and walk for miles just enjoying the weather or combining a few errands with our walk. We would then inevitably head towards a sweet shop in that area that sold this masala milk that we both enjoyed. By the time we got to the store our breakfast would be long forgotten and we would have walked ourselves into a reasonable hunger. So our stop at this store would serve the dual purpose of enjoying the milk and filling us up, at least until we got back home and had our lunch.

We both enjoy this masala milk just as much now, as we did then, and I find that this is a good way to indulge a little without overdoing the sweet part. This is also a great way to sneak in some healthy nuts and saffron along with milk into our diet. If you have never tried this milk and you like the flavors of almond and saffron you should try this, I am pretty sure you will enjoy this delicious beverage :-)


Ingredients and method to make the Masala Milk

12 raw unsalted almonds
2 tsp raw unsalted cashew pieces
2 tsp unsalted pistachio
2 very small pinches of good quality saffron (about 3-4 strands per cup)
2 tsp of sugar (or according to taste) ( I used brown sugar but any sugar should be fine)
1/4 tsp cardamom seed powder
2 cups of milk ( I used 2 % but any milk should be fine)

Soak 12 almonds in hot water for about an hour along with 2 tsp cashews and 2 tsp unsalted pistachio.

Soak 2 very small pinches of saffron in 1/4 cup of warm milk.

Blanch the almonds and drain the other nuts. Then grind the almonds along with other nuts in the milk used to soak the saffron until smooth. 

Heat the balance of the milk (I heated the milk in the microwave), mix the nut + milk + saffron mixture to it and add sugar and 1/4 tsp cardamom seed powder.

Mix well and serve hot (in winter I serve this hot and in summer I serve it cold) It tastes delicious in both ways.

Notes

You can serve this beverage cold too, just cool to room temperature and chill in the refrigerator for  a few hours and serve cold

Blanch the almonds means that after soaking the almonds in hot water, remove the skin. It is pretty easy to do that and once soaked for an hour the  skin comes out easily.

If you use the stove top to heat the milk, place in a heavy bottomed pan and stir continuously on low heat so that it does not burn. If the milk burns it will ruin the taste of this beverage.

With the quantity of sugar I used the milk was mildly sweet, so adjust the sweetness according to your taste.

This almond milk is off to the Lets go Nuts- Almonds event being hosted by JZ. 

Read more ...

Thursday, March 5, 2009

Lentil Powder (Parappu Podi) Version 2

Since I have already explained about the handy lentil powder in this post , I will not go into that again.  Suffice to say that I always keep this powder in stock in either of its versions since I like the thought of having some back up plan in case I am unable to get anything ready for dinner.Although I always manage to get something ready for dinner, the very thought of having some kind of fall back plan gives me satisfaction especially on those days when I get late in getting dinner started.

This version of the lentil powder is different from the earlier version of the powder I posted on this site and differs subtly in taste since it has more ingredients and the curry leaves in this powder imparts a wonderful aroma to this powder and enhances the taste and flavor of this powder. This one is another one of my mother in laws recipes that she gave me and has become a regular in my kitchen since.


Ingredients and Method to Make Lentil powder (Parappu Podi) Version 2 

1 cup Split red gram lentil (also known as split pigeon peas / tur dhal )
1/4 cup split yellow chick pea ( chana dhal )  
1/4 cup split moong bean (moong dhal )
20 large curry leaves
5 dry red chillies (or about 3 if you have very spicy red chillies) 
2 tsp whole black pepper (or 3 tsp of whole black pepper if you want more heat)
1 1/2 tsp salt

Dry roast each of the above ingredients separately except the salt. The lentils need to be roasted until they turn reddish and are exuding an aroma.

The curry leaves need to be roasted for a few seconds until it turns dry.The black pepper and red chillies until it changes color.

Cool all of these ingredients and powder in a blender/ spice grinder until fine.

Add salt and give it another turn in the blender/ spice grinder until the salt mixes well with the powder

Keep stored in an airtight container for months and use as required.

Notes
When serving the powder needs to be mixed with hot rice and served with a few drops of ghee (clarified butter) or sesame oil on top. About one teaspoon of this lentil  powder will be required for about 3/4  cup of cooked rice or more or less depending on your taste and how much heat you would want.. Serve with any curry and appalams/ pappadums  on side to make a complete meal.

This lentil powder (Parappu podi) is off to the Colors of Taste: Powders- Podi as an accompaniment event being hosted by Smitha


Read more ...

Monday, March 2, 2009

Eggless Cardamom Flavored Banana Oat Wheat Bread

Ripe bananas are no longer something I worry about, they are actually welcomed in my home now. There was a time when I used to worry that when there were ripe bananas in my fruit basket, that they would not get consumed and may spoil. But since I started using these ripe bananas in my baking I find that ripe bananas are something I welcome because it provides me with an opportunity to try something new with it . In the past I have baked banana bread and sugarless oatmeal raisin cookies with bananas, though cookies with bananas have been featuring more often in my kitchen than bread. This time when I found myself with a couple of ripe bananas, I was in the mood for some banana bread but wanted to try something different. 

So I looked around for some recipes and I found a recipe here and again here on red chillies site. I used this recipe as my base recipe and I adapted the recipe quite a bit. I used oat flour in place of all purpose flour, changed the proportions of the flour, pureed dates with milk and added that to the batter and increased the quantity of cardamom powder since I thought the quantity in the original recipe was not enough. The bread turned out soft and chewy and even with just 1/3 cup sugar I thought it was pretty sweet, the cardamom flavor added a dimension that we thoroughly enjoyed. For those of you familiar with the cuisine from southern India, this bread may remind you a little of appam (a fried snack made out of rice,jaggery and bananas). It definitely reminded me of appam, only a healthier version of it. We loved this version of banana bread and I am now looking forward to the next time I have ripe bananas so that I can make this again :-)


Another view of the bread........................


Ingredients and method to make the banana oat wheat bread
1 cup whole wheat flour (atta)
1 cup oat flour ( I processed rolled oats in my spice grinder to obtain oat flour) (you can use store bought flour too)
1 1/2 tsp baking soda
1 tsp salt
3/4 tsp cardamom seed powder
2 large ripe bananas
1/3 cup milk
12 large soft seedless dates
1/4 cup unsweetened applesauce
1/3 cup brown sugar
4 tbsp smart balance light (or butter) or any other vegan butter substitute
1/4 cup raisins
Preheat oven to 350 deg F 

Mix whole wheat flour, oat flour, salt, cardamom powder and baking soda in  a large bowl and keep aside.

 Blend the seedless dates, milk and bananas in a blender until smooth. Add the milk+bananas+dates mixture to the flour mixture and mix well. 

Add sugar, applesauce and smart balance (melted or melted butter ) to this mixture and mix well. Finally add raisins and mix well and keep aside

Grease a bread baking dish with a drop of oil or little butter, add the batter to this and bake between 35 to 45 minutes or until a toothpick inserted in the center comes out clean.

Remove from oven, cool thoroughly and slice into desired thickness and enjoy. :-)

Notes 
Baking times vary depending on the size and material of the dish you use so do keep that in mind and adjust times accordingly. ( I used a glass bread loaf size dish)

This bread along with my Rye dosai/crepe and Pesto Pizza with Oat Wheat Crust is off to the JFI- Wheat event being hosted by Roma
Read more ...