Monday, January 31, 2011

Instant Godumai Dosai~Atta Dosa~Savory Indian wheat crepes

A couple of days ago I came across an interesting article about foods that fudge facts. The article described how so many of the daily items we regularly purchase are filled with all kinds of additives and artificial flavors and have very trace amounts of the fruits, nuts or natural ingredients that it claims to have in it.If you want to read the entire article click here

Of course I have known for a while that a lot of food  that we purchase contains artificial flavors and additives. Over time I have become pretty good with reading labels and trying to avoid over processed foods or foods with too many chemicals and artificial ingredients. That said, I was disheartened to find items like ice cream and a well known cereal make it into this list.

Reading such articles makes me want to avoid buying processed foods as far as possible and has me yearning for something simple, wholesome and nutritious. Speaking of wholesome and nutritious, here is a wheat dosai that does complete justice to these words. When I visited India recently, my sister in law Anu made this for breakfast one morning and I loved it. When I asked her for the recipe, I was surprised at how quick and simple it is to make this dosai,  making it ideal for a quick breakfast or as an anytime snack or even a light dinner. Thanks Anu for this really neat recipe, it now features frequently in my kitchen :-)


Instant Godumai dosai~Atta Dosa~Savory Indian wheat crepes

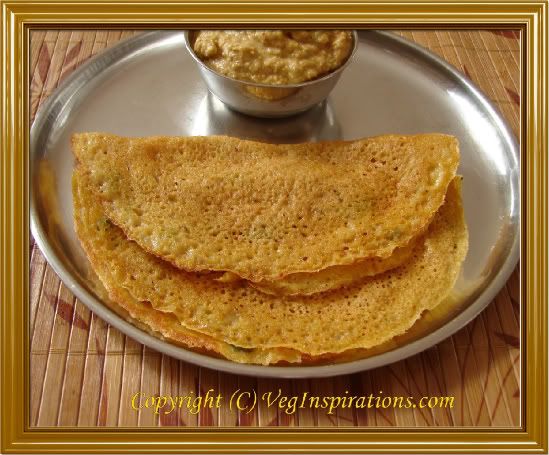
Here is a closer look at the dosai.....

Instant Godumai Dosai~Atta Dosa~Savory Indian Wheat crepes

Click here for a printable view of this recipe

Ingredients and Method to make Instant Savory Wheat Dosai
2 cups whole wheat flour (atta/godumai maavu)
salt to taste
1/4 tsp turmeric powder
1/2 tsp red chili powder (or to taste)
2 generous pinches of asafoetida powder (hing/perungayam)
approximately 3 cups of water
handful cilantro (coriander leaves) cut very fine
sesame oil as required to shallow fry the dosais

In a large bowl, add flour, spices, salt to taste and mix well.

Add water slowly half cup at a time and mix into the flour making sure that there are no lumps formed.The batter should be not too thick nor too thin. If in doubt err on the side of a thicker batter, you can always add more water later to get the right consistency.

Add cilantro to the batter and mix well.

Heat a tawa/flat pan/ griddle on medium heat. When hot, pour a ladle of batter in the center and quickly spread into a thin circle.

Add a few drops of sesame oil around the circumference of the dosai and a couple of drops in the center.

When the lower side is a nice even golden brown, flip over and cook the other side until it gets a few brownish spots on it.
The copyright of this content belongs to Veginspirations.com

Remove and serve hot with chutney of choice/ molaga podi/ sambar

This quantity yielded approximately 12 to 14 dosais

Suggested variation:

Add a small quantity of finely cut onions to the batter just before making dosai for a slightly different flavor.
Read more ...

Wednesday, January 26, 2011

Sprouted mung bean curry with a light gravy

This zucchini chutney (thogayal), this zucchini and split green pea soup and this sabudana khichdi all have one thing in common........no...not salt....... updated pictures:-) In the last few days I finally got a chance to update the pictures in each of these posts, if you have a minute,  hop on over to have a quick peek at the new ones.

Moving on to the main purpose of this post, sprouted mung bean curry.... One of the things I have been wanting to do for a while now is to include sprouts more frequently in my diet. And among different sprouts, I prefer mung bean because it cooks quickly and I love how it tastes with phulkas. As a result I try to come up with different styles of  curries with mung bean sprouts for more variety.

I was planning to make mung bean sprout curry and did not want to make either this , this or this. I wanted something completely "unique and different" :-) In order to satisfy these "requirements" , I came up with the recipe for this curry. The verdict........the curry turned out to be just right. It was light, flavorful and the slight bit of yogurt added a touch of creaminess and a hint of tart without overwhelming the flavors of the curry.


Sprouted Mung bean curry~Moong curry

Click here for a printable view of this recipe

Ingredients and Method to make sprouted mung bean curry
4 cups of sprouted mung beans (moong dhal/green gram/pachai payaru)
To learn more about how to soak and sprout the mung beans read this post
1 large tomato cut fine (tamatar/thakkali)
1/4 tsp turmeric powder
1/4 tsp red chili powder (or to taste) (optional)
salt to taste
1/4 cup plain yogurt (curds/dahi/thayir)

1 tbsp oil
1/2 tsp cumin seeds (jeera/jeeragam)

Grind together to a fine paste
1 small onion cut fine
1 tsp cumin seeds (jeera/jeeragam)
1 tsp coriander seeds (dhania/kothamalli virai)
3 Thai or Indian variety green chilies (hara mirch/pachai molagai) (or to taste)
1 inch piece of ginger

For garnish
handful of cilantro (coriander leaves/hara dhania/kothamalli) cut very fine

Grind onion, cumin, coriander,green chilies and ginger to a fine paste in a spice grinder or blender adding a few drops of water as required to enable the blades to move. Keep the paste aside.

Heat oil in a heavy bottomed large pan. Add cumin seeds to it, when the seeds begin to sizzle add the ground paste to it and stir until the onion paste completely loses its raw smell. Take your time with this, keep the heat on low to medium throughout this process. It took me about 3 to 5 minutes for the onions paste to cook completely.

Add turmeric powder and tomatoes and stir until tomatoes turn soft and mushy.

Add sprouted mung beans and water as required and allow the mung beans to simmer until it is soft and firm, not mushy
The copyright of this content belongs to Veginspirations.com

When the mung beans are cooked add salt to taste and red chili powder if using and allow to simmer another couple of minutes.

Finally add whisked plain yogurt, mix well. Remove from heat, garnish with cilantro and serve hot with phulkas or any type of roti/chapatti (Indian flat bread)

Read more ...

Sunday, January 23, 2011

Mullu Thenkozhal ( Fried and Crunchy rice crisps) and a question...

The amount of information we access on the world wide web each day never ceases to amaze me. Some of this information turns out to be very useful, some not so much and then some that makes me wonder "hmm....could this really be possible."  Recently I came across a tip that fell into the latter category. The tip suggested that cabbage could be used as a substitute for onion in any recipe.

I always think of cabbage and onions as very dissimilar vegetables, with each having very different qualities and flavors. So I would have never thought to use one in place of the other. Frankly I am a little skeptical about this tip and doubt that I am ever going to try it. That said, I am also a little curious about it, so I thought of inviting your inputs on this tip. If any of you have tried this substitution or know more about this, please do share your thoughts.

Moving on, mullu thenkozhal is a south Indian version of the probably more well known chakli. Mullu means thorn in Tamil (an Indian language) and this snack gets this name because of its shape and its "thorny" appearance. The best description that  I can think of  for this snack is fried, savory, crunchy and delicious rice and chick pea flour crisps. It is somewhat similar to this thenkozhal that I posted sometime back, with the differences being the addition of chick pea flour, spices and the shape of the spirals.

If you are in the mood for a little indulgence, or are looking for a quick and crunchy snack to go with tea or coffee for family and friends, this thenkozhal might be the one you are looking for. I will leave you with a word of caution though, these snacks can be very tempting and it may be difficult to stop at just one or two:-)

Mullu Thenkozhal~Rice Spirals

And here is a closer look at it.............

Mullu Thenkozhal~Rice Spirals


Click here for a printable view of this recipe

Ingredients and Method to make mullu thenkozhal
1 cup rice flour (arisi maavu)
1 cup chick pea flour (besan/ kadalai maavu)
2 heaped tsp black gram flour (udad/urad dhal/ ulatham maavu)
salt according to taste ( I used approximately 2 tsp for this quantity of flour)
3/4 tsp red chili powder (or according to taste)
2 tsp brown sesame seeds
1 tbsp butter melted
water as required.

Oil sufficient to deep fry the thenkozhal
A press such as this one with the desired shape disc to shape these spirals.

Heat oil in a deep vessel/pan on medium heat.

In a large bowl, add all the dry ingredients and mix them well. (If any of the flours are homemade or if they have some lumps, you may want to sift the flours first)

Add the melted butter and mix into the flour. Add water as required and knead into a soft and non sticky dough. If the dough is very stiff then it will take more effort to shape it through the press, if it is too soft, it will consume more oil when deep fried, so add water slowly a little at a time to get the right consistency for the dough.

Place the desired shape disc in the press. Then pinch out required quantity of dough, roll into an elongated ball, place in press,close and press directly into the hot oil if you are comfortable doing that. Alternatively on a large wide kitchen tissue press out the dough in small circles in as large or small size as you are comfortable.

Gently remove each one from the tissue by placing it on your palm and slide it into the oil. Depending on how much oil you have heated, and the size of the pressed out dough, you may be able to put in more than one into the oil.

After a few minutes flip with a spatula to ensure even cooking. Remember to keep the heat on medium throughout, otherwise the outside will be very dark and the insides not properly cooked.When the thenkozhal turns an even golden brown, remove from the oil and place on  kitchen tissue to drain excess oil.
The copyright of this content belongs to Veginspirations.com

When cool store in an airtight container. This snack stays for a couple of weeks or a little more if it lasts that long. Enjoy this snack with your tea/coffee or as an anytime snack.


Notes:
I find pressing out the dough on a tissue gives me more control and makes it easier to make even sized circles.It also spares me from standing near the hot oil during the entire time so I prefer to press out the dough on a tissue before transferring it to the oil.
Read more ...

Monday, January 17, 2011

Methi Thepla (Spiced Flatbread)- An Ideal travel snack

Remember the time when air travel was considered one of the coolest things. You got to your destination super fast and got treated like royalty while getting there. Unfortunately that is a thing of the past. Now all we have to look forward to when flying, especially when flying internationally,  is long waits between flights, baggage delays at the destination and bad food choices at airports.

At most airports I visit, I feel like vegetarian and vegan choices are pretty minimal. I am not sure they qualify as choices, most times I end up ordering the only vegetarian item on the menu. Increasingly I find I prefer to make something simple that I can carry with me, which becomes somewhat of a fallback option when I do not get any vegetarian "choices".

Methi thepla a spiced flat bread originating from Gujarati cuisine, is one of my favorite choices to carry with me when traveling. Some variations of this thepla are made with fresh fenugreek(methi) leaves but I prefer this simpler version made with dried fenugreek leaves, mainly because I can make it at short notice with pantry items.This thepla can be made ahead, does not require refrigeration for 2 to 3 days and it can be had without any other curries or condiments making it ideal for any kind of  travel or for a lunch box menu.

Methi Thepla~Fenugreek flavored Indian flat bread

Click here for a printable view of this recipe

Ingredients and Method to make Methi Thepla

1 1/2 cups whole wheat flour (atta)
1/2 cup chick pea lentil flour (besan/ kadalai maavu)
1 tsp cumin seeds (jeera/ jeeragam)
1/8 tsp turmeric powder
1/8 tsp asafoetida powder (hing)
3/4 tsp chili powder
salt to taste
2 1/2 tsp dried fenugreek leaves (kasuri methi) soaked in warm water for 10 to 15 minutes
2 tbsp plain yogurt (curd/dahi/thayir)
2 tbsp oil
water as required to make a soft non sticky dough

a little oil to shallow fry the theplas

Soak dry fenugreek leaves in a little warm water for about 10 to 15 minutes.

In a large bowl, add all the dry ingredients and mix well. Add soaked fenugreek leaves along with the water it was soaked in, yogurt and oil and mix into the flour.  Add water as required and knead into a soft and non sticky dough.

Keep the dough covered and allow it to "rest" for about 20 to 30 minutes.

Divide the dough into small equal sized balls. With the help of a little flour roll out the dough into a thin even circle.

Heat a griddle/tawa/ flat pan, place the rolled out dough on it. Smear a few drops of oil on the side facing upwards. When the lower side cooks and gets light golden brown spots on it, flip over and cook the other side.Cook until the lower side gets brown/light golden brown spots, smear a little oil on the side facing upwards now, flip over and cook another couple of seconds and remove.
The copyright of this content belongs to Veginspirations.com

Just like rotis/ phulkas this thepla too can be served hot with any curry of choice to make a complete meal. 

If you plan to pack it for travel, just roll them in some aluminum foil. Since it has a lot of flavors thepla does not need any additional curry or condiment, it tastes delicious on its own.

This quantity yielded approximately 14 medium sized theplas
Read more ...

Monday, January 10, 2011

Quinoa Burger Patty / Cutlet

On a trip at the end of last summer, I visited a restaurant that had quinoa burger on their menu. I was quite intrigued and immediately ordered it, only to feel very disappointed when I actually tasted it. The burger was a little too bland and boring for my taste, yet the idea of using quinoa in burgers appealed to me and stayed  in my mind. After I returned, I decided to try and make my own variation of quinoa burger, only a tastier and healthier version.

To this effect, I decided to add some cooked brown rice,  mung lentil and some veggies to amp up the nutrition content. I also added a slight Indian touch to this cutlet/patty by adding some curry powder to it. The result...........the patty/ cutlet turned out to be very tasty and versatile. I used it in a sandwich, in a burger and on its own and it never disappointed in each of these avatars. I have already made this a few times since that first time and look forward to making it often in the future too :-)


Quinoa Burger Patty

Here is another closer view of the cutlet...............

Quinoa Patty~Cutlet

Click here for a printable view of this recipe

Ingredients and Method to make Quinoa cutlet (see notes)
1 cup quinoa washed and rinsed
2 carrots cut fine
1 large green bell pepper (capsicum/ koda molagai) cut fine
1/2 heaped cup frozen green peas
1/2 cup split mung lentil (moong dhal) (washed and rinsed)
1 1/2 cups cooked brown rice (see notes)
salt to taste
1/2 tsp cumin powder (or to taste)
1/2 tsp red chili powder (or to taste)
1/2 tsp garam masala (or to taste) (can be substituted with any other curry powder)

a little oil to shallow fry the cutlets

On the stove top or the microwave steam cook the carrots until cooked yet crisp. 

In a large heavy bottomed pan, add washed and drained lentil and enough water to submerge the lentils and place on heat. Once it comes to a full boil, lower heat and allow the lentils to cook.

When the lentils are half cooked, add quinoa and more water if required and cook until both quinoa and lentils are fully cooked.

Add the steamed carrots, bell pepper and peas, sprinkle a little water if required and cook until the vegetables are done.

Add all the spices, salt to taste and mix well.

Add the cooked brown rice and mix well. Mash the entire mixture, a little coarsely using the back of the spatula or using a potato masher. At this point the mixture should quite thick and a little stiff .

Allow it to cool, then shape into patties/ cutlets of desired thickness and size. Heat a flat pan/griddle/ tawa and place two or more cutlets on it. Pour a few drops of oil around the patties and allow the lower side to turn golden brown, flip over and cook until the other side becomes golden brown.
The copyright of this content belongs to Veginspirations.com

Use this as a sandwich stuffing, or in a burger or just serve with some ketchup as a snack or something additional to go with a hearty soup. 

Suggested variation
Mince a couple (or more or less, according to taste)  of Thai or Indian variety of green chilies and add to the cooked quinoa for a slightly different flavor and a little more heat.


Notes:
I had some leftover collard greens brown rice that I never got around to posting on this site. I used that in this recipe and since the rice had had its own spices and flavors, I used less spices in the burger patty/cutlet. In case you use plain cooked brown rice, you may need to increase the quantity of each spice according to your preference.

When hot this patty/cutlet is a little fragile, but in a minute or two it becomes easier to handle. I would recommend using a large spatula to flip it over  so that it does not break in the process. If you find that it is a little too fragile, you can use whole wheat bread crumbs to make the mixture a little stiffer and make it easier to handle. I did not need anything extra so I haven't added it to my ingredient list.
Read more ...

Tuesday, January 4, 2011

A refreshing start to the year with Fennel flavored tea (chai)

Not only are we into the new year, we are already three days into it. I am sure that very soon, I am going to be exclaiming that this year too, is speeding by too fast :-)  Here is a question for all my readers out there.................what are your new year resolutions ? Hey... I never claimed that I have an original question:-) Anyway jokes apart, I would really love to know what resolutions you all have made, so do share some of them.....I just might get inspired and borrow one of your ideas :-)

In the last two years, without planning it or even realizing it, I started something of a "tradition" on this site. I started each year with a post on tea on this site. I think I have mentioned in the past, how much I value a good cup of tea, especially at the start of the day. I guess given that background it should not come as any surprise that I ended up starting the past two years with a post on tea rather than sweets, as seems to be the tradition that my friends follow on their sites :-)  Anyway I decided not to deviate from this "tradition" and this time I consciously deferred other posts to do this one.

One of the biggest pluses to this tea, other than its delicious taste is that it does not require any effort in grinding the masala for the chai, making it easy and quick. Just add the spices directly and the flavor from it gets infused into the tea. I usually make this version of tea when I  do not have the masala powder for chai handy and still want something more than just plain ginger tea. I know some of you may find fennel a surprising addition to tea, but give it a try.....it tastes pretty awesome.

Fennel flavored Chai Tea

Click here for a printable view of this recipe

Ingredients and Method to make Fennel flavored tea
1 cup water
1 cup hot milk
3/4 tsp fennel seeds (saunf/sombu)
4 whole black pepper (milagu)(can be substituted with a pinch or two of black pepper powder)
2- 1 inch pieces of cinnamon stick (dalchini/pattai)
1 inch piece of ginger (adrak/inji)crushed (or to taste)
2 tsp sugar (or to taste)
2 tsp loose tea powder

Place water in a sufficiently large pan and place on heat. Add ginger, fennel seeds, pepper, cinnamon and allow it to come to a boil. When it starts to boil, lower heat and allow this to simmer for a couple of minutes for the flavors to infuse.

Add sugar. After a few seconds add tea powder and quickly remove from heat. Allow the tea to steep for 4 to 5 minutes or more depending on how strong you like it.
The copyright of this content belongs to Veginspirations.com

Add hot milk, mix well and strain. If you want your tea piping hot and live in a colder part of the world, your tea probably needs  to be reheated by this point.

Serve hot. Serves 2
Read more ...

Saturday, January 1, 2011

New Year Wishes !

Photobucket

Wish all the readers of Veg Inspirations a very very Happy, Healthy and Joyous 2011. Hope you all have a fabulous year ahead !
Read more ...