

Wishing all my readers a very happy, joyous and wonderful new year. Also sincere apologies to all regular readers for my long absence. It has been so long since I posted anything in this space. Every time a friend, cousin or relative asked me last year, I assured them I would be back to blogging soon. Yet the effort of taking pictures of the things I make just seemed too much. With traveling and guests, 2016 was just too busy and seemed to go in a blink, and this space had to take a back seat.
One of my resolutions for this year is to blog more often. I am hoping I am able to keep this resolution ** fingers crossed ** I already have a few fun recipes lined up that I will be posting here soon.

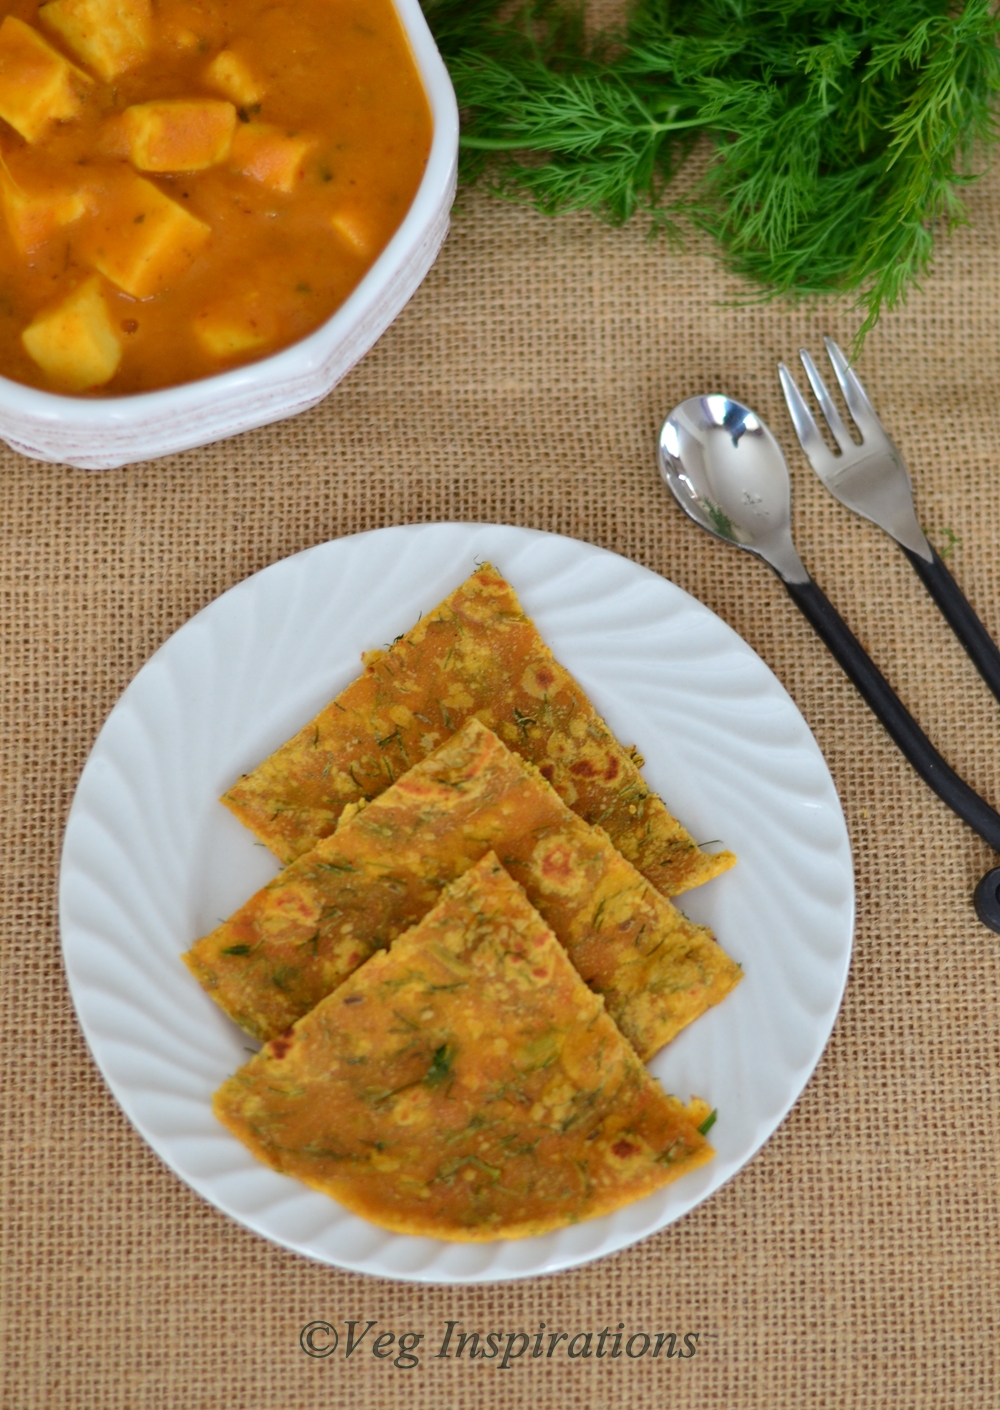
Dill leaves haven't had much of a place in my kitchen until recently. But once I started to use them, I really liked the aroma of these leaves and have been using it more often these days. Dill leaves have some amazing health properties. The are said to be a great source of calcium, have healing properties, help prevent cancer and help digestion among other things. They also taste great in parathas :) If you are looking for a new kind of paratha to go with your curries or something different for the lunch box, give this one a try and tell me what you think of it.

Click here for a printable view of this recipe
Ingredients and Method to make Dill Paratha
1 and 1/2 cup whole wheat flour (atta / godumai maavu)
1/2 cup loosely packed chopped dill leaves (sowa/ sathakuppi sompa)
salt to taste (approx 1 1/4 tsp) (namak / uppu)
1/4 tsp turmeric powder (haldi/ manjal podi)
1 tsp chili powder (or to taste) (lal mirch )
1/2 tsp cumin seeds (jeera/ jeeragam) (optional)
1/2 tsp garam masala
2 to 3 tsp of any flavorless oil + a little extra for applying on the parathas while cooking
Rinse and dry dill leaves, chop the leaves finely and keep aside.
In a large bowl add whole wheat flour, salt, spices, cumin if using and mix well.
Add dill leaves, oil and mix with your fingers.Add water as needed and knead until it forms a soft non sticky dough.
Divide the dough into equal sized balls. With the help of a little flour roll out into a circle of desired thickness. Heat a flat pan/ griddle/ tawa. Place rolled out dough on it and cook until the lower side has brownish spots on it, flip over and cook the other side until it has brown spots on it. If you wish you can apply a few drops of oil or ghee to the side facing upwards. Flip over for a few seconds and remove from heat.
Serve hot with dhal of choice, curry of choice or some raita.
Notes:
The oil/ ghee to be applied on the rotis is optional. When I plan to serve it immediately, I skip this sometimes and it tastes just as good. I do apply a little oil/ ghee when I plan to make this for the lunchbox or if I plan to serve it a little later.
If you are looking for roti varieties, here are a few more
One of my resolutions for this year is to blog more often. I am hoping I am able to keep this resolution ** fingers crossed ** I already have a few fun recipes lined up that I will be posting here soon.
Dill leaves haven't had much of a place in my kitchen until recently. But once I started to use them, I really liked the aroma of these leaves and have been using it more often these days. Dill leaves have some amazing health properties. The are said to be a great source of calcium, have healing properties, help prevent cancer and help digestion among other things. They also taste great in parathas :) If you are looking for a new kind of paratha to go with your curries or something different for the lunch box, give this one a try and tell me what you think of it.

Click here for a printable view of this recipe
Ingredients and Method to make Dill Paratha
1 and 1/2 cup whole wheat flour (atta / godumai maavu)
1/2 cup loosely packed chopped dill leaves (sowa/ sathakuppi sompa)
salt to taste (approx 1 1/4 tsp) (namak / uppu)
1/4 tsp turmeric powder (haldi/ manjal podi)
1 tsp chili powder (or to taste) (lal mirch )
1/2 tsp cumin seeds (jeera/ jeeragam) (optional)
1/2 tsp garam masala
2 to 3 tsp of any flavorless oil + a little extra for applying on the parathas while cooking
Rinse and dry dill leaves, chop the leaves finely and keep aside.
In a large bowl add whole wheat flour, salt, spices, cumin if using and mix well.
Add dill leaves, oil and mix with your fingers.Add water as needed and knead until it forms a soft non sticky dough.
Divide the dough into equal sized balls. With the help of a little flour roll out into a circle of desired thickness. Heat a flat pan/ griddle/ tawa. Place rolled out dough on it and cook until the lower side has brownish spots on it, flip over and cook the other side until it has brown spots on it. If you wish you can apply a few drops of oil or ghee to the side facing upwards. Flip over for a few seconds and remove from heat.
Serve hot with dhal of choice, curry of choice or some raita.
Notes:
The oil/ ghee to be applied on the rotis is optional. When I plan to serve it immediately, I skip this sometimes and it tastes just as good. I do apply a little oil/ ghee when I plan to make this for the lunchbox or if I plan to serve it a little later.
If you are looking for roti varieties, here are a few more
 Spring onion/ Hare Pyaaz Roti |  Carrot Roti ~ Gajar Roti |  Avocado Roti |