Monday, December 29, 2008

Microwave Doodh Pedha (Quick and simple Indian milk fudge)

Pedha in Indian cuisine refers to a fudge made basically out of  milk and sugar with some types of additional flavors added like saffron, cardamom, pistachio or a combination of these.In India this is made out of Mawa which is a type of condensed milk that is almost dry and is used in a variety of milk based sweets.  Any sweet shop in India worth its name, would have at least three to four varieties of this pedha, in various shapes made fresh each day. This sweet has always been a family favorite and every special occasion has warranted a trip to the sweet shop or Mithai as they are known in India to buy these pedhas to celebrate the occasion or event. 

The idea of making this fudge at home never even crossed my mind in all these years. I simply assumed that it would entail a very difficult and time consuming process and somehow I never had the inclination to try such a  process to make a sweet of all things, knowing I would feel guilty when I indulge in it too. But with the festive season here it seemed like a good time to try something sweet and the idea of making this pedha/ fudge got stuck in my mind. I have seen quite a few recipes for making pedha in a lot of different sites but this one that I saw on Uma's blog  remained with me.

 I modified her recipe slightly, I have seen some recipes that are similar but also add some butter but I skipped that part and just went with the condensed milk and milk powder version for my first try. I also added saffron and pitachio's in some and cardamom and almond slivers in some to give them more flavors. I loved the simplicity of this recipe and the speed with which this sweet got done is a definite plus and makes this sweet my new favorite when I am short on time and need to make something yum. If you are done having cookies and cakes this season and are looking for a different type of sweet you could probably try this for a quick and simple treat.

 Microwave Doodh Pedha ~ Quick and simple Indian milk fudge


Ingredients and Method to make Microwave Doodh Pedha (Simple Milk Fudge)

1- 14 oz can of sweetened condensed milk ( approximately 1 1/4 cups of sweetened condensed milk)
1 3/4 cups of milk powder (I used carnation milk powder)
1/8 tsp of cardamom powder (elaichi/ ellakai)
a small pinch of saffron (kesar/ kumkuma poo) (Read notes for some variations in flavor)
2 heaped tbsp clarified butter/ ghee /nei (optional, see notes)

a little extra clarified butter/ ghee to apply on hands to shape the pedhas (opt, see notes)
 
slivers of almonds( unsalted)to use as decoration
OR
few slivers of pistachio (unsalted) to use as decoration

In a large and deep microwave safe dish, add the condensed milk and the milk powder and mix well. Add clarified butter/ ghee, cardamom powder and saffron to this and mix well.

Place in the microwave and heat on high for a minute.

Remove mix well and repeat this step for another minute. 

Place this back in the microwave if required and cook in 30 seconds increments until done.
(It took me about 2 1/2 minutes to get this quantity to the required consistency )

To check if done, cool the mixture slightly and if you are able to roll between your fingers you know it is done. Try not to overcook this mixture as it will result in hard pedhas that are difficult to shape and not as tasty too.

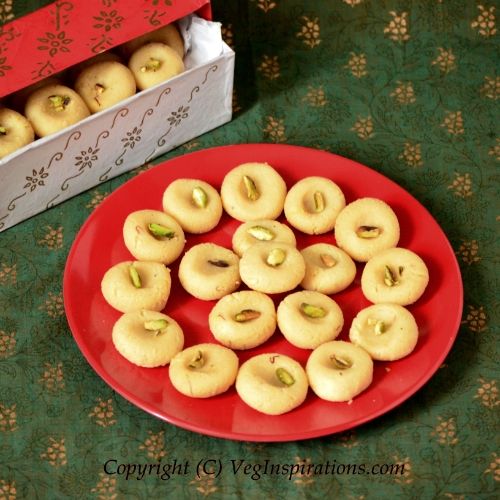
Cool mixture until it is touchable, apply a little clarified butter to palms and roll into pedha shapes ie roll into small gooseberry sized balls, then flatten slightly. (For those of you who have never seen these, this looks like mini cutlets/ patties) . This time I pressed down with my finger in the center to give it a little dent so that I could place the slivered pistachios in the center. 

Place the almond/ pistachio sliver on top of the pedha and press lightly while the pedha is still warm.
The copyright of this content belongs to Veginspirations.com
Cool thoroughly and place in an airtight container and can be kept without refrigeration for about 4-6 days. Tastes best within a 3 to 4 days of making it

Yield depends on the size of each pedha. This quantity of mixture has yielded anywhere between 22 to 35 pedhas depending on the size I make with it each time.

Notes:
I have made this with and without the clarified butter in the recipe and while both of them are delicious, I just thought that the clarified butter added a little something more to the recipe so I would recommend adding it.

I have made this with and without applying clarified butter on my palms. I find applying a little clarified butter on the palms speeds up the process of shaping these pedhas. Alternatively you can also keep you hands very very slightly moist to help shape the pedhas. 

If you have masala milk powders at home such as Kesar pista milk powder you can use about 1 to 2 tsp according to taste to flavor this quantity of pedhas instead of saffron or cardamom powder.

Time taken to cook the pedhas will vary based on the output of the microwave used and the depth and size of the dish used.

And one last thing, if the milk powder you have seems to have a very thick and granular texture, give it a turn in the blender/ mixer so that it turns into fine powder before using in this recipe. 
Read more ...

Thursday, December 18, 2008

Minestrone with Pesto

Minestrone is the name for a thick variety of Italian soup that contains seasonal vegetables and also sometimes contains pasta or rice.Common ingredients to this soup include onions, tomatoes, celery, carrot and beans. This soup has always been a favorite of mine, both while eating out at Italian restaurants and also when I am in the mood for hearty Italian soups at home.

In all the time that I have had this soup I have never had a variation of this soup with pesto in it. So I was intrigued when I saw this variation mentioned in a cookbook. I did not waste any time in trying this variation and adapted the recipe to work with the ingredients I had on hand and to suit our taste. I thought the addition of pesto took this soup to another level and I thoroughly enjoyed this soup along with savory oat muffins. Try this minestrone when you are looking for something simple and hearty yet with an unusual touch to it.


Ingredients and Method to make Minestrone soup with pesto

1 cup white beans (cannelini or northern beans) to be soaked for 8 hours

1 large onion cut fine
1/2 cup carrots cut into 1/2 inch cubes
1 cup frozen peas
4 stalks of celery cut into small pieces (yielded about 1 heaped cup of cut celery)
2 large tomatoes cut into small pieces (yielded about 2 cups of cut tomatoes)
2 medium potatoes peeled and cut into half inch pieces (yielded about 2 cups of cut potatoes)

2 tbsp olive oil
1 bay leaf
salt to taste
1/4 tsp celery seeds
1/2 tsp Italian seasoning
3 tbsp pesto sauce
1/2 tsp chilli powder (optional)

Soak white beans in sufficient water for 8 hours with a pinch of baking soda (adding soda is optional)

When the beans have soaked for 8 hours, rinse them thoroughly and place them in a large heavy bottomed pan with sufficient water and let it cook until soft.
(when the water initially boils, there may be some heavy froth on top,you can skim and remove this froth and let the beans boil in clear water)

When the beans are cooked remove and keep aside.

In the same pan, heat olive oil and add cut onions to it and saute until transparent.

Add tomatoes and saute until the tomatoes become soft and mushy

Add all the vegetables and saute for a minute.

Add water (about 4 cups) and all the herbs and spices (except the pesto sauce) and let it simmer until the vegetables are cooked.

When the vegetables are cooked, add cooked white beans and pesto sauce and adjust water to get required consistency and simmer for another 5 minutes.

Serve hot with any rustic bread  or savory muffins to make a complete meal

Serves about 3 to 4

Both Ramya  and VG   have given the Yum blog award to this site. Thanks to both of you for thinking of this site for this award. 

I would in turn like to pass this on to Pearls of EastIndhuVarsha  , Sumathi , Navita   and Pavani  

Related Recipes
Read more ...

Tuesday, December 16, 2008

South Indian mixture with a healthy twist.

Mixture is a term commonly used in south Indian cuisine with reference to a mixture made out of a variety of deep fried fritters made of chick pea flour in various shapes. These deep fried fritters are mixed together with fried peanuts, raisins and flavored with salt and spices to make the most delicious and crunchy snack. In the past I had adapted chivda  (a snack from Maharashtra) and given it my own spin with the use of rice krispies. Similarly I have been trying to duplicate the taste of the south Indian mixture using more healthy ingredients and without the frying of course :-) 

I tried it with a variety of ingredients and this has been the closest I have come to the taste of the original mixture. The major difference between my past attempts and this one was that this time both the cereals I used were not very sweet making it easier to blend with this taste, additionally I crushed the cereal slightly which helped a great deal too.The other thing I have noticed is that dry roasting the red chillies and curry leaves and grinding it makes a huge difference to the taste, using red chilli powder does not have the same impact. So if you plan to try this, do try not to skip this one step, trust me it makes a lot of difference to the final taste.So what are you waiting for, go ahead and give this one a try and enjoy it with a nice hot cuppa tea :-)


Ingredients and Method to make the Healthy south Indian mixture
1 cup golden flax cereal (uncrushed) loosely packed ( I got this at Trader Joe)
3 cups organic corn flakes (uncrushed) loosely packed( I got this at Trader Joe)
3/4 cup dry roasted peanuts
1/2 cup roasted chick peas (pottu kadalai/dalia)
1/2 cup raisin
2 tbsp corn oil (or any other oil)

3 red chillies
6 curry leaves
1/8 tsp asafoetida (hing)
salt to taste

Dry roast red chillies and curry leaves for a few minutes until the chillies start turning darker and the curry leaves look a little dried out. Keep aside to cool.

In a large bowl add the flax cereal and roughly crush it up into smaller pieces. I used the bottom part of a small bowl and used that to press the flax cereal until it broke into little bits.

Keep the flax cereal aside and in the same bowl repeat the process with the corn flakes. Mix together the corn flakes and flax cereal.

Grind the red chillies and the curry leaves in a spice grinder. Add to this, salt and asafoetida and give it a another spin in the spice grinder. Keep aside.

Heat oil in a large heavy bottomed pan, add peanuts, roasted chick peas and raisins to this and saute for a few seconds.

Add the cereal mixture and the ground spice mixture and mix well.

Cool thoroughly and store in an airtight container.

Notes
In case you want you can use any other plain unflavored cereal which is not sweet in place of the cereal I have used.

Additionally you can add some dry roasted cashew nuts too along with peanuts


Read more ...

Sunday, December 14, 2008

Onion Tomato Curry ~ Sev Tamatar ki Subzi ~ Sev tomato nu shaak ~ With Stepwise pictures

This curry made with tomatoes and onions is from Gujarat, a region in the western part of India. I am not sure though, of its origin in my kitchen :-) I believe I read this recipe a long while ago in some book or magazine and have been making it since then. I love the tangy spicy taste of this curry and find the speed and simplicity of this a real plus, especially when I am in a hurry or when I am running out of veggies.

Before I get to it though, let me share something completely off topic. Recently while working on my glossary I was researching the health benefits of mustard seeds.If you are familiar with Indian cooking then you know that mustard seeds play a prominent role in most dishes especially curries. I never really gave any thought to mustard seeds and if I would have had to say why they were used in cooking I would have concluded that they were there for taste and for decorative purposes :-) I am sure that my fellow bloggers will agree that mustard seeds, split gram lentil, cilantro and other garnishes have gained special importance as decoration, now that we have to take pictures for our blogs :-)

Anyway I was amazed when I learned that mustard seeds actually are rich in selenium and omega-3 fatty acids. They are also a good source of phosphorous, magnesium iron, zinc and calcium. Really, who knew? I, for one did not..... hmmmm so the next time I feel like skipping the seasoning for my chutney, I should keep
this article in mind :)
  

Onion Tomato curry ~ Sev tamatar ki subzi ~ Sev tomato nu shaak
 
Click here for a printable view of this recipe

Ingredients and Method to make sev tomato nu shaak
2 large onions cut fine (yielded 2 cups of cut pieces) (pyaaz/vengayam)
5 to 6 large tomatoes cut into 1/4 inch pieces (yielded 4 cups of cut pieces) (tamatar/thakkali)
1 Tbsp oil
3/4 tsp mustard seeds (rai/sarson/kadagu)
3/4 tsp cumin seeds (jeera/jeeragam)
1/4 tsp turmeric (haldi/ manjal podi)
salt to taste (namak/uppu)
1/2 tsp chilli powder ( or according to taste)
1 to 2 heaped tsp sugar (shakkar/sakkarai)
a pinch of asafoetida powder (hing/ perungayam) (optional)
sev according to taste (fried gram flour noodles) (available in all Indian groceries)
2 to 3 Tbsp cilantro cut fine (coriander leaves/ hara dhania/ kothamalli)(optional)

Heat oil in a large heavy bottomed pan. Add mustard seeds to it, when the seeds splutter, add cumin seeds to this oil.


When the cumin seeds sizzle,add asafoetida if using stir once or twice, then add onions and saute until the onions become transparent.


Add tomatoes, turmeric powder,  salt, sugar and chilli powder and stir until the tomatoes are cooked and become soft.


Garnish with cilantro and sev just before serving and serve hot with phulkas/ chapathis/ rotlis or any other kind of flat bread.

Serves approximately 2

Notes:If you plan to serve this a while after you make it, add sev just before serving.

Related RecipesCreamy Mushroom Curry 
Read more ...

Friday, December 12, 2008

Pav Bhaji (Curried Vegetables with Rustic Indian bread)

Pav Bhaji can best be described as rustic Indian bread with curried mashed vegetables. Pav=bread and Bhaji=curried vegetables. This is a famous street food of India and is offered in most restaurants and stalls in all major metros of India. Bhaji here means curry but this simple term and my picture below, both seem inadequate and don't do justice to this unique and delicious curry served with a garnish of cilantro and finely cut onions and a dollop of butter on top.

It is to be had along with with pav (bread) that is cut in half and toasted with some butter too.In fact the generous use of butter in this dish is one of the main reasons that gives one pause while ordering this dish at restaurants.Of course the homemade version of this curry is way better,  since the quantity of oil/butter/fat can be substantially reduced making it much more healthier than the restaurant version.  

Pav Bhaji-Curried vegetables with rustic Indian bread


Ingredients and method to make Pav Bhaji


For the Bhaji

1 1/2 cups green bell pepper/capsicum (simla mirch/koda molagai) deseeded and cut into little quarter inch squares)
3 large tomatoes cut fine (about 1 1/2 cups)
1 tsp finely chopped / grated ginger (adrak/inji)
3 cups cauliflower florets
1 cup green peas (fresh or frozen)
3 cups cooked, skinned and mashed potatoes (about 4 large white potatoes)
2 and 1/2 tsp pav bhaji masala (or according to taste) (I use my homemade version of pav bhaji masala that can be found here)
1/2 tsp chilli powder (or according to taste)
salt to taste
1 Tbsp butter (oil for a vegan version)

For garnish
1 small red onion cut fine (pyaaz/vengayam)( or according to taste)
2-3 small wedges of lemon
handful of cilantro cut fine (coriander leaves/hara dhania/kothamalli)
1-2 Tbsp butter (or vegan non diary butter for a vegan version)
a little additional butter if you want to toast the pav

Heat butter/oil in a large heavy bottomed pan.

Add tomatoes and grated ginger to this and saute until the tomatoes get soft and mushy.

Add cauliflower florets, green peas and green bell pepper, chilli powder, pav bhaji masala and salt to taste and saute for a minute.

Add water as required and cook the vegetables until soft.

Add the cooked mashed potatoes to the cooked vegetables,lower heat and using a potato masher mash the vegetables together.

Adjust spices according to taste and add water to achieve required consistency.

Let this simmer for a few minutes on a low flame, so that the flavors blend well.

Remove and serve with a ingredients mentioned for garnish and toasted pav on the side.


Read more ...

Wednesday, December 10, 2008

Pav (Bread) for a good cause

For a while now I have been wanting to make pav ( an Indian version of bread).Pav refers to a simple and humble version of bread that is made in India and is sold at bakeries all over, in addition you have "Pav wallahs " as they are known in Bombay, go from street to street on the bicycle selling this bread in addition to other goodies from their bakeries like nankhatai (an Indian cookie). This bread is used for a lot of fast food/ street food goodies  like Vada pav (Vada is spiced potatoes dipped in batter and fried and placed between (Pav) bread with some spices/chutney to further spice it up) and Pav bhaji ( a  yum combination of bread and mixed vegetables served with a dollop of butter) Pav is different from the regular dinner roll as it is not very sweet and tends to have a more chewy quality to it, I often feel it resembles the ciabatta bread but has a softer feel to it.

Pav-Rustic Indian bread

Ning  from Heart and Hearth tagged me to participate in a very worthwhile event by  Breadline Africa.This tag served as a motivation for me to get around to making this pav. This tag is also a challenge, and the challenge is to do something that you do not do normally, and baking this pav definitely qualifies on two levels, one I have never baked pav before, so it is definitely  different from my usual baking. Additionally I never bake with all purpose flour , but this time I decided to make an exception, I thought this tag provided the perfect excuse to bake with all purpose flour :-)   For pav recipes I used refered to Cham's recipe of pav here  and to Jugalbandi's recipe of pav here  and came up with a slightly modified version of my own which I give below.

I made two versions of this pav one completely with all purpose flour and the other partially with whole wheat flour and partially with all purpose flour. The breads turned out soft and perfect.The only thing I thought I would change was to make smaller pav the next time and keep them closer on the baking tray to get the squarish shape that pav is normally associated with. I thought both versions were very tasty but mostly I was relieved as I normally am after making bread, that the yeast did not fail to work and that the bread actually rose as it should :-) 

I would in turn like to pass on this tag to Divya  , Curry Leaf  , Navita , Karuna and Sukanya 

Pav- Rustic Indian bread


Ingredients and Method to make Pav/ Bread

All purpose flour pav
3 1/4 cups all purpose flour 
1 tsp salt
1/2 cup warm water
1/2 cup warm milk (or warm water, see notes below)
1 and 1/2 tsp sugar
3 tsp active dry yeast
2 Tbsp melted butter ( or oil for a vegan version)
a little additional butter (or for a vegan version, use non diary butter) to apply on top of the bread

For the whole wheat flour pav I substituted all purpose flour with 1 1/2 cups whole wheat flour + 1 3/4 cups all purpose flour and proceeded in the same manner as below

Mix sugar and yeast in warm water and keep aside for a few minutes until it froths up

In a large mixing bowl, mix the all purpose flour and salt and keep aside.

Add the yeast  and warm milk to the all purpose flour and knead to make a soft and smooth dough.

Add melted butter (or smart balance) to this and knead some more until the dough is soft and non sticky and smooth. Knead totally for about 10 minutes

Place this dough in a greased container and keep covered with plastic wrap or tea towel and keep aside for the dough to rise (approximately one hour)

Grease a baking tray and keep aside.

When the dough has risen (should be double) punch it down gently and make equal sized balls with the dough and place it on the baking tray about 1/2 an inch apart.

Cover with a plastic wrap and let rise for another hour. 

Preheat oven to 375 deg F.

After the dough has risen the second time (notice that the bread is joined at the ends), place the baking tray in the oven and bake for about 15 minutes until the bread is baked to a nice brown color on top.

Remove from oven, when you tap the top of the bread it will be a little hard and sound a bit hollow, apply a little butter/smart balance on top and bake for another couple of minutes.

Remove, pull apart and serve with vegetables as pav bhaji or with soup or just enjoy one warm from the oven with a little butter or jam

Updated Notes
For a more authentic pav or a vegan version use only water and skip the milk.
Read more ...

Monday, December 8, 2008

Instant Oats Idli

Generally speaking the word idli evokes images of steamed savory rice and lentil cakes that are a staple to south Indian homes. These idlis have universal appeal and are favored by most mothers since it tends to be non spicy and a great source of protein especially for vegetarians. The traditional method of making this includes soaking the lentils and rice for several hours, then to stone grind (or machine grind ) this into a smooth batter and then fermenting this batter for about 8 to 10 hours before it is ready to be steamed.

This labor intensive process used to be even more arduous in the days before food processors and machines. I remember seeing my mother grind this on a stone "grinder". I use the term grinder loosely here since all the efforts would be of the person grinding. It was a solid stone container with a large rim and a deep hole in the center to contain the batter that looked like an inverted hat and another large pear shaped stone which would be used to grind the rice and lentils into batter. The soaked lentils/ rice needed to be placed in the center of the stone in the deep hole and place the pear shaped stone over that lentils / rice and crush it and keep rotating the pear shaped stone to make batter.The stone container was so heavy that it could not even be lifted and had to be rolled from its usual resting position to the center of the room to use and rolled back to its usual rest later on. As I watched my mother make batter in this way I used to marvel at how she managed to make this difficult process look really simple . Of course after all that trouble the end product used to be so soft, tender and fluffy. Nowadays though, the stone grinder of the past has almost become extinct and has been replaced by a lot of machine versions that do the same job at a touch of a button.

As with any other type of dish idli's also have instant versions that are quick and flavorful and that do not need grinding and fermenting. One such version is the rava idli that refers to steamed cake made with semolina and yogurt and spices for flavor. This really quick method to make idlis is a life saver on days when time is short.

Using the basic idea of rava idli, I have been substituting it with oats to make for a healthier idli. This was something I tried as yet another way to include the all important oats in our diet. But I loved the soft idlis made with oats so much that I now only make these type of oat idlis whenever I make instant idlis. The oats is so well blended in this dish that you do not miss the semolina, in addition when flavored correctly the addition of oats is not obvious making this an excellent way to sneak oats in with picky eaters :-) So give this a try when you are in the mood for some quick and healthy dish and all you need is some chutney or sambar to make this a complete meal.

 photo c51e8cf9-d7e4-43c1-8b70-64e4b475526b_zps42e4d61f.jpg

Click here for a printable view of this recipe

Ingredients and Method to make Instant Oats Idli
3 cups oats (1 minute quick cooking oats)
1 1/2 cups fine semolina (rava)
5-6 green chillies cut very fine (the small thai variety) ( or according to taste)
2 tsp split chick pea lentil (chana dhal)
6 tsp broken cashew nuts
2 tsp salt ( or according to taste)
1 tsp baking soda
handful cilantro cut fine
2 tbsp olive oil (or any other oil)
plain yogurt (about 4 1/2 cups for the entire quantity of oats idli powder)

Dry roast the one minute oats in a heavy bottomed pan on medium to medium high heat stirring continuously until it turns creamy/light brown. Keep aside to cool for a few minutes.

In the meanwhile dry roast the semolina on medium to medium high heat for 3-4 minutes stirring continuously, then remove from heat and keep aside to cool.

When the oats is cooler, grind coarsely in a spice grinder in batches. Take care to process these in short bursts as they grind very quickly and they only need to be ground to a coarse consistency.

Mix the cooled semolina and coarsely ground oats together.

Add to this mixture salt to taste and baking soda and mix well.

Heat oil, add mustard seeds to it, when mustard seeds begin to splutter add split chick pea lentil (chana dhal) and cashews to it and saute for a few seconds.

When the lentil and cashews begin to turn brownish, add cut green chillies to it and saute for about a minute until the green chillies start to change color.

Pour this oil + lentil + green chillies mixture on the dry mixture of oats and semolina. Mix very well.

Take out the required amount of this mixture and mix with equal parts of plain yogurt. Add cut cilantro and mix well.

Grease idli moulds and place spoonfuls of this mixture into each mould and steam for about 6 to 7 minutes.

Remove from heat, cool for about a minute, remove each idli and serve with sambar or chutney of choice.

For about 1 1/2 cups of this mixture the yield was approximately 12 medium sized idli's

Notes:
The unused portion of the oats idli powder can be refrigerated and will stay fine for about a week to 10 days.

Do remember that once the idli powder is mixed with yogurt it needs to be steamed immediately otherwise it will not rise well so only mix required quantities of mixture with yogurt.

The fine semolina can be substituted with coarse semolina ( I used fine because I like the softness and texture from the fine semolina )

You can very easily double or half this recipe to make quantities that you require. Just maintain the proportion of 2: 1 for oats to semolina

This turned out to be very mild with the number of green chillies I used so if you like your idli's really spicy then you may want to increase the number of green chillies in this recipe

If you do not have an idli mould you could very easily place the mixture in a greased curved stainless steel plate, steam until done and cut into squares before serving.

Related Recipes
Oats dosai ( Savory Oat Crepes)

Read more ...

Thursday, December 4, 2008

Butternut Squash curry ~ Kadoo ki sabzi

Butternut squash like most other winter squash is an excellent source of Vitamin A (in the form of beta carotene) Vitamin C, potassium , dietary fiber and manganese.It is a also a good source of folate, vitamin B6, vitamin B1, copper and omega 3 fatty acids.One of the most abundant nutrients in squash which is beta carotene is a very powerful anti oxidant and also has anti inflammatory properties. The best way to select squash is to choose ones that are firm and heavy for their size. The rind should be hard all over and there should be no softness in any part of the rind.

I use butternut squash often in soups, but I also like using it in curries. This easy and quick curry is something I make from time to time with butternut squash. I love the contrasting elements in this curry, a little sweet, a little heat/ spice and a slight undertone of bitter. It tastes amazing with some phulkas/ rotis but you can just as easily make this as a side dish for any Indian themed meal. I like it so much that sometimes I just have some in a bowl and skip the bread entirely :)

Butternut squash curry ~ Kadoo ki sabzi | Veg Inspirations

Click here for a printable view of this recipe

Ingredients and method to make butternut squash curry
4 1/2 cups - 1 inch pieces of butternut squash  (or pumpkin/ kadoo/ parangikkai)
1 Tbsp oil
1 tsp mustard seeds (rai/ sarson/ kadagu)
1/2 tsp fenugreek seeds (methi seeds/ mendiyam)  (see notes for variations)
2-3 Thai or Indian variety green chillies cut very fine (or according to taste) (hari mirch/ pachai molagai)
salt to taste (namak/ uppu)
1/4 tsp turmeric powder
1 Tbsp grated jaggery (or 2 tsp sugar) (gud/ vellam or cheeni/ sakkarai)
2 Tbsp cilantro cut fine for garnish (hara dhania/ kothamalli)

Remove skin and cut the butternut squash into 1 inch pieces, discard the seeds in the center.


Heat oil in a large heavy bottomed pan, add mustard seeds to it.When the mustard seeds start to splutter add fenugreek seeds, when they start turning a little browner, add finely cut green chillies to it. Stir chillies a few times, then add  turmeric powder, stir once or twice. 


Add squash pieces, salt to taste and mix well.  Sprinkle a few spoons of water, cover with a lid and cook squash on low to medium low heat,  stirring occasionally to cook evenly. Cook until squash is soft and cooked, yet retains its shape and is not mushy.


Add jaggery/ sugar ( if you plan to use it ) and mix well, heat on low for another minute or two, garnish with cilantro and serve hot.


Variations: If you cannot find butternut squash, this curry can also be made with pumpkin (or kadoo/ lal bhopla/ parangikkay)  as it is known in India)

 If you do not like the slight bitterness imparted by fenugreek seeds you can substitute it with equal quantity of split black gram lentil (udad dhal/ ulatham parappu)

This can be made as a side dish and paired with rice and rasam or sambar to make a complete traditional Indian fare.

Related Recipes Potato Curry
Read more ...

Monday, December 1, 2008

Oat Barley and Bell pepper cutlets.

For some time now I have been receiving requests to add recipe printing options for this blog so that readers will be able to print out recipes and keep it for future reference. I am happy to say that I have just managed to add printing option for all of the recipes on this blog. The link for printable recipe is given below the picture of each recipe and clicking on it will take you to a text only version of the recipe,when on the page of the text only version you can use the browsers print button and print out the recipe. I tested this with internet explorer, Firefox and Google chrome and it is fine in all of these browsers.

Since barley and oats are such fantastic grains I am always on a mission to try and sneak these grains into my diet. These cutlets are a result of my imagination and my determined attempt to sneak these grains in a kind of a fun food. This turned out to be such a simple and tasty way to have both these grains and the cool thing about these cutlets are that unless you tell those who are having it that it contains oats and barley they would not be able to tell, so for those who think grains like oats are boring, this is really a nice way to have it.


Ingredients and Method to make Oat Barley and Bell Pepper Cutlets

1 small onion cut fine ( I used yellow onion) 
2 cups mixed bell peppers cut into long strips either fresh or frozen ( I used frozen)
1 cup green peas 
1/2 cup quick 10 minute quick cooking barley ( I used quaker)
1/2 cup quick 1 minute quick cooking oats (I used quaker)
1/4 cup cooked moong (optional)

3 green chillies (or according to taste)
1 inch ginger (grated fine)

3 tbsp wheat flour (atta)
3 tbsp chick pea flour (besan)

1/2 tsp chilli powder (optional or according to taste)
1/4 tsp cumin powder
1/4 tsp coriander powder

handful of  cilantro cut fine
salt to taste
1 1/2 cups water ( or as required)
1 tbsp olive oil ( or any other oil)

a little more olive oil to shallow fry the cutlets

Heat 1 tbsp olive oil in a large heavy bottomed pan. Add cumin seeds to it, when the  cumin seeds splutter add green chillies and grated ginger.

Saute for a minute or so until the skin of the green chillies kind of get whiter. Add the onions and saute until it turns transparent.

Add bell peppers, green peas,chilli powder, cumin powder and coriander powder and saute for a couple of minutes.

Add 1 1/2 cups of water, barley and salt to taste and cook on a medium to medium high flame until the barley is cooked. 

Add the quick cooking oats to this and the cooked moong (if you are using any) and water only if required and cook an additional couple of minutes or so.

Let all the water evaporate from the vegetables and finally add the wheat flour and chick pea flour and mix well.

Add cilantro to this and mix well and keep aside until cooler.

Make small lemon sized balls of this mixture and flatten it.

In a flat pan/ griddle/ tawa  place the flattened mixture to it and add a few drops of olive oil to it. Let it brown on one side before flipping it over and browning the other side.

Proceed with the rest of the mixture.

Serve hot with cilantro chutney, or use as a filling in a wrap or a sandwich.

Related Recipes

Read more ...

Tuesday, November 25, 2008

Orange Payasam (Milk sweet with oranges)

For the longest time now I have been wanting to experiment using agave nectar entirely in Indian sweets but did not get around to it. Additionally this past few weeks I have been craving some kind of milk based sweet, every time I visit a friend's blog I seem to see some kind of milk based sweet which did not help matters either :-) Anyway the opportunity to do both presented itself when out of the loads of oranges I buy regularly in this season I landed up with a batch that seemed a little tangy. Normally on the rare occasions that I find myself with slightly tangy oranges I just toss the oranges in fruit salad with a host of other fruits.

But this time since I had been wanting to make payasam too, it got me wondering how payasam would taste if I used these oranges in it. Since there is no better way to know than to really try it, I decided to go ahead and see how this works out. At the end of the experiment, after thoroughly enjoying some of this payasam (tasting yummy stuff is one of the fringe benefits of cooking isn't it? ), I concluded that this was a successful experiment, the payasam turned out to be light, mildly sweet and fruity and the orange added an exotic touch to it.The saffron and oranges complemented each other and lent a pretty color to the payasam and from the reactions I received I would say this sweet is here to stay in my kitchen. :-)


Ingredients and method to make the orange payasam
3 1/2 cups milk ( I used 2 % but you can use whole milk)
few strands of saffron
pulp from 3 little oranges (approximately scant 1/4 cup)
1/4 cup agave nectar ( or substitute with 1/3 to 1/2 cup sugar according to taste)
3 tsp sugar (optional) (omit if using sugar instead of agave nectar)

Remove the outer skin of the orange, then remove and discard the inner thin skin and the seeds and just save and keep aside the pulpy part of the orange.

You know the drill, as with any other milk based payasam, the first step is to place the milk in a heavy bottomed  large pan and heat on a medium to medium high heat. When the milk comes to near boil,add saffron strands to the milk and  turn down the heat to medium to medium low and let it simmer for some time.

When the milk is on a low simmer add agave nectar (or sugar if you are using that ) and let it melt and mix with the milk.

When the milk is halved ( took me about 30 mins)  and is looking creamy in both color and texture, remove from heat and keep aside.

Let it cool THOROUGHLY  before adding the orange pulp to it. Do keep in mind, if orange pulp is added to milk before it cools completely the milk will curdle.

Chill this in the refrigerator for a few hours and serve cold.

Serves approximately 3

Notes:
If using very sweet oranges in this payasam, reduce the sweetness a little if you like mild sweets.

This is my entry into the Sweet celebrations event  being hosted by Aparna 

This is also my entry into the Vegetarian Thanksgiving Recipe Carnival  being hosted by Mansi.


Read more ...

Sunday, November 23, 2008

Mini Pepper Chutney

On my last trip to Trader Joes I saw these really pretty mini peppers that just called out to me to pick it up. So I did, with no specific plan on any dish to use it in.On the day when I was planning to make the sago dosai I wanted to try some new type of chutney and instantly these pretty peppers came to mind. I decided to use them in the chutney.

Since I was running low on time I did not try to find a new recipe for this chutney but just went on to make them with ingredients I like, and some that I try to sneak in because they are healthy.This chutney turned out very very mild and was not very spicy at all, so for those of you who like spicy chutneys you may want to increase the spice level in this. Also for those of you who are not able to get mini peppers this chutney would work just as well with any other type of bell pepper (capsicum).The texture of this chutney was nice and I thought it would have worked equally well as a dip for pita chips or for raw veggies.


Ingredients and method to make mini pepper chutney

1 yellow onion
4 tsp brown sesame seeds
4 tsp raw peanuts
3 red chillies
1 cup mini peppers cut into long strips (or equal amount of any bell pepper/capsicum)
1 tsp mustard seeds
1 very small piece tamarind (optional)
1 tbsp olive oil or any other oil
salt to taste

Dry roast raw peanuts and keep aside

Dry roast sesame and keep aside

Heat oil in a heavy bottomed pan and add mustard seeds to it,when the mustard seeds splutter add onions and saute for a few minutes until the onions become transparent.

Add red chillies to this and saute for a  minute or so.

Add the sliced mini peppers and saute until the peppers are cooked. 

cool this completely and grind along with the peanuts and sesame until smooth with very little water in a blender.

Add salt to taste and mix well.

Serve with raw veggies, pita chips or dosai/idli or even rotis.

This is my entry into the Culinarty original recipe event being hosted by Lore


This is my entry into Vegan Ventures Round 2 being hosted by Suganya

Related Recipes
Read more ...