Wednesday, March 27, 2013

Spinach with Black Bean Brown Rice

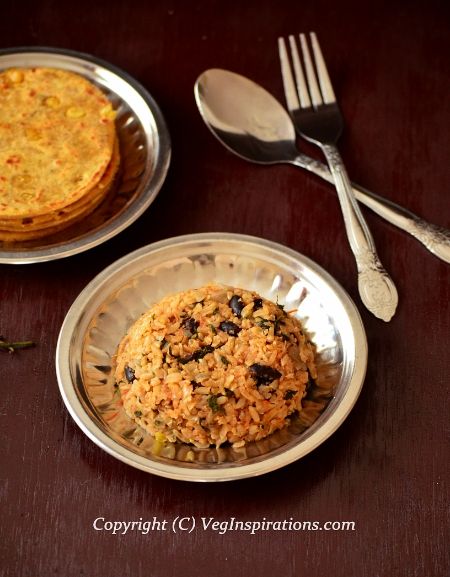
One dish meals are indispensable in the weekly menu, especially for rushed weeknight dinners when making a lot of different types of dishes becomes a little too much. And one dish meals that combine veggies and some form of protein are the best kind. Healthy, filling and nutritious, what's not to like about it :) Here is one that I make from time to time, this one combines spinach, tomatoes and black beans. I do not use too many spices or flavoring in this rice, just keep it simple.

 Usually I serve this with some kind of raita (a salad made with veggies and yogurt), this time I decided to try an apple raita to go with this rice. And I loved the combination, the spices from the rice were perfectly complemented with the cool, slightly sweetish apple raita.Will post the recipe for the apple raita soon. Of course, this rice works just as well with a curry on the side or any kind of raita or even just plain yogurt. So if you are looking for a rice that can be made in a jiffy with very little effort, give this rice a try :)

Spinach Black bean rice

Click here for a printable view of this recipe

Ingredients and Method to make Spinach with Black bean rice
5 Cups cooked brown rice (can be substituted with white rice) (see notes)
1 large red onion cut fine
4 medium tomatoes cut fine
2 packed cups chopped spinach (palak) leaves
1 cup cooked black beans
a sliver ginger, grated very fine or minced
2 cloves of garlic cut very fine
2 tbsp oil
salt to taste
1/2 tsp red chili powder (or to taste)
1/2 tsp garam masala (can be substituted with any other curry powder)
To know how to make your own garam masala check this post

Prep all the vegetables and rice.

Heat oil in a large heavy bottomed pan. Add onions and saute until it is translucent. Add garlic and ginger and stir for a minute or so, until the garlic begins to brown slightly. Add tomatoes and stir until tomatoes turn soft and mushy.

Add chopped spinach leaves and stir for a couple of minutes until it wilts. Add all the spices, cooked rice and salt to taste and mix well.

Add cooked black beans and mix again. Adjust salt if required and allow the entire mixture to heat on low to medium low heat for a minute or two.

Remove from heat and serve hot with curry of choice or some raita.
The copyright of this content belongs to Veginspirations.com

I served this with apple raita (will post the recipe soon) and the combination of spicy rice with a sweetish raita worked perfectly :)

Notes
For the brown rice, I soaked 1 and 1/2 cups of brown basmati rice in 2 and 1/4 cups of water for about 30 minutes, then pressure cooked it until done. It yielded me approx 5 cups of cooked rice. You can easily use any kind of cooked rice, white or brown or even leftover rice in this recipe. If you use white rice, I would suggest you make sure it is well cooled before using in this recipe, as white rice breaks a bit more easily than brown rice.
Read more ...

Tuesday, March 19, 2013

Buckwheat Upma

Buckwheat, despite its name is not related to wheat in any way. It is actually a grain like fruit seed, from a plant that is called Fagopyrum esculentum, and is related to plants like sorrel and rhubarb. Buckwheat is known to have some amazing health benefits, it is said to lower the risk of developing high cholesterol and high blood pressure. Some studies find that the nutrients in buckwheat may contribute to blood sugar control and may be helpful in the management of diabetes. Buckwheat is also a great source of magnesium, iron, potassium, zinc, selenium and is also very high in fiber.

 Buckwheat upma ~ Buckwheat pilaf | Veg Inspirations

Recently on a trip to my local health food store I  came across roasted buckwheat and decided to give it  a try. As with some other grains I have tried in the past, in this instance too I had no clue what I would use it in, or how it tastes. I just knew that it was very healthy and that I wanted to try something with it. After discarding many ideas I finally decided on trying a simple upma with it. Upma is a savory Indian snack, traditionally served as a light dinner or at breakfast usually made with many different ingredients, the most popular version made with semolina.

I didn't really know what to expect and was pleasantly surprised that the upma turned out so well. Buckwheat has a slightly nutty and chewy taste when cooked and the flavors of this upma worked very well with the nutty taste of buckwheat. The upma had an almost pilaf like feel to it and this was a very filling and satisfying dish. I can't wait to try buckwheat in a host of other dishes, I definitely plan to use a lot more of it in my kitchen :)

Buckwheat upma-Kuttu upma

Click here for a printable view of this recipe

Ingredients and Method to make Buckwheat upma
1 and 1/2 cups roasted buckwheat (kasha/kuttu) (can be substituted with raw buckwheat )(see notes)
1 red onion cut fine
2 medium tomatoes cut fine
1/4 head of cauliflower broken into florets
1 large red bell pepper deseeded and cut into 1/4 inch pieces (can be substituted with green bell pepper/capsicum/koda molagai)
1/2 cup fresh or frozen peas (if frozen thaw to room temperature)

2 tsp oil + 1 tbsp oil
4 Thai or Indian variety of green chilies cut fine (or to taste)
7 to 8 curry leaves
1 tsp mustard seeds
1 tsp split chick pea lentil (chana dhal/ kadalai parappu)

Salt to taste
4 tbsp finely chopped cilantro/ coriander leaves for garnish
1 and 1/2 tbsp lemon juice for garnish (or to taste)

Roast the buckwheat in 2 tsp oil on low to medium low heat in a heavy bottomed pan. This just took a couple of mins (if you have raw buckwheat, see notes) Remove and keep aside.

In the same pan heat the rest of oil on medium heat, add mustard seeds, when the seeds begin to splutter, add chick pea lentil and stir until it turns reddish. Then add green chilies and curry leaves (keep a lid handy as sometimes, curry leaves splutter a little and cause oil to splatter slightly. Stir a couple of times, then add onions and saute until it turns translucent. Add tomatoes and stir until the tomatoes turn soft and mushy.

Add all the vegetables, salt to taste and about 1 cup of water and allow the vegetables to cook until soft, yet not mushy.
The copyright of this content belongs to Veginspirations.com

When all the vegetables are cooked, add water as required (see notes for quantity of water) , salt to taste and bring to a boil. When water is boiling,. lower heat and add buckwheat and allow it to cook until soft, stirring in between to ensure even cooking.

Finally garnish with cilantro and lemon juice to taste and serve hot with chutney or pickle or even on it's own.

Notes:

I purchased roasted buckwheat, so the roasting I did just before making upma was just to enhance flavor. If you get raw buckwheat, you may need to roast over low heat for a few minutes more, until it achieves a  golden brown color and is evenly roasted.

To cook buckwheat, water is added at twice the ratio of buckwheat. That is, one cup of buckwheat requires 2 cups of water to cook it.  After the vegetables are cooked, if there is plenty of water left in the pan, adjust the water you add, bring to boil, then add buckwheat. I had approx 1/4 cup of water left in the pan, so I added 2 and 3/4 cups of water, brought it to a boil and added buckwheat to it.

This Buckwheat Upma is off to the Healthy Me & Healthy Us event being hosted by my friend Priya
and to the HITS – Diabetic friendly and HITS page"
Read more ...

Wednesday, March 13, 2013

Vegetable Kolhapuri (Vegetable Medley curry) and a tip :)

Veg Kolhapuri is a Maharashtrian curry made with a medley of vegetables. Typically a lot of dishes from this region use dry coconut in their masala. In addition to dry coconut, this curry also uses sesame and this fascinating combination lends this curry a very unique and interesting taste. This popular curry is offered in many Indian restaurants and even sometimes featured in wedding reception menus and I have tasted many variations of this curry over time. Invariably the restaurant versions or caterer versions always tend to be pretty oily, making me a little hesitant to taste more than a spoon of the curry at most. There were times when I could actually see the grease float on the top. Eeeeek!!! not quite what I would ever want to make at home :)

But then, that's the best part about recreating favorite restaurant recipes at home, isn't it? We get to control the ingredients and make healthier versions of our favorites for our families without compromising on taste :)
I love making this curry at home, it tastes perfect with phulkas/ rotis or even plain steamed rice. My only issue with making it often used to be availability of dry coconut. My local Indian grocer does stock dry coconut but it is sold in a large pack, which I am not able to use up entirely. And there were a few times that straight out of the packet, the coconut tasted a little old and I felt it spoiled the taste of the dish. Dry coconut has a fairly long shelf life but it cannot be stored forever, after a point it does turn rancid.

My solution to this has been to dry coconut in my oven. This has proved to be a very neat solution to my problem, I get to dry just as much coconut as I need and do not have to worry about wasting any leftover dry coconut. It tastes far fresher and tastier than the store bought version too.   And so long as I have fresh coconut on hand, I also have the ability to get dry coconut, so I do not have to worry about stocking up this ingredient separately. If you do not get dry coconut in your area or the kind you get is something that you dislike, you could try this tip to dry coconut too. Its simple and straightforward, just like this curry :)

Veg Kolhapuri-Mixed Vegetable curry

Click here for a printable view of this recipe

Ingredients and Method to make Vegetable Kolhapuri
For the curry
3 medium onions cut fine
3 medium tomatoes cut fine
1 green bell pepper (capsicum/ koda molagai) deseeded and cut into 1/4 inch pieces (can be substituted with red bell pepper too)
3 large carrots cut lengthwise into 1 inch pieces
1/2 head of cauliflower broken into florets
3 medium sized potatoes, peeled and cut into 1/2 inch pieces
1 1/2 heaped cups beans snipped and cut into 1 inch pieces
2 tbsp oil
salt to taste
1/2 tsp red chili powder (can be substituted with cayenne pepper) (or to taste)
3/4 tsp garam masala  (or any other curry powder) (my recipe for garam masala is here)

For the masala
1 inch piece of ginger
4 cloves of garlic
1/2 tsp fennel seeds (saunf/sombu)
1/2 tsp coriander seeds (dhania/kothamalli virai)
2 heaped tbsp sesame seeds
1/4 cup grated dry coconut (kopra) (if you do not have dry coconut see notes)
5 small whole dry red chilies (or to taste)

Grind all the ingredients mentioned under masala to a smooth paste in a small spice grinder/ blender using as little water as is needed and keep the paste aside.

Prep all the vegetables as required and keep aside. Heat oil in a heavy bottomed pan, add onions and saute until onions turn translucent.

Add the masala paste and stir on low to medium low heat until all the moisture from the paste evaporates and the paste dries, add tomatoes and stir until the tomatoes turn soft and mushy.
The copyright of this content belongs to Veginspirations.com

Add all the vegetables, chili powder, salt to taste and water as required and allow to simmer until the vegetables are cooked, yet not mushy.  Adjust water as required to achieve required consistency, adj salt and chili powder to taste and add garam masala and allow the curry to simmer until the flavors mingle.

Remove from heat and serve hot on a bed of plain steamed rice, or with a side of rotis/ phulkas/ chapathis (Indian flat bread)

Notes:
If you do not have dry coconut,  pre heat oven @ 250 deg F. Line a tray with parchment paper and spread approx  1/2 cup of fresh grated coconut on the lined tray and place in oven and bake for approx 25 to 35 minutes or until it turns a creamy golden color. Remove and use in recipe as required. You can easily dry more quantities of coconut at a time, I usually dry only so much because I hardly use dry coconut very much.
Read more ...

Wednesday, March 6, 2013

Simple Strawberry Ice Cream and a faux mosaic frame made with recycled cds :)

First let me start with the faux mosaic frame :) I have a stack of unusable cds/dvds that I've never really figured out what to do with, they just continue to lie in some part of the closet collecting dust. Recently I had one of those "Well duh !! Why didn't I ever think of that? " moments. These moments, I have noticed, happen often, especially when I am browsing the internet:)   I discovered that cds can be cut into little pieces. I have no clue why I never ever thought of cutting cds before, but I was really glad I did.  The best part is that they are really easy to cut up too. So the next thing was to figure out how to use it....

Faux Mosaic Frame (VI) photo 5626babe-8c3a-42a7-b0a1-695545f74f63_zpsb8ac6aae.jpg

This frame was the first thing I thought of to decorate with the cd pieces. I had a couple of unfinished wood frames that I was planning to paint or stain to a different color, but I just placed the cd pieces on them and loved the look of it. So I decided to give the frames a kind of faux mosaic look. If you are interested, check out this post for a detailed tutorial on this frame.

Moving on to the strawberry ice cream. It feels strange to talk about ice cream when the weather outside is almost freezing.  But here's the thing, R enjoys frozen treats even in freezing cold weather while all I want is a piping cup of chai tea when the weather turns cold.

Simple Strawberry ice cream

Recently we had a little warm up for a couple of days before the weather got all cold again. And I thought it might be a good time to treat R to a batch of homemade ice cream. Since I had a large box of strawberries lying in my refrigerator, the choice of which flavor ice cream to make was kind of a no brainer. This is an ultra simple recipe that hardly requires any effort at all. Just puree, mix and churn in an ice cream maker and voila, a yum frozen treat. If you do not have an ice cream maker I have provided a link below to make this ice cream without one. This turned out to be a perfect treat and I have to admit, I have been digging into it even though the weather has gotten back cold again.....hmmm maybe R is onto something :)

 Strawberry ice cream

Click here for a printable view of this recipe

Ingredients and Method to make Strawberry Ice cream (Adapted from this Carnation recipe)
2 cups fresh strawberries
1 can (12 fl oz) evaporated milk
a pinch of salt
1 tsp lemon juice
3/4 cup granulated sugar

Clean and prep the strawberries. Puree strawberries with a little evaporated milk. Pour in a large bowl.

Add a pinch of salt, lemon juice and sugar and mix well or give it a turn in the blender for it to mix well.
The copyright of this content belongs to Veginspirations.com

Use ice cream maker to churn this ice cream as per manufacturers directions. Mine requires the mixture to be chilled for a couple of hours and then churned in the machine. If you do not have an ice cream maker than place the mixture in the freezer. When it begins to freeze around the edges, remove and stir it vigorously with a whisk or spatula. Return to freezer and continue this process every 30 or so minutes, stirring at least five to six times. Allow it to freeze and serve. If you want more details on this process check out this post
Read more ...