Monday, February 28, 2011

Sprouted Mung Bean Adai~Moong Dhal Dosa~Savory Indian crepe with rice and lentils

Recently when I was chatting with my mother in law, the conversation veered to...........where else.........food, of course. In the course of the conversation she mentioned that she made thavala adai, a kind of adai that I am yet to make or even taste. While sharing the recipe, she mentioned sprouted mung bean as one of the ingredients. Since the list of ingredients for thavala adai seemed a little too long, I decided to put it off for a different time, when I have everything at hand and a little more patience to try it too.

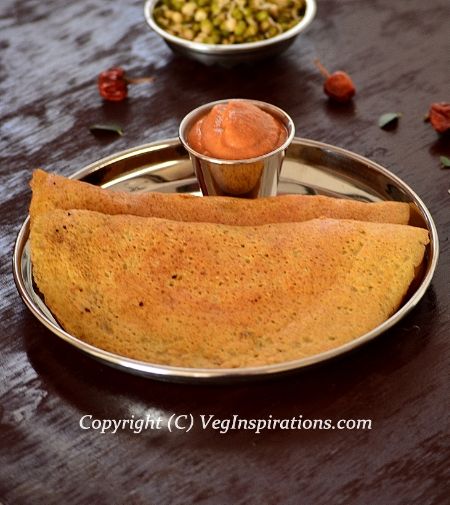
In the meanwhile the idea of using mung sprouts in adai got stuck in my head and I decided to give it a try as a variation to the traditional adai. I am so glad I tried this, the adai turned out beautifully, mung sprouts added a subtly different taste and texture from the traditional adai and I loved how it tasted. I am also so glad to find one more way to include sprouts in our diet. If you like adai, give this one a try....you will definitely enjoy it:-)

While on the topic of adai, one quick update before moving on to the recipe. I finally managed to update the pictures on this oat barley adai and this traditional adai. Have a quick peek if you have a minute....

Sprouted Moong Adai~Dhal dosa~Savory Indian crepe with mung beans, rice and other lentils

Click here for a printable view of this recipe

Ingredients and Method to make Sprouted Mung bean adai
2 cups brown rice  ( I used brown basmati) ( can be substituted with white rice too)
1/2 cup split pigeon peas (tur dhal/ tuvaram parappu)
1/2 cup split yellow chick pea lentil (chana dhal/ kadalai parappu)
3/4 cup sprouted mung bean (Whole moong/green gram/pachai payaru) ( to learn how to sprout mung bean read this post)
5 dry red chilies (or to taste)
5 Thai or Indian variety green chilies (or to taste)
1 inch piece of ginger
1 stalk of curry leaves (optional)
salt to taste
1/4 tsp asafoetida powder (hing/ perungayam)
a little sesame oil to shallow fry adai

To learn how to soak and make mung bean sprouts read this post 

Soak brown rice, split pigeon peas and chick pea lentil for 3 hours in sufficient water in a large bowl.

Add sprouted mung bean to the above grains and allow to soak for additional 30 minutes.

Grind the grains along with ginger, green chilies, red chilies and curry leaves if using, in batches adding water as required. The grains need only to be of a coarse texture so you do not need to grind it smooth.The batter needs to be on the thicker side, not runny so do not use water too liberally when grinding the batter.
The copyright of this content belongs to Veginspirations.com

Add salt to taste, asafoetida powder to the batter and mix well. This batter can be used immediately or can be refrigerated and used within a few days (not too long say 3 to 4 days) to make adai (crepe).

When making adai, heat a flat pan/ griddle/ tawa on medium heat. When hot, pour a little batter on the center of the pan/ tawa and quickly spread it into a thin circle. Pour a few drops of sesame oil around the circumference of the adai. When the lower side is golden brown, flip over and cook the other side until it has a few brownish/golden spots on it.

Remove and serve hot with either chutneymolaga podi, aviyal or even a piece of jaggery (vellam)
Yield will depend on the size and thickness of each adai.
Read more ...

Thursday, February 24, 2011

Microwave Chocolate covered raisins

There are some food combination's that I find nearly irresistible. Chocolate covered raisins come under this category. Individually I love both raisins and chocolate,but when the two get combined, I cannot stop at just one. That is why every time I come across chocolate raisin packs in store aisles, I give it a lot of longing looks but exert every bit of self control and avoid buying it. I know that if I get it, I would probably end up eating it entirely :-( 

The other day when I was making this chocolate oatmeal bars, it suddenly struck me that I have never made or even thought of making chocolate raisins at home. Once that idea had taken seed, I was not able to dislodge it. Deciding to indulge a little, I made chocolate covered raisins at home and used this recipe as a reference.

The verdict.......... these choco raisins were fantastic. They definitely did not have the perfect shiny look of the store bought ones. On the other hand they did not have the slightly artificial taste or the "entirely too sweet" feel  of the ready made ones either. This tasted far more fresher and had more of a "melt in your mouth" quality that made it that much more delicious. And the best part,  this hardly takes any time or effort to make:-)


Chocolate Covered Raisins

Here is a closer look at these chocolate raisins....

Chocolate Raisins

Click here for a printable view of this recipe

Ingredients and Method to make chocolate covered raisins
1/2 cup semi sweet chocolate morsels
3 tbsp white chocolate morsels
1 tbsp oil
heaped 1/2 cup plump dark raisins

Line a tray with parchment paper and keep aside.

Place both chocolate morsels in a microwave safe dish (I used a glass dish)

Pour oil on it and place in the microwave. Microwave it @ 40 percent power for 2 minutes.

Remove, stir well and place again in the microwave. Microwave @ 40 percent power for another 2 minutes and 30 seconds and or until the  chocolate has completely melted stirring every 30 seconds to a minute to make sure the chocolate does not get overheated.
The copyright of this content belongs to Veginspirations.com

Stir the melted chocolate well, then add plump dark raisins and mix until all the raisins are coated with chocolate.

Spoon the chocolate covered raisins on the parchment lined tray making sure that there are no big clumps. Freeze this for about 10 minutes or so.

Remove, store in an airtight container and enjoy. Refrigerate the balance if any if you plan to store for a longer time.

Read more ...

Monday, February 21, 2011

Chana Palak (Chickpeas in Spinach gravy curry)

The importance of protein in our diet cannot be underestimated. Protein is important for many physiological functions from building muscle to keeping cells in good working order. Recent studies also suggest that adding protein to a meal makes it more satiating which in turn could help in maintaining a healthy weight. Knowing this, I always make a conscious effort to include more protein in our diet.

My "go to" sources of protein usually are lentils and beans. I especially like dishes that allow me to combine lentils or beans with some vegetable. In fact, a perfect example of such a dish is this chana palak. This quick, delicious and satisfying curry originates from north Indian cuisine and is a very versatile and well liked curry. Whether you pair it with plain rice or pulao, or with some type of Indian flat bread like phulkas, rotis, parathas or naan, it never fails to satisfy.

Chana Palak-Chickpeas and Spinach curry

Click here for a printable view of this recipe

Ingredients and Method to make chickpea and spinach curry
1 cup chick peas (chana) soaked for 8 hours in sufficient water with a pinch of bkg soda (soda is optional)
6 oz of spinach (palak)
2 small onions (pyaaz/vengayam) peeled and cut fine
1 tbsp oil
1 inch piece of ginger (adrak/inji) minced or grated fine
1/2 tsp minced garlic (lehsun/poondu)
2 small tomatoes cut fine(tamatar/thakkali)
1/2 tsp red chili powder (or according to taste)
1/2 tsp cumin powder (jeera/ jeeragam powder)
1 tsp garam masala (or to taste) (can be substituted with other curry powder) You can check out my homemade garam masala recipe here .
1 tsp sugar (optional) 
salt to taste

Drain the water the chick peas were soaked in, fill with fresh water and pressure cook or cook on stove top until the chickpeas are soft but not mushy. Keep aside.

Place spinach leaves in a bowl of hot water for a couple of minutes. When the leaves begin to wilt remove with a slotted spoon and place in a bowl of cold water.  Drain this spinach and puree until smooth and keep aside.

Heat oil in a large heavy bottomed pan, add onion and saute until it turns transparent. Then add  ginger, garlic and stir a few times. 

The copyright of this content belongs to Veginspirations.com

Add tomatoes and stir until tomatoes are cooked and soft. Remove from heat, cool and puree this mixture in the blender until smooth and place back in the pan.

Add chili powder, cumin powder, garam masala  and mix well.

Add pureed spinach, salt to taste, sugar if using (this helps retain color of spinach)  and cooked chickpeas and simmer together for a few minutes or until the flavors come together.

Serve hot with plain rice or pulao or roti, naan/ kulcha , phulka or paratha of choice.

Serves approx 2 to 3

Suggested variation :
Sprout the chickpeas for additional nutritional punch :) 
Read more ...

Thursday, February 17, 2011

Microwave Chocolate Oatmeal Bar

In the past when I posted this and this version of oatmeal bar, a lot of readers sent emails mentioning that they were unable to try the recipes because they do not have a conventional oven and requested me to post a microwave version. Finally, a few days ago I got a chance to try a microwave version of oatmeal bar. I referred to this recipe as a guide but tweaked it by reducing the quantity of butter and chocolate, skipping the corn syrup entirely and adding flax to provide some binding and to make it healthier :-)

Chocolate Oatmeal Bar

The verdict......this oatmeal bar was delicious, the slight amount of chocolate really enhanced its taste. I was also impressed with how quickly this oatmeal bar could be made, it took me around fifteen to twenty minutes from start to finish including prep time but without taking the freezing time into account. This makes a very convenient travel or "on the go " snack and is a great way to add some oatmeal in our daily diet :-)

 Microwave Chocolate Oatmeal Bar

Click here for a printable view of this recipe

Ingredients and Method to make microwave chocolate oatmeal bar
2 cups 1 minute oatmeal (quick cooking oats)
1 tbsp flax meal (powdered flax seeds/ alsi) + 3 tbsp water
Additional 2 tbsp water
1/2 cup sugar
6 tbsp butter melted
1/2 tsp pure vanilla extract
1/4 to 1/2 cup semi sweet chocolate morsels ( I used 1/4 cup) 
a little extra butter to grease the baking dish.

Grease a 8 inch round glass dish with a little butter and keep aside

In a large bowl mix together sugar and oatmeal.Whisk flax seed meal with water together for a few seconds until it turns gelatinous. Keep this aside.

Melt butter and pour over the oatmeal + sugar mixture and mix well. Pour the flax seed mixture over it as well and mix again. Add additional 2 tbsp water, vanilla extract and mix once more.

Spoon this mixture onto the pre greased dish and press down with the back of the spoon.

Microwave on high in 1 minute increments, rotate the dish every minute (if your microwave plate does not rotate) to ensure even cooking. It took me 4 minutes.
The copyright of this content belongs to Veginspirations.com

Remove and spread the chocolate morsels on top of the oatmeal mixture and on 30 percent power cook for 2 to 4 minutes or until the morsels turn shiny. (it took me 2 minutes because I only used 1/4 cup of morsels)

Spread the morsels with a knife and allow this mixture to cool a little. Place the dish in freezer for 15 to 20 minutes.

Cut into rectangle bars or small squares and place in an air tight container. Use within a few days for best freshness. I used this up in one weeks time.

Notes:
Because of varying wattage in each microwave, cooking times will vary in different microwaves. Also if you use a slightly larger or smaller dish, it will also impact the cooking times. So please use the times given in this recipe only as a guide. It may take a little lesser or more time to cook depending on your microwave and your dish.

Read more ...

Tuesday, February 15, 2011

Sweet Potato and Bean Paratha (stuffed Indian flat bread)

Surprised by the mention of bean in the title?  I know this seems like an unusual combination for a paratha filling but trust me this combination works :-)  I make sweet potato paratha frequently and usually make it just as I have mentioned in this recipe below ,minus the beans. The other day when I had some cooked pinto beans, I wondered how it would taste if I combined it with sweet potato in this paratha as a way to get some additional protein along with the vegetable.

The results were surprisingly good, the paratha turned out delicious and was very filling.I enjoyed the texture and slight "bite" that the beans contributed to the paratha.  This variation of sweet potato paratha has become my new favorite. Try this if you are in the mood for something "different"............. like me, you may end up making this your favorite version of paratha too:-) 


Sweet Potato And Bean Paratha

Click here for a printable view of this recipe

Ingredients and Method to make Sweet potato and Bean paratha
For the dough
2 cups whole wheat flour (atta / godumai maavu)
salt to taste
water as needed

For the filling
1 large sweet potato peeled, cut into cubes and cooked until soft.
3/4 cup cooked beans ( I used pinto beans but it can be substituted with any other bean like black eyed beans (chawli) or red kidney beans(rajma) )
salt to taste
3 Thai or Indian variety of green chilies cut very fine (or according to taste)
1/2 tsp dry mango powder (amchur powder)
1/2 tsp cumin powder (jeera powder)
2 tbsp finely chopped cilantro (coriander leaves/dhania/ kothamalli)

a little oil (if you want a vegan version) or clarified butter (ghee/nei) to apply on the parathas.

In a large bowl mix together whole wheat flour and salt well. Add water as required and knead to make a soft and non sticky dough with the emphasis on soft. Keep dough covered for at least 30 minutes or so.

In the meanwhile peel sweet potato, cut into cubes and cook it until soft either using the stove top or the microwave. I used the microwave and it took me just a few minutes. Add as little water as possible while cooking the potato.

When the sweet potatoes are cooked and a little cool, mash them. Then add salt, green chili, dry mango powder, cumin powder and cilantro to it and mix well. If you do not want too much of a bite from the bean, mash the cooked beans coarsely and add to the sweet potato mixture. I like a little bite so I do not mash cooked beans very much.
The copyright of this content belongs to Veginspirations.com

Divide the dough into lemon sized balls. With the help of a little flour roll out each ball into a small thickish circle. Place about 1 tbsp to 2 tbsp of the sweet potato mixture in the center of the circle. Pull the ends together and seal it. Flatten gently and with the help of a little flour roll the dough out gently into as thin or thick a circle as you like. Check out this post for some step by step pictures to explain this process.

Heat a tawa/ flat pan/ griddle on medium to medium low heat. Place the rolled out paratha in the center and allow it to cook until there are small golden spots on the lower side. Apply some oil/ clarified butter to the side facing upwards and flip over and cook the other side until it has a few golden/ brownish spots on it.

Remove and serve hot with plain yogurt, raita or curry of choice.

This quantity yielded approximately 8 to 10 parathas

Notes:

If you do not like beans or are cooking for someone who doesn't you can easily omit the  beans and make this a simple sweet potato paratha , just be sure to scale down the spices a little to compensate for the lack of beans. 
Read more ...

Thursday, February 10, 2011

Carrot Cucumber Raita

You may have heard cucumbers being recommended as a diet food because they consist of mostly water and are low in calories. But did you know that cucumbers are also packed with nutrition. The flesh of cucumbers is said to be a very good source of vitamins A, C and folic acid. And their hard skin is rich in fiber and has a variety of minerals including magnesium, silica and potassium. In fact the reason why cucumbers are considered good for maintaining healthy skin is because it contains silica, which is said to enhance skin tone and its texture.

Sadly I come under the category of people that peel cucumbers before using them in some dishes. A habit that I am trying to break......I have resolved to try and find more ways to include the skin of cucumbers along with the flesh in the future :-)  In the meanwhile here is a simple raita (a yogurt based salad) with a combination of cucumbers and carrots that I find very refreshing, quick, delicious and colorful. This raita works really well along with any type of north Indian rice recipe like pulao or with parathas (Stuffed Indian flat bread) or even just by itself.


Carrot Cucumber Raita~Indian style yogurt based salad

Click here for a printable view of this recipe

Ingredients and Method to make Carrot Cucumber Raita
1 large cucumber (kakadi/Kheera/veldrikkai) peeled and grated
2 large carrots grated fine
1 1/2 cups whisked plain yogurt (dahi/thayir)
salt to taste (namak/uppu)
1/2 tsp red chili  powder (or to taste)
1/4 tsp cumin powder (jeera/jeeragam powder)
2 tbsp very finely chopped cilantro (coriander leaves/hara dhania/kothamalli) for garnish.

In a large bowl, mix together cucumber, carrot, salt, chili powder and cumin powder.
The copyright of this content belongs to Veginspirations.com

Add whisked plain yogurt and mix well. Garnish with chopped cilantro and serve chilled along with pulao, or other rice dishes, or with paratha.
Read more ...

Monday, February 7, 2011

Asparagus lentil coconut curry ~ Kootu

While reading about the health benefits of different vegetables, I discovered that asparagus has some amazing health benefits. This vegetable among other things,  is known for being rich in folate, for its anti inflammatory properties, anti cancer properties, anti aging properties and is also said to help in detoxifying our bodies. In addition this vegetable is also said to be good for the eyes and heart. Really what more can we ask for from our vegetables.... :-)

Once I learned that asparagus is so healthy I resolved to include it far more often in our diet.In the past I used asparagus very occasionally and when I did, it was usually in recipes like this one or in soups. I have never tried asparagus in an Indian style curry. I wanted to try asparagus in a kootu like preparation so that I could combine some protein with my veggies and get a more complete dish. Since I have already explained what kootu is in this post, I will not go into it again. Suffice to say that this asparagus kootu turned out to be a huge success and I have already made this quite a few times since the first time I tried it.....

 Asparagus Lentil Curry ~ Kootu


Click here for a printable view of this recipe

Ingredients and Method to make Asparagus Kootu
1/4 cup split pigeon peas (tur dhal/ tuvaram parappu)
1/4 cup split chick pea lentil (chana dhal/ kadalai parappu) (soaked for 20 to 30 minutes)
1 bunch asparagus ends cut off and cut into 1/8 inch pieces (yielded approx 3 1/2 cups of pieces)
1/4 tsp turmeric powder (haldi/manjal podi)
salt to taste

Grind together to a smooth paste
1/4 cup grated fresh or frozen coconut (if frozen thaw to room temperature)
3/4 tsp cumin seeds (jeera/ jeeragam)
3 dry red chilies (lal mirch/molaga vathal) (or to taste) (I used byadgi variety)

For the seasoning (optional, see notes)
1 Tbsp oil (preferably coconut oil)
1 tsp mustard seeds (sarson/ rai/ kadagu)
1 tsp split black gram lentil (udad dhal/ ulatham parappu)
pinch of asafoetida powder (hing/ perungayam)

Cook the split pigeon peas using the pressure cooker or the stove top until it is soft and mushy. Mash these lentils with the back of a large spoon and keep aside.

Grind, coconut, cumin seeds and dry red chilies to a smooth paste and keep aside.

Soak the split chick pea lentil for 20 to 30 minutes.In a large heavy bottomed pan cook the chick pea lentils adding water as required until it is soft, yet firm and retains its shape. When split chick pea lentil is ready, add asparagus, turmeric powder and more water if required and allow it to cook until asparagus is soft, yet firm.

When the asparagus is cooked, add salt to taste and allow to simmer for an additional couple of minutes.
The copyright of this content belongs to Veginspirations.com

Add cooked and mashed lentils, coconut paste and allow to simmer for a few minutes until all the flavors blend.

In a small pan, heat oil, add mustard seeds, when the seeds begin to splutter, add split black gram lentil. When the lentils begin to turn reddish, add asafoetida powder, mix once or twice and pour entire seasoning on the asparagus curry. Allow to simmer another additional minute or so and  remove from heat.

Serve hot with rice and rasam or sambar, or serve to go with some phulkas/ rotis.

Notes: 
If you want to skip the seasoning, add 1 Tbsp of coconut oil to the curry when it is simmering in the end and add 8 to 10 curry leaves torn into small pieces for garnish

Read more ...

Thursday, February 3, 2011

Capsicum Brown Rice and can you identify this ?

On my recent trip to Coimbatore (a city in India) I came across these bright and attractive greens. My mother in law tells me that this is an edible green, and a lot of folks in that region use it much as they would spinach. I have no clue what this is called or how it tastes , but I am curious to learn more about it. I would love it if any of you could identify this and give more information about it. Looking forward to your responses :-)
 
Photobucket

In the meanwhile,  moving on from unidentifiable greens to a much more well known green veggie. I am referring to green bell pepper also known as capsicum in some parts of the world. Green bell peppers are among my favorite veggies, these peppers seem to enhance the flavor of any dish that they are used in.This green bell pepper rice is something I make when I am looking for a quick, flavorful one dish meal. I just add some raita or salad and some chips or papad and I get a complete meal.


Photobucket

Click here for a printable view of this recipe

Ingredients and Method to make Capsicum Brown Rice
1 1/2 cups brown basmati soaked in 2 1/4 cups of water for 30 minutes and cooked in the rice cooker with 1 tsp clarified butter (ghee/nei) see notes
2 green bell peppers (capsicum/ koda molagai) de-seeded and cut into thin strips
1 large onion cut into 1/4 inch pieces
2 tsp clarified butter (ghee/nei) or oil
Additional 2 tsp clarified butter (optional) (if you want a little richer taste)
3/4 tsp mustard seeds
salt to taste

Garnish with
4 tsp lemon juice (or to taste)
4 tbsp finely cut cilantro (coriander leaves/kothamalli)

For the masala
(Dry roast each of these items separately until aromatic, cool and grind to a fine powder)

2 tsp coriander seeds (dhania)
1/2 tsp cumin seeds (jeera )
2 tsp split black gram lentil (udad dhal/ulatham parappu)
3 dry red chilies (or to taste) ( I used byadgi variety)
6 tsp raw peanuts with skin

Soak brown basmati in water as mentioned above for 30 or so minutes, then place in a rice cooker, add 1 tsp clarified butter and cook until it is done. 

Dry roast each of the ingredients mentioned under masala separately in a heavy bottomed pan until aromatic.
Remove and keep aside to cool. Grind in a spice grinder to a fine powder.

Heat ghee in a heavy bottomed pan, add mustard seeds. When the seeds begin to splutter add onion and saute until the onions turn transparent.

Add bell pepper and stir fry until it is cooked yet crisp.
The copyright of this content belongs to Veginspirations.com

Add cooked rice, salt to taste, masala powder and mix well.

Just before serving add lemon juice and cilantro and mix well.

Serve with raita/ chips/ papad or any curry of choice

Notes:
Brown basmati can also be cooked in the pressure cooker if you prefer, just  make sure that the rice is cooked yet each grain is separate.

This dish can also be made with white basmati if you prefer, just cook the rice as you would for pulao. Then cool it a little by spreading on a plate, then add to the cooked capsicum and proceed as above. The reason you do not need to do this for brown basmati is because brown basmati holds its shape better and does not break when hot the way white rice does.

The masala can be made ahead and stored in an airtight container for convenience.
Read more ...