Wednesday, June 22, 2011

Keerai Oat Dosai ~ Palak Oats Dosa ~ Savory Indian crepes with spinach and oats

If you are very health conscious you may have already come across scores of articles and debates about the need to buy organic vegetables and fruits. But the price tag of organic veggies and fruits can be a little steep:-(    My rule of thumb so far has been, for greens like spinach and chard, I always buy organic and for the other vegetables, I am not very insistent on it being organic. But recently I came across this article that lists vegetables and fruits that contain the most pesticides and also contains a list of the cleanest veggies and fruits, meaning ones that contain the least amount of pesticides.

It is a very informative and illuminating article. I was surprised to find items like apple, celery, strawberries and peaches at the top of the list of items that have the most pesticides.  Spinach actually comes fifth on the list of items that contain the most pesticides. I guess I am going to have to revise my "definitely needs to be organic" list and soon ! If you too do not buy all organic veggies and fruits you may want to glance at the above article so you get an idea of which ones are safe to buy inorganic and which ones are better organic.

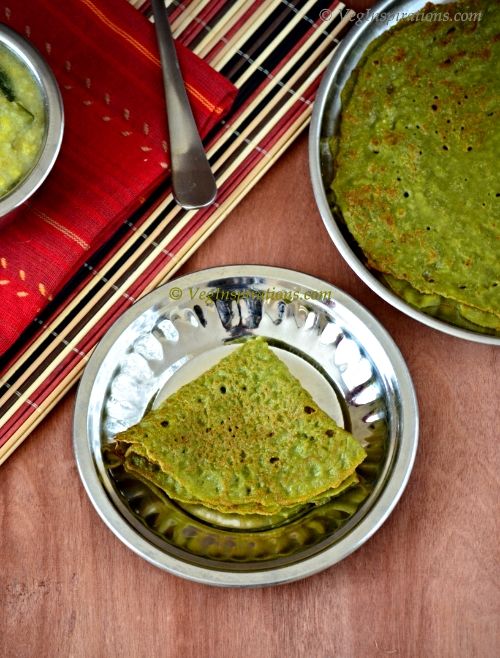
Moving on, it has been a while since I posted any type of dosai recipe in this space. Not because I am not making dosai these days, but because my hectic schedule these days does not allow me very much time for experimenting and I end up making tried and tested recipes that I have already posted here. Finally a few weeks back I tried something new....................... this time I combined oats, wheat, brown rice and spinach for a super nutritious dosai that we both loved. It was fast and quick to make. A little soaking + a little grinding + no fermentation= fast and yum dosai :-)  So if you are looking for new ideas to sneak in a little oats or spinach or both into your diet, give this dosai a try..... you may end up liking it as much as we did :-)

 Keerai Oat Dosai ~ Palak Oats Dosa ~ Savory Indian crepes with spinach and oats


Click here for a printable view of this recipe

Ingredients and Method to make Spinach oat dosai
1 cup cracked wheat (broken wheat/ dalia / fada)
1 cup brown rice (can be substituted with white raw rice ) (chawal/ arisi)
1 cup rolled oats
2 cups of  baby spinach or regular spinach leaves (washed, rinsed and dried) (about 5 oz/140 gms) (palak/keerai)
salt to taste (namak/uppu)
a little sesame oil to shallow fry the dosai (til ka tel/  nalla ennai)

Soak the first three ingredients in sufficient water for at least 3 to 4 hours.

Grind together in batches  in a blender/ mixer, adding water as required to get a smooth and slightly thick batter. The batter should be not too thin and not too thick, definitely not runny. When in doubt err on the side of a thicker batter, its much simpler to add a little more water later on to achieve correct consistency.

If  the grains have been divided into 3 parts to process , then divide the spinach in 3 parts too and add one part of the spinach leaves to the processed batter and give it another turn or two in the blender until the spinach is pureed completely . Remove and continue for the rest of the grains until they are all processed.
The copyright of this content belongs to Veginspirations.com

Add salt to taste and mix well.This batter can be stored in the refrigerator for 2 to 3 days.

When making dosai, heat a flat pan/ tawa/ griddle. When hot pour a  little of the batter in the center and immediately spread into a thin even circle. Add a few drops of sesame oil around the circumference of the circle and a couple of drops in the center. Allow to cook until the lower side begins to get a little brownish. Flip over and cook the other side until the other side begins to get a few brown spots.

Remove and serve hot with sambar of choice/ chutney of choice or molaga podi or any combination of the three. I served this with oat coconut chutney for a double dose of oats in one go :-)

This dosa is off to the Show me your dosa event being hosted by Divya
Read more ...

Thursday, June 16, 2011

Tandoori Paneer Pizza

Thanks all of you for your responses to the two questions that I had asked in my last post. I enjoyed reading  all your comments and descriptions on both the tandoori sauce guessing game and how puffed rice is made.Amy shared a youtube link in the previous post on how the Chinese make puffed rice. It was a very interesting video, thanks Amy for sharing it with me. I have uploaded the video here if any of you are interested in seeing this video. 

For those of you who played along on the guessing game, the title of this post has already given away the answer on what I did with the tandoori sauce. My blog friends Deepa, Harini-Jaya and Sowmya, you can all take a bow because you all guessed the answer correctly. When I visited India last year, I tasted a tandoori pizza at a local Pizza hut that I really liked. I have been wanting to recreate that pizza since I got back. This is my take on that pizza. This pizza turned out fabulously, the tandoori sauce and the paneer added a very unique and interesting flavor to the pizza . Since I made the sauce ahead, it also took very little time to assemble this pizza. So if your weekend plans include pizza, do give this pizza a try and let me know what you think about it :-)

Tandoori Paneer (Indian cottage cheese) Pizza-Fusion Pizza- Indian style pizza

Click here for a printable view of the Tandoori Paneer Pizza

Ingredients and Method to make Tandoori Pizza
1 red onion cut lengthwise
1 green bell pepper (capsicum) deseeded and cut into thin long strips
2 cups of paneer cubes (Indian cottage cheese)  (Here is how you can make your own paneer)
2 cups of other vegetables like peas and corn (optional)
Shredded cheese as required
Tandoori sauce as required ( I used approx half the quantity of sauce made as per this recipe)
Pizza base as required ( I used approximately 3- 8 inch oat wheat pizza base made as per this recipe )
Red pepper flakes (optional)

Preheat oven to 425 deg F

Apply tandoori sauce on the pizza base, followed by the shredded cheese, toppings and paneer cubes.

Place in the oven for approximately 20 mins or until the paneer and cheese have light brown spots on top of it.
The copyright of this content belongs to Veginspirations.com

Remove, slice into wedges and serve hot with some red pepper flakes if you want.
Read more ...

Tuesday, June 14, 2011

Tandoori Sauce and a couple of questions :-)

A few years back on a trip to India, I had visited a tea estate in Ooty (a city in the state of Tamilnadu) and got a chance to see the step by step process involved in tea making. I found the entire experience quite fascinating and was surprised at the numerous steps involved in making fresh tea leaves into the more familiar dried tea leaves that we use each day.

This visit made me a little more curious about some food items in my own pantry. Like puffed rice (or pori/murmura),  have you ever wondered how puffed rice becomes ....err... puffed rice. I have read that the combination of rice, moisture and the right amount of heat causes rice to puff up the way it does. But I would love to be able to see how it is done at least once :-) So here's my first question to all of you out there, have any of you actually seen puffed rice being made, and if yes do share your experiences in the comments below, I would love to read about it :-)

Moving on to the second part of this post, tandoori sauce. This delicious sauce is easy to make and very versatile. You can use this sauce in your vegetable stir fry to add some flavor or in curries  as a marinade or pretty much any which way that you chose. You can even make a quick chickpea curry or a curry with any beans if you have cooked chickpeas/ beans on hand using this sauce as the base.I made a fusion dish with this sauce and that brings me to my second question. Can any of you guess in what dish I used this tandoori sauce in?   I'll give you a clue, it's an Italian dish:-)  Looking forward to hearing your replies to both the questions. Will post the answer when I post the dish itself, which will be in a day or two at most. Until then, I will leave you with this sauce to whet your appetite:-)

Tandoori Sauce

Click here for a printable view of this recipe

Ingredients and Method to make Tandoori Sauce
2 medium red onions cut fine
1 inch piece of ginger cut fine
2 tbsp oil
1/2 tsp minced garlic
5 medium tomatoes cut fine
salt to taste ( I needed approximately 1 tsp)
1 1/2 tsp garam masala ( or to taste) (click on the word garam masala if you want its recipe)
3/4 tsp tandoori masala (optional ) ( if not using use a little more garam masala)
1/2 tsp cumin powder (jeera powder)
1/2 tsp coriander powder (dhania powder)
1/2 cup plain yogurt (curd/ dahi)

Heat oil in a heavy bottomed pan. Add onions and saute until onions are transparent.

Add ginger and garlic and stir a few times. Add tomatoes and cook until the tomatoes are soft and mushy.

Add garam masala, tandoori masala (if using), cumin and coriander powders and salt to taste and stir a few times.Remove this mixture from heat and cool to room temperature.

Puree this mixture along with yogurt until smooth.  Use as required in recipes.
The copyright of this content belongs to Veginspirations.com

Store unused portion of sauce in an airtight container and refrigerate. Use within a few days (not more than 2 to 3 days) for freshest taste.

Read more ...

Thursday, June 9, 2011

Adzuki bean (Red chori) curry

Adzuki beans pronounced as "azuki" beans are also known as red chori or red cow peas.  According to wiki these beans are widely grown throughout East Asia and the Himalayas. These beans when cooked have a sweet and nutty flavor and like other beans are a good source of soluble fiber. Also these beans are said to be a good source of folate, potassium, phosphorous, magnesium, iron and zinc. If all the above health benefits does not make you want to put these beans on your next grocery shopping list, here is another...............these beans taste awesome in curries.

Adzuki bean curry-Red chori curry

I have been experimenting with these beans in different curries for a while now. Some of the recipes almost made it into this site too, sadly I missed taking pictures of the curries and couldn't post them here........ sigh !  Anyway this time I managed to snag a few pictures of this curry. Though the pictures did not turn out too well and do not do justice to this curry, at least it kind of gives you an idea of how the curry looks. The taste of this curry was definitely far better than the picture seems to suggest, you will just have to take my word on that :-) Or better still give this curry a try yourself, it is versatile enough to be paired with just about anything, plain steamed rice, any type of Indian flat bread like phulkas, rotis or naans or even breads like dinner rolls, pav or ciabatta!  


Adzuki Bean curry/ Red chori Curry

Click here for a printable view of this recipe

Ingredients and Method to make Adzuki bean curry
1 1/4 cup adzuki beans (red chori / red cowpeas)  soaked in sufficient water for 6 to 8 hours with a pinch of soda (soda is optional)
2 small onions cut fine
2 medium tomatoes cut fine
2 tbsp oil
1 inch piece of ginger minced
1/2 tsp minced garlic
4 Thai or Indian variety green chilies (or to taste)
1/4 tsp turmeric powder
1 tsp garam masala (or to taste) (can be substituted with any other curry powder)
Check this post for the recipe of homemade garam masala
salt to taste
1/4 cup whisked yogurt (optional) (can be skipped for a vegan version, see notes)
handful of cilantro (coriander leaves/ kothamalli) cut very fine

Soak adzuki beans for 6 to 8 hours in sufficient water. I usually add a pinch of soda to this while soaking because I feel the beans tend to be softer, but the soda can be skipped. Drain the water the beans were soaked in, fill with fresh water and pressure cook until the beans are soft but not mushy. Alternatively the beans can be cooked on the stove top until it is soft yet not mushy.

In a large heavy bottomed pan, heat oil. When hot add onions and saute until onions are transparent. Add minced ginger and garlic and stir a few times. Add tomatoes and stir until tomatoes soften and become mushy.
Add green chilies and stir a couple of times.
The copyright of this content belongs to Veginspirations.com

Remove this mixture from heat and allow to cool. Puree the onion + tomato mixture until smooth. Pour the pureed mixture back into the pan. Add turmeric powder, garam masala and the pre cooked adzuki beans.

Add salt to taste and allow the adzuki beans to simmer in this gravy for about 10 to 15 minutes. Do not skip this step as the flavors get infused into the adzuki beans while it simmers, and the resulting curry is that much more flavorful.

Finally remove from heat and just before serving add whisked yogurt if using and garnish with cilantro.

Serve hot with any type of Indian flat bread like naan/ tandoori roti, phulkas/ rotis or even breads like pav/ dinner rolls/ ciabatta bread.

Serves approximately 2 to 3

Notes:
Pureeing onion and tomatoes is not necessary, but pureeing it results in a smoother gravy. This step can be skipped if you are not particular about a smoother gravy. Only thing, if you plan to skip this step make sure the vegetables and chilies are cut very fine.

Adding yogurt is optional, this curry tastes pretty good even without it. I just add it to add a touch of creaminess. If you want to make a vegan version of this curry, you can just skip the yogurt completely.
Read more ...

Monday, June 6, 2011

Thai Inspired Pasta


One evening a couple of weeks ago, I had pasta planned for dinner. I was planning to make it with traditional pasta sauce, but while I was waiting for the pasta to get cooked, I suddenly realized I was more in the mood for something with Thai flavors than Italian. A quick search through my refrigerator and pantry revealed that I had some ingredients that could work together to infuse Thai flavors to the pasta dish.

So I decided to give it a try. Luckily for both of us, this idea worked out very well. The red curry paste, coconut milk and peanut butter gave the pasta dish that typical Thai kind of flavor that I was craving that day. In addition it was really quick to make and super easy too. So if you are in the mood to try something "different" with your pasta and you like Thai flavors, maybe you could give this pasta dish a try:-)   

Thai Inspired Pasta

Click here for a printable view of this recipe

Ingredients and Method to make Thai Inspired Pasta
1 14.5 oz packet of multi grain angel hair pasta (see notes)

2 tbsp oil ( I used coconut oil) + 1 tsp any oil
1 large red onion cut lengthwise

1 large red bell pepper deseeded and cut lengthwise into thin strips
1 large green bell pepper deseeded and cut lengthwise into thin strips
1 inch piece of ginger minced
1/2 tsp minced garlic
salt to taste
1/2 tsp chili powder (optional) (or according to taste)

For the sauce
3 tbsp smooth peanut butter
2 tbsp red thai curry paste (see notes)
3/4 cup coconut milk

Prepare pasta/ noodles as per manufacturers directions. Drain and add 1 teaspoon of oil to the noodles and mix well. This ensures that the noodles do not stick to each other.

Whisk together peanut butter, Thai curry paste and  coconut milk until smooth and keep aside.

Heat oil in a large heavy bottomed pan, add onions and saute until it turns transparent. Add minced ginger and garlic and stir a few times.

Add bell pepper strips, stir frequently until it cooks and is soft yet a little crisp.

Add red chili powder if using, salt to taste and mix well. Add the cooked pasta and mix well. Add the sauce, mix well. Adjust spices if required.
The copyright of this content belongs to Veginspirations.com

Remove and serve hot with any Thai style curry or even on its own.

Notes:
In place of angel hair pasta Thai style noodles can be used as well. Also you can use any type of angel hair pasta, I used barilla plus multi grain pasta because I really like it very much :-)

Some types of Thai sauces available in the markets have some type of fish sauces in them. So if you are a vegetarian or vegan you might want to read through the labels to make sure that the one you buy does not contain fish sauce. I use Thai kitchen brand since it is vegan.
Read more ...