Thursday, October 28, 2010

Cauliflower cabbage curry ( poriyal) and a food riddle

First let me start with this food riddle that I came across recently and found very interesting. I thought my readers might enjoy it too so I am sharing it here. Guess what this item is......

Throw out my outer
Keep my inner
Eat my outer
Throw out my inner

I am looking forward to hearing your guesses. I will be moderating comments on this post, so that everyone gets a chance to guess the correct answer. I will publish all the comments when I post the answer in my next post.....

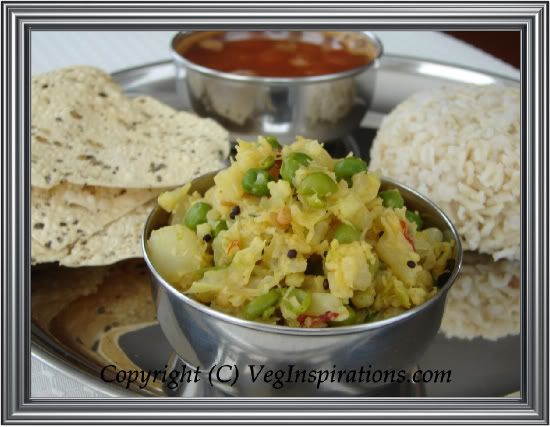
Moving on, since I already gave a brief description of poriyal earlier, I will not go into it again. This simple type of curry is something I often turn to when I am making south Indian style lunches/ dinners. In the past I have posted this carrot with mung lentil poriyal and this cauliflower potato poriyal here. My mother in law favors this combination of cabbage and cauliflower and I picked up the idea of using this combination from her. If you are looking for a quick and simple curry to go with your rasam or sambar you may want to consider this curry. It also works very well with rotis/ Indian flatbread/phulkas.  

Update: The answer to the riddle in this post can be found here

 Cauliflower cabbage curry~Poriyal

Click here for a printable view of this recipe

Ingredients and Method to make Cauliflower cabbage poriyal (curry)

1 head of cauliflower broken into florets
1/4 of large cabbage cut fine (yielded approx 3 cups)
1 heaped cup frozen peas (thawed to room temperature)
1/4 tsp turmeric powder
salt to taste
1/2 tsp red chili powder (optional)
4 to 6 tbsp grated coconut for garnish

Seasoning
1 tbsp coconut oil
1 tsp mustard seeds
1 tsp black gram lentil (udad dhal/ ulatham parappu)
pinch of asafoetida powder (hing/ perungayam)
1 dry red chili broken into small pieces

a little extra salt and turmeric powder for soaking the cauliflower florets.

In a large heavy bottomed pan fill water as required that will submerge the cauliflower florets entirely. Place on heat and allow to come to a full boil. Add 1/2 tsp salt and a pinch of turmeric powder. Add cauliflower florets and allow the water to simmer for a couple of minutes. Remove from heat and drain the water.Keep the cauliflower florets aside. The idea is to semi cook the florets just a little at this point to ensure even cooking when added with other vegetables.

In the same pan heat oil, add mustard seeds to it. When the mustard seeds splutter, add split black gram lentil(udad dhal) and stir until it turns reddish. Quickly add a pinch of asafoetida powder and broken red chili and stir a couple of times. Add turmeric powder, mix once, then add cabbage, cauliflower, green peas and mix well.
The copyright of this content belongs to Veginspirations.com

Add salt to taste, mix well and cover the pan with a lid and allow the vegetables to cook on low to medium low heat without adding any water. Keep an eye on it, if absolutely required sprinkle a few drops of water. I usually never need any additional water for this curry.

Finally when the vegetables are cooked,  add red chili powder if you plan to use it, and garnish with grated coconut. Mix well and serve hot with some plain steamed rice and some sambar or rasam.

Serves approximately 2 to 3
Read more ...

Monday, October 25, 2010

Tomato Mozzarella Panini and Cuisinart Gr-1Panini Maker Review

Panini is a type of Italian sandwich, usually made with breads like ciabatta, grilled in a sandwich press and served hot. The first panini I tried was a tomato mozarella panini at Panera bread, this panini soon became a favorite and I looked forward to it, whenever I visited Panera bread. The combined flavors of sundried tomato pesto, fresh basil and mozarella in a grilled sandwich is simply delicious.

Thanks to CSN stores I now get to make this and more varieties of paninis in my own home. I have done a review of the panini maker below and I have to admit I just love this gadget, it is such a fabulous addition to my kitchen. In the short time that I have had it, I have already tried so many different types of panini.

Since tomato mozarella panini is such a favorite I started with that one first. I tried it a few times with ciabatta bread, a couple of times with some other types of Italian bread. Instead of using fresh basil, which is a little difficult to find right now, I used a pinch of dried basil. The verdict.....this panini exceeded my expectations and I was so happy with it, every variation of it tasted very good. It is also great that it can be put together in a matter of minutes making it ideal for quick dinners or lunches. 


Tomato Mozarella Panini

Here is another view of the panini......

Tomato Mozarella Panini

Click here for a printable view of this recipe

Ingredients and Method to make Tomato Mozarella Panini
Ciabatta bread or any other Italian bread as required
Mozarella slices as required
Tomato slices as required
Sundried Tomato Pesto as required
Crushed red pepper flakes as required (optional)
pinch of dried basil (optional, see notes)
a little Extra virgin olive oil to brush on the bread

Switch on the panini maker to pre heat.
The copyright of this content belongs to Veginspirations.com

To assemble the panini, cut a ciabatta bread horizontally. Apply sundried tomato pesto to both sides of the bread, layer one side of the bread with tomato, mozarella, sprinkle a pinch of basil and a little red pepper flakes if using. Place the other bread on top.

Brush the outer sides of the bread with a little olive oil and place in  the pre heated panini maker. Close and hold down gently for a few seconds. When done, remove and serve hot with soup of choice.

I think this Minestrone soup, or this Minestrone with pesto  would go very well with this Panini.

Notes
In case you want to use fresh basil, use about 2 to 3 leaves, washed and cut into small pieces in each panini

Cuisinart GR-1 Griddler Panini and Sandwich Press Review

Finally here is the review of the Panini maker that I first referred to in this post. As I mentioned before, CSN stores is one of the largest growing online specialty retailer with over 200 stores offering a wide range of products. Whether you want a bathroom sink or some cookware, some lighting or home decor CSN stores seems to have it all.

They recently approached me to do a product review from their site.They sent over this Cuisinart Panini and Sandwich press to use and then do a review. Thanks CSN for giving me this opportunity. A panini maker has long been on my list of things to buy and the idea of making different variations of paninis in my own home is very appealing. 


Photobucket

Here is another view of the panini maker...............

Photobucket

How does this panini maker work?

It has a preset temperature and all you have to do is to plug it in, the red light comes on and it starts to heat to the preset temperature.This panini maker does not have an on/ off switch, so you need to plug it in to start the machine and pull out the plug to stop it. 

When the preset temperature is reached, the light turns green indicating the unit is ready to be used. It just takes a few minutes for the light to go from red to green.

It has non stick surface and so far, since I began to use it, clean up has been a breeze. After the unit cools down, I just wipe it with a damp kitchen tissue and follow up with a dry tissue and it is clean and ready to be stored. The panini maker also comes with a scraper, but I have never needed to use it until now.

Some favorite features of this panini maker....

The flexible floating hinge makes it easy to make paninis that are both thin or thick.

Pretty large surface, can handle more than two paninis at the same time.

When plugged in, the unit heats up fairly fast, it gives me just enough time to put together the panini. Usually when I am done assembling the panini, the units light turns green indicating that it is ready, I just place the panini and close the lid and in a few minutes, I have an evenly hot and golden brown panini ready to eat.

Has a neat cord storage at the back that allows me to wrap the cord out of sight.

Features that would have been nice to have in this panini maker................

One minor quibble with this unit is that it cannot be stored upright, so it occupies a little more space in my kitchen. It would have been nice if this panini maker could be stored upright.

The other small quibble is that it would have been nice to have an on /off switch, other than this I have really not seen any big cons to this panini maker.


Disclosure:

This is an honest product review. My review was not influenced in any manner by CSN stores or Cuisinart. In compliance with FTC rules, I disclose that this product was provided free for the purpose of a review. This was not a paid endorsement nor have I received any compensation in any form to do this review.
Read more ...

Thursday, October 21, 2010

Fruit Salad with Orange Juice dressing

Whenever I plan to make fruit salad to go with an Indian themed lunch, my first choice usually is this fruit chaat salad. Last week when I was looking for something different, I came across a lot of recipes on food sites that used orange juice as a dressing. Most of them also tended to make the dressing too sweet and sugary for my taste. I was looking for something light and fruity with no added sugar.

So I decided to use the idea of orange juice in dressing but gave it my own twist by adding a little salt, chili powder and a touch of nutmeg. The orange juice added a lovely flavor to the fruit salad and the salad turned out to be mildly sweet with the natural sweetness from the fruits with a very mild hint of spice. I loved the salad and I am looking forward to making it often :-)

Fruit Salad with Orange Juice Dressing

Click here for a printable view of this recipe

2 Red sweet apples peeled, cored and cut into small pieces
1 20 oz can of pineapple pieces (reserve the juice)
6 strawberries cut into small pieces
1/2 cup dark raisins

Dressing
1/4 cup pineapple juice reserved from the can (see notes)
1/4 cup orange juice (see notes)
1/4 tsp salt (or to taste)
1/4 tsp red chili powder (or to taste)
a pinch of nutmeg powder (optional)

In a large bowl, assemble all the fruits together and mix well.

In a small bowl, add items mentioned under dressing and mix well.
The copyright of this content belongs to Veginspirations.com

Pour the dressing over the assembled fruits and mix again. Chill in the refrigerator for an hour or so, and serve cold.

Serves approximately 2 to 3

Notes
Both the orange juice and the pineapple juice reserved from the can of pineapple pieces that I buy have no added sugar. In case you use orange and pineapple juices that have added sugar you may need to use a little more chili powder to adjust for the added sweetness, if you do not want the fruit salad to be too sweet .
Read more ...

Monday, October 18, 2010

Verkadalai Sundal ~ Savory Seasoned Snack Made With Peanuts

One of the things that terrifies me, is to find that food items I routinely buy and use in my cooking, have some problems with it and have been recalled. Yesterday I heard that some types of frozen peas and mixed vegetables have been recalled because they have glass fragments in them. How scary......I always keep some frozen peas and mixed veggies in my freezer for emergencies, luckily I did not get this brand, but if any of you want more information on this recall, check out the link here ...........

Back to the peanut sundal..............as I mentioned in this post, sundal is a type of snack from south Indian cuisine, that is simple, quick, healthy and tasty. Among the many, many varieties of sundal, peanut sundal quite easily ranks at the top of my favorite list. Probably because I love all things peanut, whether it is this type of curry with a peanut base or this type of pitla with peanuts in them, peanuts always add such an interesting taste and flavor to dishes. If you are into peanuts too, and are in the mood for an easy snack, give this sundal a try, you really cannot go wrong with this :-)

  Verkadalai Sundal ~ Savory Seasoned Snack made with peanuts | Veg Inspirations

Click here for a printable view of this recipe

Ingredients and Method to make Peanut sundal
1/2 cup raw peanuts (mungphali/verkadalai) (with skin) soaked in  sufficient water for an hour and cooked until soft
salt to taste (I needed less than 1/2 a tsp, just a tad bit more than 1/4 tsp for this quantity)
2 to 4 tbsp Fresh or frozen grated coconut (nariyal/thengai) (according to taste) (if frozen thaw to room temperature)

Seasoning
2 tsp oil (preferably coconut oil)
1/2  tsp split black gram lentil (udad dhal/ ulatham parappu)
1/2  tsp mustard seeds (rai/ kadagu)
1 Thai or Indian variety green chilies cut very fine(hara mirch/ pachai molagai)(or to taste)
4 to 5 curry leaves broken into small pieces (optional) (karipatha/ karvapillai)
pinch of asafoetida powder (hing/ perungayam)

Soak raw peanuts in sufficient water for about 30 minutes to an hour. Cook the peanuts using the pressure cooker, or on the stove top or in the microwave until soft. (see notes)

If there is any excess water, drain the peanuts, add a little salt, mix well and keep aside.

In a small pan heat oil, add mustard seeds, when the seeds begin to splutter, add black gram lentil/ udad dhal and stir a few times. When the black gram lentil begins to turn reddish, add green chilies and pinch of asafoetida. Add curry leaves if using, stir once or twice and pour the entire mixture on the cooked peanuts and mix well.
The copyright of this content belongs to Veginspirations.com

Garnish with coconut, mix well and serve hot or at room temperature as a snack.

Notes
To cook the peanuts I used the microwave. I just added the soaked peanuts along with some water to a microwave safe glass dish, placed it in the microwave and cooked 4 to 6 minutes at full powder. Stir every minute or two and add more water if the peanuts are not yet cooked and continue.

You can also add a enough water to submerge the peanuts and place in pressure cooker and cook until soft.

This recipe can easily be doubled if you need to make larger quantities. 
Read more ...

Thursday, October 14, 2010

Collard Greens Roti ~ Indian flat bread with collard greens

Since the experiment of using swiss chard in this roti and this kootu was such a success , I felt motivated to try and expand my horizons a little more and try more of the greens I see in the produce section. In fact I admit,  since the last experiment with greens, I have been looking at all the greens in the produce section with new, more appreciative eyes.

This time around I tried my hand at collard greens. Collard greens have thick, slightly bitter leaves. For more  details and pictures of collard greens, check out this wiki entry. Since the leaves are far more thicker than the other greens I have worked with in the past, I decided to cook it before adding it to the flour. How did it turn out?.......... well the rotis turned out delicious, the spices managed to counter the slight bitterness from the leaves, leaving just a hint of it in the roti. I served it with a simple sweet potato curry and managed to include two vibrant colored veggies in my diet at one go :-) 

Nov 20, 2013 : Updated the picture when I made this roti again this time with wheat flour instead of multigrain flour. Also I paired it with this mung curry :)

Collard Greens Roti~Indian flat bread with collard greens

Click here for a printable view of this recipe

2 cups Multigrain atta (can be substituted with whole wheat flour)
salt to taste (I needed approx 1 1/2 tsp)
1 tsp red chili powder (or to taste)
1/2 tsp garam masala (or any other curry powder)

1 tsp oil
3/4 tsp cumin seeds
2 1/2 cups packed finely cut collard greens.
a little extra flour for rolling the dough.
a little oil/ ghee (clarified butter) to shallow fry the rotis  (use oil for a vegan version)

In a large bowl add the first four ingredients and mix well.

In a heavy bottomed pan, heat oil, add cumin seeds. When the seeds sizzle add collard greens and stir until the greens are cooked and soft. Cool to room temperature.

Add the sauteed greens to the flour mixture and knead. Add water as required and knead until it forms a soft and non sticky dough. Cover the dough and allow it to rest for about 30 minutes.
The copyright of this content belongs to Veginspirations.com

Divide the dough into equal lemon sized balls. With the help of a little flour  roll out the dough into an even circle of desired thickness.

Heat a tawa/ flat pan/ griddle and place the rolled out dough on it, when the lower side cooks a little, flip and cook the other side. Apply a few drops of oil/ghee to the upper side of the roti and flip over and cook until brown spots appear on the roti.

Remove and serve hot with curry of choice. I served it with this sweet potato curry.

Proceed with the rest of the dough in the same manner. You can store the balance dough if any wrapped in cling film in the refrigerator for up to 2 to 3 days and use when required.
Read more ...

Monday, October 11, 2010

Vaal Beans aka Hyacinth beans in peanut gravy curry

For some time now, I have been wanting to try some type of curry with whole vaal beans aka hyacinth beans. To know more about this bean, check out this wiki entry. Usually, this microwave curry made with split vaal lentil graces my table in regular frequency. But whole vaal beans that I recently purchased had been relegated to a corner of my pantry waiting its turn.

When I came across this recipe on ISG's Daily musings, I was instantly intrigued and knew I would not be able to resist trying it out very soon. I changed a few things from her version of this dish, skipped the coconut in favor of coconut oil, skipped the tamarind in favor of dry mango powder and increased the quantity of peanuts in the gravy to give this dish a more curry like feel. We thoroughly enjoyed this curry, it was perfect with both plain steamed rice and plain phulkas (Indian flat bread) 


 Vaal beans curry ~ Hyacinth beans in peanut gravy curry

Click here for a printable view of this recipe

Ingredients and Method to make whole val beans curry
2 cups whole val beans( mochai) soaked for 6 to 8 hours
1 medium onion cut fine
2 medium tomatoes cut fine
2 tbsp grated jaggery (or to taste)
1/2 tsp dry mango ( amchur ) powder (optional see notes)
1 tbsp coconut oil
1 tsp mustard seeds
salt to taste

Dry roast and grind the following
1 1/2 tbsp coriander seeds
2 dry red chilies ( I used byadgi variety) (or to taste)
1/3 cup unsalted skinned peanuts
along with
1 inch piece of ginger and
2 Thai or Indian variety green chilies (or to taste)

Drain the soaked val beans and keep aside.

Dry roast coriander seeds, dry red chilies and unsalted skinned peanuts separately   until it changes color and is aromatic. Remove from heat, cool to room temperature and powder in a spice grinder or blender until fine. Once powdered, add ginger, green chilies, a few drops of water as required and grind again to a smooth paste. Keep this paste aside.

Heat oil in a large heavy bottomed pan, add mustard seeds to it. When the seeds begin to splutter add onions and saute until onions are transparent. Add tomatoes, stir and allow tomatoes to cook until soft and mushy.

Add to this drained val beans and some water and allow the beans to simmer and cook until soft yet not mushy. You can also pressure cook the val beans ahead of time and add just after cooking the tomatoes.
The copyright of this content belongs to Veginspirations.com

Once the val beans are cooked, add salt to taste, amchur powder, grated jaggery, ground paste and water as needed to achieve required consistency. Allow the val beans to simmer in this gravy for a few minutes for the flavors to blend.

Remove from heat and serve hot with plain steamed rice or rotis/ phulkas (Indian flat bread)


Notes:
In case you want to avoid the dry mango powder (amchur) you can increase the quantity of tomatoes to give this dish a little more tang/tartness.
Read more ...

Thursday, October 7, 2010

Instant Ragi Oat Dosai ~ Nachani dosa ~ Savory Indian Millet and oat crepes

Ragi or Finger millet has some amazing health benefits, some of which I have already mentioned in this post.
One of my favorite ways to try and incorporate this cereal grain in our diet is by using it in dosais( savory crepes) and idlis (steamed cakes). As I have already mentioned my preference for dosai over idli in the past, I will not go into that again :-)

I often make variations of dosai for weekend breakfasts or light dinners. This variation of ragi dosai, in addition to being healthy and tasty has one more thing in its favor, quick preparation. The batter for this dosai can be ready in under fifteen minutes and then it just needs to be shallow fried, making this an ideal breakfast item in my book. If you are looking for ways to include both oatmeal and ragi in your diet, this dosai may be what you are looking for.....

On an unrelated note, in the recent past, I have been on a mission to update pictures in some of my older posts.  The latest post that managed to snag my attention and get an updated picture is this sweet potato roti. Have a peek at it if you have a minute :-)


 Instant Ragi Oat Dosai ~ Nachani dosa ~ Savory Indian finger millet and oat crepes

Click here for a printable view of this recipe

Ingredients and Method for Oat Ragi Dosai
1 1/2 quick oats powdered fine
3/4 cup medium semolina (rava)
3/4 cup rice flour (chawal ka atta/ arisi maavu)
1/2 cup finger millet flour (nachani/ ragi flour)
salt to taste


Seasoning
2 tsp coconut oil (or any other flavorless oil, see notes)
4 Thai or Indian variety green chilies cut fine (or to taste)
3/4 tsp cumin seeds (jeera/jeeragam)
3/4 tsp mustard seeds (rai/kadagu)
1/8 tsp asafoetida powder (hing)

a few drops of sesame oil to shallow fry the dosai.

Dry roast the quick 1 minute oats for a minute or two. Cool to room temperature and powder fine using a spice grinder / blender.

In a large bowl, mix together oat flour, rice flour, semolina , ragi flour and salt to taste. Add water one cup at a time and mix well, making sure no lumps are formed. The batter needs to be a little thick not too runny. If in doubt err on the side of getting a thicker batter, it can be corrected more easily later by adding a little more water.


Heat oil in a small pan. Add mustard seeds, when it begins to splutter, add cumin seeds. When it begins to sizzle, add green chilies and asafoetida powder. Stir a few times and pour the entire seasoning on the batter and mix well.


Heat a griddle/ flat pan/ tawa , when it is hot, pour a ladle of batter in the center and quickly spread into a thin even circle. Pour a few drops of sesame oil around the outer circle of the dosai and a couple of drops in the center.
The copyright of this content belongs to Veginspirations.com


When the lower side is golden brown, flip over and cook the other side until it gets brown spots on it. Remove and serve hot along with chutney of choice/ sambar/ flax molaga podi (spice powder)/ Traditional molaga podi 


Proceed with the balance of the batter in the same manner. Balance of batter can be refrigerated for upto a week and used as needed.

Notes:
I used coconut oil in seasoning and found it added a light hint of coconut flavor that I enjoyed in this dosai. It can be substituted with any other oil if you do not want or like the slight hint of coconut in your dosai. 
Read more ...

Monday, October 4, 2010

Simple Sweet Potato Curry~Sakkaraivallikizhangu curry

Sweet potatoes are often categorized as a super food and are powerhouses of nutrients. For more on the health benefits of sweet potatoes read this post. Recently I came across an article that stated that we need to get some sweet potato in our diet every day if possible. Unfortunately I did not bookmark the article and cannot find it now, so I am unable to share that link.  In any case, I find that including  sweet potatoes each day in our diet somewhat of a tall order, but getting it each week seems very doable to me and is something I have consistently managed to do in the recent past.

This satisfying sweet potato curry with a minimum of spices and simple seasoning finds its way to my dinner table whenever I am in the mood for a quick and simple sweet potato curry. This curry combined with some plain or multigrain phulkas makes a wonderful simple meal that can best be described as comfort food.  Try this curry if you too are looking for a simple way to include more sweet potatoes in your diet :-)  


Simple Sweet Potato Curry~Sakkaraivallikizhangu curry

Click here for a printable view of this recipe

Ingredients and Method to make Sweet Potato curry
1 large onion cut fine
3 small to medium Tomatoes cut fine
5 large Sweet Potatoes (Meethe Aloo/Sakkaraivalikizhangu)  peeled and cut into 1/2 inch pieces (yielded approx 5 cups of cut potatoes)

1 tbsp oil
1 tsp cumin seeds
1/4 tsp turmeric powder (optional)
salt to taste
1/2 tsp red chili powder (or according to taste)

Heat oil in a large heavy bottomed pan, add cumin seeds to it. When the seeds begin to sizzle add onions and saute until transparent. Add tomatoes and stir until the tomatoes are cooked and soft.

Add turmeric powder and stir a couple of times. Add sweet potatoes, salt to taste, red chili powder and mix well.
The copyright of this content belongs to Veginspirations.com

Cover with a lid and allow the sweet potatoes to cook on low to medium low heat, stir a few times in between to ensure even cooking. Make sure to cook the sweet potatoes until soft yet it retains its shape, over cooking can turn sweet potatoes into mush.  Keeping the pan covered usually provides sufficient moisture to cook the sweet potatoes, but keep an eye on it and if required, sprinkle a few drops of water for a little moisture to cook the potatoes.

Remove from heat and serve hot as a side dish to any Indian themed menu, this curry works very well with phulkas / rotis (Indian flat bread)  too.
Read more ...