Wednesday, June 30, 2010

Mushroom in yogurt gravy curry

The last time I flipped through my Nita Mehta cookbook to make this mushroom peas curry, I came across another mushroom curry recipe that sounded interesting and I made a mental note to get to it the next time I bought mushrooms. The one ingredient that really jumped out at me when I read the recipe was the use of carom seeds/ ajwain. I have never really used so much of ajwain in a curry before, so I was both intrigued and  a little nervous by the use of it and wondered how it would taste.

The simplicity of the recipe, combined with the minimum of ingredients required and my own curiosity of how it would turn out sold me on the recipe and I decided to try it :-) I am  really glad I did, because the curry turned out delicious.For a change I did not tweak the recipe too much and more or less followed the recipe in the book. The ajwain lent the curry a very pleasant and unique flavor and the curry was perfect for phulkas/ rotis.


Photobucket

Click here for a printable view of this recipe

Ingredients and Method to make Mushroom in yogurt gravy curry
12 large button mushrooms sliced (yielded approximately 5 1/2 cups of sliced mushrooms)
2 large onions cut fine
2 tbsp oil
1 tsp carom seeds ( ajwain/ omam )
3 Indian or Thai variety green chilies cut very fine (or according to taste)
1 inch piece of ginger minced
1 1/2 tsp coriander seed powder (dhania)
3/4 tsp red chili powder
1/2 tsp garam masala
1 cup plain yogurt beaten well until smooth
salt to taste

Heat oil in a large heavy bottomed pan, add carom seeds to it . Stir for a few seconds until the seeds turn golden brown.

The copyright of this content belongs to Veginspirations.com

Add onions, green chilies and minced ginger and saute until onions turn transparent. Add mushrooms and cook on low to medium low heat stirring occasionally until soft yet firm. Add red chili powder and coriander powder and stir a few times.

Add beaten yogurt, garam masala and salt. Let this simmer on medium heat until the curry achieves required consistency.

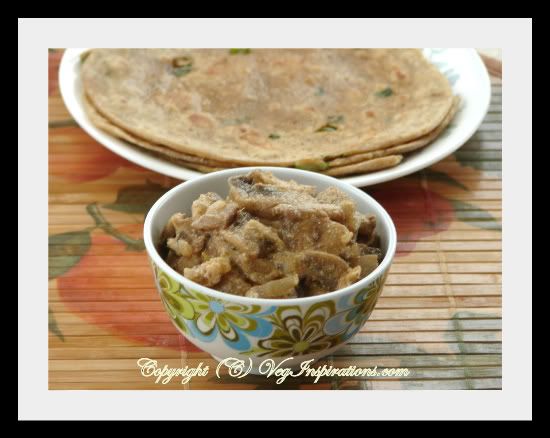
Serve hot with Rotis/ Phulkas

Serves approximately 2 to 3
Read more ...

Monday, June 28, 2010

Flax and Peanut Chutney powder

There is always at least one type of chutney powder/ spice powder in stock in my pantry. When my stock of chutney powder begins to dwindle, I make another batch quickly. I cannot imagine not having some chutney powder at home, not only because these powders are convenient and versatile but also very healthy.

In addition to the traditional use of these powders as instant chutneys, they are also a great way to add spice or flavor to just about anything. When my in laws were visiting we made sabudana khichdi and found that it was not spicy enough, so my mother in law and I decided to add a little of this chutney powder to spice it up  I was a little wary about this fusion of south Indian style chutney with Maharashtrian style khichdi,  but the khichdi ended up tasting awesome. Now I add this powder to my khichdi often:-)

If you too are looking for ways to include the flax in your family's diet than this chutney powder is a great way to do it. As you know flax has immense health benefits, I have already mentioned some when I did my post on another type of flax chutney powder, so I will not get into it again :-) The nutty flavor of flax blends in perfectly with the complementing flavors of peanut, sesame and lentils in this chutney and makes it a fabulously tasty way to incorporate flax in our diet :-)

Photobucket

Click here for a printable view of this recipe

Ingredients and Method to make Flax and Peanut Chutney Powder
1/2 cup raw unsalted peanuts (singdana/ kadalai)
1/2 cup brown sesame seeds (til/ ellu)
1/2 cup split yellow chick pea lentil (chana dhal / kadalai parappu)
1/2 cup whole black gram lentil without skin (Whole udad dhal/ muzhu ulandhu) can be substituted with the split variety too
1/2 cup flax seed meal (powdered flax seeds/ alsi/ali virai)
25 dry red chilies (or according to taste) (see notes)
1 inch piece of jaggery (optional)
salt to taste ( I used approximately 1 1/2 tsp salt)

Dry roast each of the above ingredients seperately except salt and jaggery until each of them are reddish brown and aromatic. The red chilies will turn a shade darker and flax seed meal does not change color a lot, but it emits a nutty aroma when done.

Cool all the ingredients to room temperature and powder them in a spice grinder/ blender.Powder the lentils first coarsely, then add sesame, peanut, flax and red chilies and powder in short bursts. Over powdering after the nuts are added may result in clumping. Add jaggery and give another short churn. Finally add salt and mix well.
The copyright of this content belongs to Veginspirations.com

Store this powder in an air tight container. This powder can be kept on the shelf for a few weeks, but if you think it may take you months to use it up, it is recommended to store this in the refrigerator as flax can turn rancid quickly.

Serve a small quantity of this powder mixed with a few drops of sesame oil with either dosai/ adai/ idli , or add this chutney powder to spice up your curries. Alternatively it can be mixed with yogurt to make an instant dip.

Notes
Use dry red chilies as per your taste. My current batch of red chilies are not very spicy so even with 25 of them I only got the chutney powder to be mildly spicy. If you have very spicy red chilies you may have to use far less of them, so do use your judgment on the quantity to be used.
Read more ...

Friday, June 25, 2010

Cracked Wheat and Oat Adai ~Dalia Dhal Dosa ~ Vegan Savory Indian crepes ~ With Video Clip

After my last post, a lot of you left comments and sent me emails saying that you would like to see how I made the paneer. I haven't had the chance to respond to each of you yet, so I just wanted to let you all know that I read your comments. Unfortunately the last time I made paneer, I did not take pictures, so I was not able to update that post with the recipe. I will post very soon on how I make paneer along with the pictures, so watch this space for it :-)

Moving on, Adai is a type of spicy savory crepe that originates from south Indian cuisine. One of the nicest things about adai, is the addition of three different types of lentils in it. It is a great way to get some protein in a vegetarian diet.  In the past I have played around with using quinoa and oats and barley in adai successfully.

 Cracked Wheat and Oat Adai ~ Dalia Dhal Dosa ~ Vegan Savory Indian crepes| Veg Inspirations

This time I wanted to try and make adai minus the rice and substituting it with cracked wheat and oats. For those of you who are not able to get brown rice, this is a great way to make the traditional adai a bit more healthy. This adai turned out fabulously, I was a little worried at first about not having any rice in it, but from the softness, taste and texture angles the rice was not missed at all :-)

 Oat & Broken Wheat Adai ~ Dalia dhal dosa | Veg Inspirations


Click here for a printable view of this recipe

Ingredients and Method to make Cracked wheat and oat adai
1 cup cracked wheat (Broken wheat/ dalia/ fada/ lapsi)
1 cup rolled oats
1/2 cup split yellow pigeon peas (tur dhal/ tuvaram parappu)
1/2 cup split yellow chick pea lentil (chana dhal/ kadalai parappu)
1/2 cup split black gram lentil (udad dhal/ ulatham parappu)


1 inch piece ginger
5 Thai or Indian variety green chilies (or according to taste)
7 dry red chilies (or according to taste)
salt to taste
1/2 tsp asafoetida powder (hing) (optional but recommended)

a little sesame oil (or any other flavorless oil ) to shallow fry the adai

Place the first five ingredients in a large container. Add water to it, swirl with your hand a few times and drain water. Fill with fresh water and soak all the five ingredients in sufficient water for two hours.

Grind in batches along with ginger, green chilies and red chilies to make a thick batter adding water as required. The lentils/ grains need not be ground until completely fine, they only need to ground until they feel a little like coarse, thick semolina texture.

Update: Added a pic of the batter that might give you an idea of the consistency and texture of the batter. Not a great pic I know, will try and update with a better pic soon :)


To the batter, add salt to taste, hing and mix well.
The copyright of this content belongs to Veginspirations.com

Heat a heavy flat pan/ tawa/ griddle, you know the tawa is ready when a few drops of water splashed on it makes the water dance and pearl up. Pour a ladle of this batter on the center of the tawa and quickly spread into as thin or thick circle as you like. Thinner ones are crisper than thicker ones. Pour a few drops of sesame oil around the edges of the spread out batter, when the lower side gets to a golden brownish color, flip over and cook the other side until it get a few brownish spots on it.

Update: Have added a video clip to explain this process better. Take a look.....


Remove and serve hot with a chutney podi like this flax chutney powder or molaga podi, any chutney or avial or jaggery/ honey.
Read more ...

Wednesday, June 23, 2010

Cilantro Mint Chutney, Paneer Curry and Paneer stuffed Sandwiches

Recently I mentioned how much I admire people who plan  their menus well in advance and how easy it must make their lives in terms of shopping for groceries etc. I still think that, but I learned recently that sometimes spontaneity in the kitchen  is not really that bad. Yes we sometimes find ourselves without some essential ingredient required in our menu, but sometimes that is what causes us to come up with solutions that turn out well right ? Wondering what I am talking about ?

This is what happened this past week, I wanted to make sandwiches, initially the plan was to make Bombay sandwich with cucumber, tomato, potato etc etc. But suddenly I thought it might be a better idea to make a paneer curry to stuff in the sandwich. The only problem I had no paneer on hand and I did not want to make a trip all the way to the Indian grocery just to pick up this one item.

 Paneer Stuffed Sandwich-Indian Cottage curry stuffed sandwich

So I decided to make paneer at home, this was my first try making paneer at home. I relied essentially on my cousin S's tips on making paneer and it turned out fabulously. In less time then it would have taken me to go to the store, I was able to make it at home itself, that too without very much effort. R and I could not get over just how fresh and tasty the paneer turned out, I think I might never go back to store bought paneer after this..... I would have never tried making paneer had I not found myself without it in the nth hour, so this one time my lack of menu planning turned out well for me :-)

Updated to add: Since a lot of you asked for it, I have posted about how to make paneer with stepwise pictures here.

Cilantro Mint Chutney

 Cilantro Mint Chutney

Click here for a printable view of the chutney

Ingredients and Method to make Cilantro Mint Chutney

1 handful mint leaves (about 15 large mint leaves)
1 bunch cilantro (coriander leaves/ hara dhania/ kothamalli) cut fine (yielded 2 packed cups of leaves)
1 thin sliver of ginger (adrak/inji) cut fine
3 thumb sized pieces of tamarind (imli/puli) (optional but recommended, see notes)
3 Thai or Indian variety green chilies (or according to taste) cut fine
salt to taste (I used approximately 3/4 tsp)
1/2 tsp cumin seed powder (jeera powder) (optional)
2 and 1/2 tsp fresh lemon juice
1/4 cup plain yogurt (curds/dahi/thayir)

Assemble all the ingredients except salt and lemon, place in a blender and grind until it turns to smooth paste consistency.

Add salt to taste, give it another turn in the blender. Taste test and add lemon juice and give it another turn in the blender
The copyright of this content belongs to Veginspirations.com

Remove, keep in a dry airtight container and store in the refrigerator and use in a sandwich or serve with samosas or any other snack or serve as a dip with vegetables. This chutney tastes best within a few days of making it.

Notes:
If you use tart variety of yogurt, you can skip the tamarind. Also if you are avoiding tamarind for any reason and your yogurt is not of the tart kind you can add a little more lemon juice if needed to add a touch of tartness to this chutney

Paneer Curry


Paneer Curry-Indian cottage Cheese curry

Click here for a printable view of the curry

Paneer Curry
Ingredients and Method to make Paneer curry
2 cups of crumbled paneer
1 large onion cut fine
1 large tomato cut fine (optional, see notes)
1 large bell pepper (capsicum) de seeded and into 1/2 inch pieces
1 Tbsp oil
3/4 tsp cumin seeds (jeera)
1/4 tsp turmeric powder
1/4 tsp red chili powder (or to taste)
salt to taste
2 pinches kasuri methi (dried fenugreek leaves) (optional)
1/2 tsp garam masala (or any other curry powder)
a Tbsp of water or milk if required

Heat oil in a medium heavy bottomed pan, add cumin seeds when it sizzles add onions and saute until transparent. Add tomatoes (if using) and saute until soft and mushy. Add turmeric powder, red chili powder, kasuri methi if using and garam masala, stir a couple of times.
The copyright of this content belongs to Veginspirations.com

Then add bell pepper , stir until it is cooked yet crisp. Add paneer, salt to taste and stir a little until it mixes well and absorbs some of the spices. If you need some moisture add a few tbsp of water or milk ( I did not require any but if you use store bought paneer you might need just a little for a little moisture, especially if you do not use tomatoes)

Remove from heat and use as stuffing in a sandwich or as a side dish for rotis/ phulkas

Notes:
The tomatoes are not necessary in this curry, I have made it with and without and both versions taste good. 

Sandwich

Paneer Sandwich- Indian Cottage Cheese Stuffed Sandwich


To assemble the sandwiches
Whole wheat bread as many slices as required
Cilantro mint chutney as required
Paneer curry as required
a little butter/  oil/ ghee to apply to the top of the bread

Apply chutney as required to two slices of wheat bread. Place a tbsp or two of the above curry on one slice and close with the other. Eat as is or if using a sandwich maker, apply a little oil/ butter/ ghee to the top sides of the bread and place in sandwich maker/ panini maker until it turns golden. Serve with ketchup or tomato sauce.

This entire quantity of curry yielded about 7 to 8 full sandwiches.
Read more ...

Monday, June 21, 2010

Bittergourd in lentil gravy curry with Peanuts (Pahakai Pitla Kozhambu with Kadalai)

Pahakai pitla kozhambu or bittergourd in lentil gravy curry is a traditional curry type preparation originating from south Indian cuisine. I posted one recipe of this kozhambu along with a more detailed introduction to the dish here.  Sometime back when I was on the phone with my mother in law she mentioned that her sister made her this new variation of pitla with peanuts in it that she really liked. Just the mention of peanuts was enough for me and I was completely sold on the idea.

I could almost imagine the taste of the soft and juicy peanuts in lentil gravy even before I made it. Needless to say that this variation appeared in my kitchen very quickly after that conversation. The taste of this pitla was just as I imagined, delicious and the peanuts added a very unique texture and crunch to the kozhambu. Before I go on to the recipe here is a small tip on storing bittergourd that I discovered recently, some of you may already be knowing this.....In case you end up buying a lot of bittergourd that you are not able to use up immediately, cut lengthwise, remove the seeds and slice the bittergourd into 1/4 inch pieces. Place these pieces in a freezer safe plastic bag and place the bag in a freezer, the bittergourd stays for a good long while this way.

Photobucket

Click here for a printable view of this recipe

Ingredients and Method to make Pahakai pitla with peanuts
3/4 cup split pigeon peas (tur dhal) rinsed, drained and soaked in 1 cup of water for 30 minutes

1/2 cup raw peanuts
small lime sized tamarind soaked in sufficient water to submerge it.
1 1/2 cups sliced deseeded bittergourd
salt to taste
2 to 3 tbsp grated jaggery (can be replaced with 1 to 2  tbsp sugar)

Dry roast the following until reddish and aromatic
2 tbsp split yellow chick pea lentil (chana dhal/ kadalai parappu)
2 tbsp split black gram lentil (udad dhal/ ulatham parappu)
4 tbsp coriander seeds (dhania )
4 to 5 dry red chillies (or according to taste) to be dry roasted until it turns darkish.
grind (see notes below)  all of the above along with
8 tbsp fresh or frozen grated coconut (if frozen thaw to room temperature)

Seasoning
1 tbsp oil
1 tsp mustard seeds
1/8 tsp asafoetida powder (hing)

Extract juice from tamarind and discard the pulp and seeds. Yielded me about 2 1/2 cups of tamarind juice. (For a note on how to extract tamarind read this post )

Cook the lentils until soft and keep aside. I used the pressure cooker for this, and on a plate above the container I used to cook the lentils, I spread the raw peanuts and allowed it to cook in the steam too. ( you can use the stove top or m/w to cook lentils too, for a note on different styles of cooking lentils read this post)

In case you do not use the pressure cooker to cook lentils, then cook raw peanut on a stove top adding water as required until it is soft yet firm.

Make spice paste and keep aside. (see note below)

Heat oil in a heavy bottomed pan, add mustard seeds to it, when mustard seeds start to splutter add asafoetida powder, give it a stir.

Then quickly add tamarind juice, cut pieces of bittergourd and salt to taste and allow to cook until the raw smell of tamarind disappears.
The copyright of this content belongs to Veginspirations.comAdd cooked peanuts and allow it to simmer in this tamarind juice for a few minutes.

Mash the cooked lentils and add to the tamarind juice. Add spice paste to the tamarind juice too. Add jaggery to this mixture and  allow this mixture to simmer for a few minutes for the flavors to blend.

Serve hot on a bed of plain steamed rice with chips/ papad/ vadam on the side.

Notes
While grinding the spice mixture, first cool all the dry roasted lentil and red chilies to room temperature, then place in spice grinder and grind the dry ingredients first until they are powdered fine. Then add grated coconut, grind once, then add water as required and grind again until it forms a smooth paste.

Suggested variation:
In case you do not want to use bittergourd, you can substitute with small Indian eggplants cut into 1/2 inch pieces

I came across this hilarious piece of humor that I have posted here , check it out if you have a minute.
Read more ...

Friday, June 18, 2010

Potato Masala curry and some humor :)

This cute little bit of humor that I came across recently made me smile, I thought my readers may enjoy it too so I am sharing it here..........
---------------------------------------------------------------------------------------------------------------
One morning as Professor Jones was leaving for the university his wife told her absent-minded husband, "Don't forget we are moving today. If you come to this house this afternoon it will be empty."
Predictably, he didn't remember until he found the house vacated that afternoon. He mumbled to himself, "And where was it we were moving to?"
He went out in front of the house and asked a little girl, "Did you see a moving van here today, little girl?"
"Yes," she replied.
"Would you know which way it went?"
She looked up at him and said, "Yes, Daddy, I'll show you." --------------------------------------------------------------------------------------------------------------

Moving on, as I mentioned in my last post , puri with potato masala curry or masaal as it is called in our home is a classic and popular combination. If you have already had this combination you know why it is so popular, and if you haven't you really should try it at least once. Digging into delicious potato masala curry with a small piece of freshly made puri and popping it into your mouth is just such a treat :-) This combination is surprisingly popular as a breakfast item too, but having puris first thing in the morning is just not my cup of tea and I prefer this combination for lunch/ dinner. In any case,  no matter what time you have it, this classic combination never fails to please.....

 Potato Masala Curry ~ With Stepwise pictures

Click here for a printable view of this recipe

Ingredients and Method to make Potato masala curry
5 medium large potatoes cooked until soft ( I pressure cooked mine )(batata/urilakizhangu)
2 medium onions cut fine (Pyaaz/Venghayam)
salt to taste (namak/uppu)
2 heaped tsp chick pea flour (besan/kadalai maavu) mixed with 1/2 cup of water
additional water as required to achieve required consistency
handful cilantro (coriander leaves/hara dhania)  cut fine for garnish
1 1/2 Tbsp lemon juice (or to taste) (limbu/ elummichampazham)

2 tbsp oil
1 tsp mustard seeds (rai/kadagu)
1 1/2 tsp split yellow chick pea lentil (chana dhal/ kadalai parappu)
1 sprig curry leaves (about 6 to 8 leaves) cut into small pieces (can be substituted with 2 tsp dried curry leaves)
1/8 tsp asafoetida powder (hing/ perungayam)
1 inch piece of ginger minced fine
1/4 tsp turmeric powder
4 Thai or Indian variety green chilies (or according to taste)

After cooling the cooked potatoes, peel and mash them roughly such that no piece is larger than an inch or an inch and a half.

Mix chick pea flour (besan) in half cup of water, making sure there are no lumps and keep this mixture aside.

In a large heavy bottomed pan, heat oil add mustard seeds and chana dhal. When the mustard seeds begin to splutter and chana dhal begins to turn reddish, add green chilies, curry leaves, asafoetida, minced ginger and stir for a few seconds. The quickly add onions and saute until onions turn transparent.


The copyright of this content belongs to Veginspirations.com

Add turmeric powder, mix well and then add the roughly mashed potatoes and mix again.

Add salt to taste, followed by the chickpea flour in water mixture and allow it to cook on a low heat for a few minutes stirring frequently. This step is important because the chick pea flour loses its raw smell when cooked this way otherwise the raw smell of chick pea flour can over power the dish.


Add more water if required to achieve required consistency. (This curry is served sometimes in a more watery/thinner consistency than my picture suggests, add water to the extent you want, also remember that when it cools it tends to thicken a little and the curry feels more moist when served hot)

Finally just before serving, add lemon juice and garnish with cilantro. Mix well and serve along with puris


This curry can also be used as a stuffing to make Masala dosas or for some fusion use this curry as a filling for this sandwich
Read more ...

Wednesday, June 16, 2010

Puri ~ Puffed Fried Indian Whole Wheat Bread ~ With Stepwise Pictures and a video clip.

Puri or Indian puffed fried bread, is universally popular.  These simple and delicious golden beauties appeared often in our home in my childhood and I remember enjoying them with a variety of different condiments, aam ras, shrikhand and even jam. Surprisingly the famous combination of puri with potato masala curry was never that attractive to me when I was younger....Now of course I appreciate this combination quite a lot.

Unfortunately neither puris nor potato masala curry appear very often in our home these days. Sigh :-(    this is one of the downsides to watching our diet all the time, you cannot indulge in some goodies often. But you can indulge in goodies occasionally, and that is just what we did. After a long gap of more than two years I finally made puris again and we enjoyed this rare treat along with potato masala curry ( I will post my version of this curry soon) 

Puri ~ Poori ~ Puffed fried Indian whole wheat bread ~ With Stepwise pictures and a video clip


Click here for a printable view of this recipe

Ingredients and Method to make Puris

2 cups whole wheat flour (atta)
1 tsp salt (or according to taste)
3/4 cup water + 2 additional tbsp water only if required
oil to deep fry

In a large bowl, add whole wheat flour and salt and mix well.


Add water slowly, kneading to form a slightly stiff non sticky and smooth dough. Unlike for rotis the dough for puris need not be very soft as it will absorb more oil that way.


Keep the bowl with the kneaded dough covered and let the dough rest for about 30 minutes.

Heat oil sufficient to deep fry the puris in a wok/kadhai/ or medium sized pan on medium high heat

Divide the dough into small lime/ large gooseberry sized balls. With the help of very little flour (only if required)  roll out the dough evenly into a small circle. Make sure that the dough is not rolled out too thin/ transparent since it will not puff up well in that case. I have seen some people use oil instead of flour to roll out the dough, you can use oil too. Usually since the dough is not sticky I have never had to use either oil or flour to roll out the dough.
 The copyright of this content belongs to Veginspirations.com


When the oil is hot, lower heat to medium and slowly slide the rolled out dough into it. Do not press the puris from the top, allow it to puff up on its own. When the puris are fully puffed and the lower side is brownish/ reddish brown, flip over and let the other side cook for a few seconds, remove from heat. Continue to do this  until all the dough is used up.


Serve puris hot with potato curry (I will post my version of this curry tomorrow) or with shrikhand (an Indian sweet made with strained yogurt)  or aam ras (mango juice) or chana masala or vegetable kurma

Updated: I have attached a small video clip of the process of frying the puris....check out the video below

Updated to add: My version of potato masala curry can be found here 
Read more ...

Monday, June 14, 2010

Simple Sprouted Mung Bean Dry Curry and a beautiful bloom :)

For the first time this year, at the beginning of spring, I planted a couple of dahlia bulbs. It took a good long while for the first shoots to come out of the soil and it seemed like it took even longer for the first bud to show up on the plant. Finally last week, after what seemed like an endless wait the plant got its first bloom. And I have to admit that it seems well worth the wait when the result looks like this..........

  photo d7df6161-9ffe-4150-bcfe-c29a10b54c74_zps7ebb83c4.jpg


Moving on to the reason for this post, a simple and satisfying sprouted mung bean curry. On my last visit to her home, my friend V made a salad with sprouted mung beans that I loved... Inspired by that salad, I made this curry that is just ridiculously simple to make. In addition because of the sprouted mung beans this curry packs a nutritional punch too. If you are in the mood for a simple, delicious curry to go with your phulkas or rotis or even just as a salad this might be the curry for you :-)

 photo 5bc7f480-725f-47e3-b42e-e985c8eb0675_zps9c59d87f.jpg


Click here for a printable view of this recipe

Ingredients and Method to make mung sprout dry curry
1 large onion cut fine
2 medium tomatoes cut fine
4 1/2 cups of mung bean sprouts ( to learn how to make mung bean sprouts check this post )
2 tbsp oil
1 tsp mustard seeds
1 tsp cumin seeds
1/4 tsp asafoetida powder (hing)
1/4 tsp turmeric powder
3 Thai or Indian variety green chilies cut fine(or according to taste)
1 inch piece of ginger minced
salt to taste
water as required to cook the beans

Heat oil in a large heavy bottomed pan, add mustard seeds to it. When the mustard seeds start to splutter add cumin seeds, quickly followed by green chilies, turmeric powder, asafoetida powder and give it a quick stir.

Add onions and saute until it is transparent, add minced ginger and stir a few times. Add tomatoes and saute until it is cooked and it turns soft and mushy.
The copyright of this content belongs to Veginspirations.com

Add mung bean sprouts and a little bit of water and allow the sprouts to cook. Keep the pan closed with a lid to speed the process of cooking. When the sprouts are cooked, soft but not mushy, add salt to taste. (Add salt at the end because adding it earlier will not allow the mung beans to cook properly)

Allow the curry to remain on low to medium low heat for another couple of minutes for the flavors to mingle.

Remove and serve hot with rotis or as a side dish to any Indian themed lunch /dinner or even as a salad.

This sprouted mung bean curry is off to the MLLA-24 event being hosted by Diana originally started by Susan
Read more ...

Friday, June 11, 2010

Mango Frozen Yogurt

Imagine this, it is a hot and humid day with temperature in the nineties. There is not even a hint of breeze and the only sounds you hear are of some birds chirping at a distance. You are in a park with two hours of time on your hands and not a worry in the world.  You are seated in a shady spot, with your favorite book within reach and in your hand you have a delicious mango flavored frozen yogurt that you are slowly savoring, letting it melt on your tongue to enjoy it fully.  Ahh bliss isn't it ? Just imagining this scene makes me feel so nice.

Now this is how it actually played out for me, hot and humid day, check, no breeze, check, mango yogurt, check. There was no park, no book and no worry free couple of hours but hey three out of eight is not too bad. Especially if one of those three items is mango yogurt, it definitely compensates for the lack of a book, park and a couple of worry free hours :-)

Mangoes are in season right now and I could not resist making a batch of mango flavored frozen yogurt with them. This way I was also able to give my barely used ice cream maker a workout too. This is the perfect weekend indulgence, try it if you are in the mood for a quick and delicious frozen treat, your taste buds and your family will thank you for it :-)

Mango Frozen Yogurt photo 094bf6bf-f488-4598-a3b5-a20e3cfe4a97_zpsad50ac51.jpg

Click here for a printable view of this recipe

Ingredients and Method to make Mango Frozen Yogurt

3 medium mangoes skinned, de seeded and cut into 1 inch pieces (yielded 3 cups of cut pieces)
3/4 cup light cream
2 cup Greek style plain yogurt (if you do not have greek yogurt, then you can make your own, instructions below)
approximately 3/4 cup sugar (adjust according to sweetness of mangoes)

Puree the mango pieces until it is smooth.

Add cream and give it a churn in the blender too.

In a large bowl, mix together the cream+ mango puree, greek style yogurt and sugar. 
The copyright of this content belongs to Veginspirations.com

Chill in the refrigerator for an hour or two. Place in the ice cream maker and churn to make frozen yogurt as per your ice cream makers instructions. I churned in two batches for this quantity and each batch took me twenty to twenty five minutes of churning for it to set.

If you do not have an ice cream maker than place the mixture in the freezer. When it begins to freeze around the edges, remove and stir it vigorously with a whisk or spatula. Return to freezer and continue this process every 30 or so minutes, stirring at least five to six times. Allow it to freeze and serve. If you want more details on this process check out this post

Serve immediately, freeze the balance and use as required.

Notes
If you do not get greek yogurt in your area, then you can make your own. Greek yogurt is just regular yogurt that has been strained. Line a colander with a muslin cloth, place regular yogurt in it and let it drain.(just as you would for making shrikhand if you have done that in the past)  For some more details and  pictures check out this post
                                                    

This kid friendly yogurt is off to Kids Delight- Coloring your Kids delight event being hosted by Srivalli
Read more ...

Wednesday, June 9, 2010

Miloni Tahari (Mixed Vegetable with Rice) in a rice cooker

Have you met some one who plans their lunch/ dinner menu, days or sometimes even weeks in advance. I really admire such people, it must make life easier in respect to shopping for groceries and such..... I, on the other hand, have never managed to plan my lunch/dinner menu even a few days in advance, let alone weeks. Sometimes I do plan my dinner menu a day or so in advance but that is it, I have never yet planned my menu a week or weeks in advance except if it was for a party or I was entertaining friends or something like that...

Most days this is not a problem, I manage to come up with something that works for us. Sometimes though, I find myself staring at the veggie tray looking for inspiration. As if just by looking at the vegetables, some new recipe is going to somehow telegraph itself from the vegetable to my brain :-) One such day when I was looking for ideas on what to make for Sunday lunch and my brain was refusing to come up with ideas on its own, I turned to a cook book. More precisely Nita Mehta's cookbook on Indian vegetarian cooking. I found two items there that sounded interesting and which I thought would work well together.

The first one was this Mushroom peas curry that I posted sometime back. The second was this rice dish with the name Miloni Tahari. I have never heard of this rice dish before and frankly I have no idea what the two words mean, if any of you know the meaning do share. Anyway the recipe itself sounded very interesting and I decided to try it.  I tweaked the recipe slightly, used brown basmati instead of white, changed the spices a little and made it in the rice cooker instead of the stove top. The result was a very flavorful and delicious rice dish that was a great fit with the curry I mentioned earlier.


Photobucket

Here is another closer view of the mixed vegetable rice.......

Photobucket

Click here for a printable view of this recipe

Ingredients and Method to make Miloni tahari

2 cups brown basmati rinsed and soaked in 3 cups of water for 30 minutes (see notes)
1 large carrot cut into 1/2 inch pieces
1/4 head of cauliflower broken into florets
2 med to med large potatoes peeled and cut into 1/2 inch pieces
1 cup fresh or frozen peas (if frozen thaw to room temperature)

2 tbsp oil
3 cloves
1 inch cinnamon stick
3 small bay leaves
1 1/2 tsp garam masala
1 tsp lemon juice
salt to taste ( I used approximately 1 1/2 tsp for this quantity)

Grind together
1 large onion
3 medium tomatoes
1 tsp minced garlic
1 1/2 inch piece of ginger

Grind onion, tomatoes ginger and garlic in a blender or spice grinder to a smooth paste adding only as much water as is required to move the blades. Keep the paste aside.

Heat oil in a medium sized heavy bottomed pan, add the onion tomato paste and saute until it is dry and the onion loses its raw smell.

Add cloves and cinnamon stick and stir a few times.Add vegetables and saute for approximately five minutes or until all the vegetables are semi cooked.

Add garam masala,bay leaves, salt to taste and stir a couple of minutes.

Add these vegetables to the container that goes into the rice cooker. Add the soaked rice with water to the same container. Add lemon juice, mix everything well.
The copyright of this content belongs to Veginspirations.com

Then set the rice cooker to either brown rice setting or white rice setting (depending on which rice you use to make this) and forget about it until done :-)

Just before serving, gently fluff up the rice and mix the vegetables if any that are settled at the bottom and serve hot with raita/ curry of choice.


Serves approximately 2 to3

I served this with raita and mushroom peas curry but this rice can be served like pulao with just some raita too.

Notes
You can substitute brown basmati with white basmati too, just follow the same steps as brown basmati. You may need to reduce the quantity of water by quarter to half cup when using white rice since it does not need as much water as brown rice.

Here is the latest bit of humor that had me in splits, check it out if you have a minute.........
Read more ...

Monday, June 7, 2010

Mixed Fruit Jam ~ With Stepwise Pictures

Among various jam flavors, mixed fruit jam has always been one of my favorites. I remember even in my school days if we ever bought jam from the stores, our default selection always was Kissan (an Indian brand) Mixed fruit jam. We would vary our jam choice very rarely. So it is somewhat of a surprise to me that I have never tried making this jam earlier.

 Mixed Fruit Jam

Anyway, now that summer is here, or at least it feels like summer with the weather consistently in the mid nineties, I have been enjoying the wider variety of fruits that have begun showing up in the produce section. But as I sometimes do, especially with fruits,  I ended up with a little too much and afraid that the fruits would spoil, I was planning to make a fruit salad with it. In the last minute I changed my mind and decided to make mixed fruit jam with it, and I am so glad I did.... This mixed fruit jam turned out to be just perfect, and tasted fabulous. I loved the flavor from the fruit blend and I think I am never going to be able to go back to store bought mixed fruit jam after this....


Mixed Fruit Jam ~ Without added pectin ~ With Stepwise pictures


Click here for a printable view of this recipe

Ingredients and Method to make Mixed Fruit Jam
1 large ripe banana
2 1/2 cup red seedless grapes
10 to 12 large strawberries cut into little pieces yielded 1 cup of cut strawberry pieces
1 large apple (peeled , de-seeded and cut pieces) yielded about 1 1/2 cups of cut pieces

3 1/2 cups of sugar
3 tbsp lemon juice

Additional 10 to 12 large strawberries cut into little pieces need not be pureed (optional see below for explanantion)


Puree all the fruits in batches in a blender . I got a total of 4 1/2 cups of puree. I kept some strawberries without pureeing so that I could feel some fruit bits in my jam, if you do not like it that way, then puree all the fruits.


In a large heavy bottomed pan, mix together the fruit puree, sugar and heat on medium heat. Bring to a boil, lower heat to medium low, add lemon juice and keep stirring allowing it to cook until it thickens.


You know when the jam is ready, if you lift the spatula and allow the jam to pour and it flows together and not in little drops

Alternatively, pour a few drops on a plate, if it spreads easily, then the jam is not ready. When you pour a few drops and it stays firm without moving, and has a jam like consistency, the jam is ready.
The copyright of this content belongs to Veginspirations.com


Remove from heat, cool slightly and pour into glass jars. This quantity yielded me enough jam to fill 2, 16oz jam containers

Refrigerate after it cools to room temperature and use as required

Notes
For this quantity I did not sterilize my bottle, since I was making a very small batch. In case you plan to make lot of jam, then it is suggested to sterilize your glass jar before you fill it with jam, click here to know how to sterilize your glass jars

In case you have a minute and are interested in humor, I have posted the latest bit of humor I came across here

Reader Feedback on this recipe through email/ social media :

Reshma says " .......... i tried ur mixed fruit jam recipe, it turned out perfect thanks a lot for the recipe
as this is my first attempt in jam making"

Lataji says " ................. The Mixed Fruit jam beats any branded one hands down:) I have been unable to stop dipping a finger and bringing out some to taste, into the tiny jar that have stored it in."

Thanks so much for the feedback :)
Read more ...

Friday, June 4, 2010

Instant Quinoa Rava Dosai

For quite a while now, I have been using quinoa in making dosai (Indian savory crepes) and I have enjoyed it every single time. In the past I paired quinoa with ragi in this dosai, quinoa with brown rice in this uthappam (a savory pancake), quinoa with lentils in this adai and finally quinoa with cracked wheat in this crispy style dosai
Since quinoa has a slight nutty taste it works very well in dosais.

But all of these dosai's require grinding to make the batter and I thought it would be nice to try a quinoa dosai that is quicker to make. I wanted to make something on the lines of rava dosai because both of us like rava dosai a lot. I dry roasted and powdered the quinoa since I did not have quinoa flour on hand, but even with that getting the batter ready took me under fifteen minutes.And the best thing is, between the flax and quinoa this in one nutrition packed tasty dosai, making it ideal  for all times of day, whether breakfast, or tiffin or even light dinners. 


Photobucket

Click here for a printable view of this recipe

Ingredients and Method to make Quinoa Rava Dosai

1 cup quinoa dry roasted until reddish, cooled and ground to semolina flour consistency/fine rava consistency (see notes)
1/2 cup semolina (medium rava)
1 cup rice flour
4 tbsp flax seed meal (powdered flax seeds/ alsi/ ali virai)
1 1/2 tsp salt (or to taste)
Approximately 4 1/4 cup of water

Seasoning (see notes)
2 tsp oil
3/4 tsp mustard seeds
3/4 tsp cumin seeds
4 green chilies cut fine (or to taste)
1 tsp dried curry leaves (optional)
1/8 tsp asafoetida powder (hing/ perungayam)

a few drops of sesame seed oil to shallow fry/cook the dosai

In a large dry container, mix the first five ingredients well.

Then add water 1 cup at a time slowly mixing it in to form a batter. The batter should be kind of runny, not very thick. It should be a bit thicker than milk (just like rava dosai batter if you have made the instant kind) .If in doubt err on the side of making a thicker batter and you can always add more water to make it thinner when making the crepes/dosais.   Keep this batter aside.
The copyright of this content belongs to Veginspirations.com


Heat oil in a small pan, add mustard seeds to it, when the seeds start to splutter add cumin seeds. When cumin seeds begin to sizzle a bit, quickly add green chilies, asafoetida powder, curry leaves. Stir once or twice and pour the entire seasoning on the batter and mix well.


Heat a heavy griddle/ tawa/ flat pan, pour a ladle of batter in a large wide circle, the batter will immediately spread to the center and form a lacy crepe with wholes in it. Pour a few drops of oil on the side facing up.
Lower heat and allow to cook for a bit, until the lower side is brown. Flip over and cook the other side until it has brown spots.

Remove and serve hot with molaga podi, or sambar or any chutney of choice.
Refrigerate the balance of the batter and use within a few days. In case you refrigerate and find that the batter is a little thicker when you make it next, add a little water to thin it out a little.

Yield will depend on the size of each crepe

Notes
In case you want to use store bought quinoa flour, you can do that too. Just lightly dry roast the flour until it gives out an aroma and use it in the recipe
The seasoning imparts a great bit of flavor to this recipe, so it is recommended not to skip it.
Read more ...