Showing posts with label Low fat snacks. Show all posts

Monday, June 15, 2015

Egg Free Blueberry wheat muffins

These past couple of weeks, the weather in our neck of the woods has been hot. Sometimes it is so hot that I fondly look forward to fall and cooler weather. Yeah, I am not much of a summer person, sweltering heat is not one of my favorite things. But there is one thing about this time of the year that I really enjoy, the sheer variety of fruits that are available right now. Between peaches, cherries, blueberries and mangoes among other things, I can never decide on one that I favor more, so I end up picking up quite a few kinds of fruits each time.

And since I always seem to have a nice variety of fruits on hand and it has been a long time since I baked anything fun, I thought it would be nice if I could bake some fruity kind of muffin. After a little thought I decided on blueberry muffins. This is quite easily one of the easiest muffins I have ever made. The prep time for it took hardly a few minutes, while the oven was pre heating I mixed the ingredients and I was good to go. The end result was soft, tender muffins bursting with delicious blueberries in each bite.  Definitely a keeper, I plan to make this again..... and soon :) 


Click here for a printable view of this recipe

Ingredients and method to make egg free blueberry wheat muffins (Recipe adapted from this one)
3/4 cup whole wheat flour (atta)
3/4 cup unbleached all purpose flour (maida) 
2 tsp baking powder (I use aluminum free baking powder)
1/2 tsp salt
1/2 cup sugar (see notes)  + 1 Tbsp turbinado sugar (optional, see notes)
1 cup fresh blueberries (rinsed and patted dry)
1 cup milk (use non diary milk for vegan version)
1/4 cup oil

Pre heat oven @ 400 deg F (approx 200 deg C) Line a muffin tray with paper or grease the muffin tray and keep aside.
 
In a large bowl, add whole wheat flour, all purpose flour, salt, baking powder, sugar and mix well.


Add milk and oil and mix again.


Add in fresh blueberries and mix gently. Spoon the mixture into pre lined muffin tray until each of them are 2/3 of the way full.  Sprinkle with a little sugar on top of the muffins.


Place tray in oven and bake for 20 to 23 minutes, or until toothpick inserted in the center comes out clean.


Remove, cool a little and enjoy. This quantity yielded 11 standard size muffins.

Notes:
If you have granular sugar, powder the sugar before using in recipe. With this quantity of sugar the muffins turned out mildly sweet, if you like your muffins with a pronounced sweetness, increase the quantity of sugar to 3/4 cup or to taste. I sprinkled a little turbinado sugar on top just for a little crunchiness and sweetness, you can skip this if you do not want it.

If you are looking egg free muffins, here are a few more


Mocha Choco Chip Muffins

Apple Wheat Muffins

Apple Banana Choco Chip Muffin


Read more ...

Wednesday, March 5, 2014

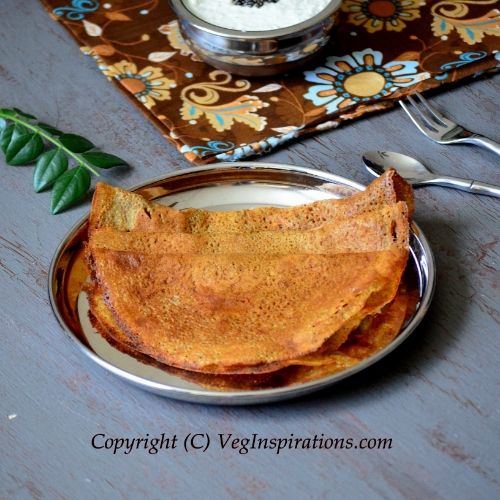
Bajra Dosa~Kambu Dosai~Savory Pearl Millet Indian crepes

Pearl millet/ Bajra is a highly nutritious, gluten free grain. It is said to be an excellent source of protein, fiber and is rich in minerals like phosphorous and iron. It is also beneficial to lowering cholesterol and reducing the risk of cancer. One of my resolutions this year is to try and include millets much more often in our diet. I do use finger millet/ragi/nachni much more often, but pearl millet has not been something I have used very often.

The first thing I tried with millets was this dosai and it was an instant winner in my book. It does not taste vastly different from the traditional dosai and yet has the added nutritional benefits of bajra. Since the first time I made this, I have made this dosai many, many times. Sometimes with brown rice, sometimes with white and sometimes a little of both. It works well in all of these variations. Since the batter can be made ahead, I love this for weekend breakfast, its quick and easy and yet provides a great start to the day :)


Click here for a printable view of this recipe

Ingredients and Method to make Kambu dosai
1 cup hulled pearl millet (bajra/kambu)
1 cup raw rice (chawal/arisi) (see notes)
1/2 cup split black gram lentil (udad dhal/ ulatham parappu)
salt to taste
a little sesame oil to shallow fry the dosai

In a large bowl, add millet, rice and lentils and mix well. Add water to this, swirl with hand and drain. Do this a couple of times. Fill with sufficient water to submerge the grains and soak for about 4 to 5 hours.


Drain and grind the grains in batches with water as required to a smooth batter.The batter should be of pouring consistency but not too thin. If in doubt err on the side of a thicker batter, you can always add more water later to achieve required consistency. Pour this batter in a large bowl that is large enough to allow the batter to ferment, when it ferments the batter doubles in size. Add a pinch of salt, mix well and keep in a warm place for about 8 to 10 hours.


I usually keep it in my oven with the oven light on, since we have such cold temperatures here. Sometimes I set the oven @ 175 deg F, switch it off, then switch on the oven light and keep the batter in, depending on how cold it is here. If you live in a warm place, you can avoid all this fuss and just cover the batter and wait for it to ferment :)

After it has fermented, add salt to taste, mix well. 

When you are ready to make the dosai, heat a tawa/ flat pan/ griddle. Add water if required to achieve required consistency.  The batter should not be runny or watery but slightly thick pouring consistency.


When the tawa is hot, pour a little batter in the center and quickly spread into a thin circle. Add a few drops of oil around the circumference of the dosa. When the lower side is golden brown, flip over and cook until the other side has light golden brown spots.


Here is a video clip of the process, it is not of this dosai, but something similar, just to give you an idea of the process of making the dosai......


Remove and serve hot with chutney of choice, sambar or with some kind of masala curry. This time I served this dosai with tomato chutney (will post the recipe here soon) and a carrot potato masala curry (will post the recipe for that too)

Balance of batter can be refrigerated and used within the next 2 to 3 days for maximum freshness.

Notes:
This dosai turns out fine with white raw rice/ brown rice or half white and half brown too. The batter with brown rice is slightly more creamier, this time when I took the pics I used half white, half brown, hence the creamier color of the batter.


Read more ...

Wednesday, October 16, 2013

Bread Besan Toast- Vegan Savory French Toast

Trying to come up with healthy snacks that are tasty and inviting and can be rustled up in a few minutes can be somewhat of a tall order. But here is a snack that fits the bill perfectly. I think of bread besan toast as an Indian cousin to the savory French toast, only this one is eggfree and vegan to boot and as a bonus is mostly low fat and healthy too, of course only if you use wheat bread or multi grain bread to make it as I do :) This is one of those snacks that seems to have universal appeal,  and regardless of age everyone seems to enjoy this snack quite a lot. 

Bread Besan Toast ~ Vegan Savory French Toast

I love how quickly and effortlessly this snack can be put together and with regular pantry items too,  meaning it does not require much time to plan ahead for it, or a run to the grocery store to stock up on specific items to make it. If you are looking for an easy peasy, quick snack that's kid friendly too, give this toast a try and as always do let me know what you think about it, or better yet, do send in your pictures, I would love to see how it worked out for all of you :)

Bread besan toast ~ Vegan Savory French Toast

Click here for a printable view of this recipe

Ingredients and Method to make Bread Besan Toast
3/4 cup chick pea flour (gram flour/ besan/ kadalai maavu)
1/4 cup rice flour (chawal ka atta/ arisi maavu)
salt to taste ( I used approx 1 and 1/4 tsp salt)
1/2 tsp red chili powder (or to taste)
1/4 tsp roasted cumin powder (optional or to taste)
handful cilantro (coriander leaves/ kothamalli ) cut very fine
1/2 of a large onion or 1 small onion cut very fine
1 small bell pepper (capsicum/ simla mirch/ koda molagai) de seeded and cut very fine
8 to 9 slices of bread (see notes)
a few drops of oil to shallow fry the toast

In a large shallow bowl/ dish, add all the dry ingredients (the two kinds of flours + the spices) and mix well.

Add water, a little at a time and mix to create a batter making sure there are no lumps formed. The batter should be thin/ runny, a tad bit like butter milk consistency. Add onions, bell pepper and chopped cilantro and mix well.
The copyright of this content belongs to Veginspirations.com

Heat a non stick flat pan/ griddle/ tawa on medium heat. Dip one slice of bread in the batter and flip it so that both sides are nicely coated with the batter. Remove gently and place on the tawa/ griddle and add a few drops of oil around the bread. Cook until the lower side turns a nice golden, then flip over and cook the other side until it has a few golden brown spots.

Remove from heat and serve hot with some ketchup on the side, or some cilantro chutney or even just by itself. Great as a snack/ tiffin/ breakfast.

Notes:
I use wheat bread to make this snack, but I have also used multi grain bread and it tastes good that way too. Basically any bread that you have should work for this snack. Also the number of slices of bread required for this quantity of gravy would vary slightly depending on the size and thickness of slices used :)

Read more ...

Tuesday, August 27, 2013

Quick Oats Upma

Ever since I posted this upma with steel cut oats,  I have had a number of readers requesting me to make a version of oats upma with quick oats, since steel cut oats is not available everywhere. Upma as I mentioned in this post is a savory Indian snack that is most commonly made with semolina. This is usually served at breakfast or as a light dinner.  A few weeks back I finally got a chance to try making upma with quick oats. I was a bit concerned that quick oats would become either slimy or mushy, but I was pleasantly surprised to see how perfectly it turned out the first time itself.

Since then I have made this a few times and I love how consistently this upma turns out to be both easy and tasty. It doesn't take much time to put together making this my fave choice for weeknight dinners when I do not want to spend too much time in the kitchen, yet want something nutritious. Whether this upma is served at breakfast or dinner or even in a lunch box, this is an easy and convenient way to include some nutrition and fiber into our diet:)

Edited to add : Feeling so happy and honored that this recipe got published in Shape magazine in their healthy breakfast category. Here is a link to the article....
http://www.shape.com/healthy-eating/healthy-recipes/quick-oats-upma

Quick Oats Upma-Savory Indian breakfast with quick oats and vegetables

Click here for a printable view of this recipe

Ingredients and Method to make Quick oats upma.
2 cups quick cooking oats
2 medium sized onions cut fine
2 medium carrots cut into small pieces or grated
1/2 cup of small pieces of mixed bell peppers or green bell peppers (capsicum/simla mirch/ koda molagai )
3 Thai or Indian variety green chilies cut fine (or to taste)
2 tsp oil + 1 tbsp oil
1 tsp cumin seeds (jeera/ jeeragam)
salt to taste
1 and 1/2 cups of water
1 tsp lemon juice

In a heavy bottomed pan, roast quick cooking oats in 2 tsp of oil on low to medium low heat until the oats is slightly reddish. Remove from heat and keep the roasted oats aside.

In the same pan, heat balance of oil. Add cumin seeds to it, when the seeds sizzle add green chilies and stir a few times. Add onions and saute until onions turn transparent.

Add grated carrots/ carrot pieces and mixed bell peppers and sprinkle a little water and allow to cook on low to medium low heat, stirring a few times in between to ensure even cooking.

When the veggies are cooked add 1 and 1/2 cups of water and salt to taste and allow the water to come to a boil.
The copyright of this content belongs to Veginspirations.com

When the water boils, add the roasted oats, keep the heat at low to medium low and keep stirring until the oats cook and turn soft and absorbs the water. Remove from heat and keep covered with a lid for a few minutes.

Garnish with lemon juice, mix well and serve hot.

Serves approx 2 to 3

If you are looking for recipes with quick oats, here are a few more


No Bake Chocolate Oatmeal Bar

Instant Low fat Paniyaram

Instant Multigrain dosa


Read more ...

Wednesday, July 17, 2013

Carrot Raisin Oat Bran Muffins (Egg Free and Butter free)

Carrot cakes are my favorite kind of cake, and for a while now I have been wanting to make a carrot cake. I have some recipes that I have book marked and some ideas I want to try, yet somehow making the carrot cake seems to never quite happen. This week when I decided to make muffins with oat bran,  I decided to add some carrots and raisins to the muffins. I thought since I am not getting the chance and time to make the cake, and I was anyway planning to make some healthy breakfast kind of muffins, I might as well incorporate the flavors of a carrot cake that would at least partially satisfy my carrot cake cravings :)

Carrot Raisin Oat Bran Muffins

Now here is the fun thing about these muffins, when you taste them, you would never suspect that these are egg free, butter free and filled with the goodness of whole wheat and oat bran. They taste pretty delicious. These are also great for breakfast or as a snack on the go, they are filled with both nutrition and taste. So give these a try and do let me know what you think of them :)


 Egg Free Carrot Raisin Oat Bran Muffins

Click here for a printable view of this recipe

Ingredients and Method to make Carrot Raisin Muffins

1 cup whole wheat flour (atta)
1 cup oat bran (see notes)
1/4 cup all purpose flour (maida)
1 and 1/2 tsp baking powder
1/2 tsp baking soda
1/2 tsp salt
1 tsp ground cinnamon (cinnamon powder)
1/2 cup sugar
1 cup dark raisins
1 and 1/2 cups grated carrots (I used about 4 medium sized carrots for this)

1/2 cup oil (I used almond oil)
1/2 cup plain yogurt (Curds/ dahi)
2 tbsp flax meal ( powdered flax seeds/ alsi/ ali virai)  + 6 tbsp water 

Pre heat oven to 350 deg F. Line a muffin pan with liners and keep aside.  
In a large bowl, mix together all the flours, salt, baking powder, baking soda and cinnamon and mix well.

Mix flax meal with water and whisk well until it begins to get gelatinous and keep aside.
Add sugar, dark raisins and grated carrots to the flour mix and mix well.

Add flax + water, mix into the flour mix. Add yogurt and mix slowly into the flour mixture. Finally add oil and mix slowly into the flour mixture.
The copyright of this content belongs to Veginspirations.com

Spoon the mixture a little at a time into the pre lined muffins cups, until it is about 2/3 cup full. Place in pre heated oven and bake for about 17 to 20 mins or until a toothpick or cake tester inserted in the center comes out clean. Remove from the oven, cool a little and enjoy. Store the balance in an airtight container and enjoy within the next few days.

This quantity yielded me approximately 12 standard size muffins + 12 mini muffins (see notes).

Notes
If you do not have oat bran, you can also substitute it with equal quantity of whole wheat flour.
If you want to bake these as mini muffins, the baking time would be much less. It would take approx between 12 to 15 minutes, so do keep an eye on the muffins and check by inserting a toothpick or cake tester to see if it comes out clean a bit early.

Read more ...

Tuesday, September 18, 2012

Low Fat Crunchy Roasted Chickpeas


For the longest time I have been wanting to try oven roasting some beans, I always wanted to try first with either chickpeas or mung beans, since both these beans are my favorites and I think a crunchy snack with either of them would taste pretty good. A few weeks back when I was planning to make this chana masala, I decided to keep some cooked chickpeas aside specifically for this "experiment". It is so simple that I am not even sure this qualifies as a recipe, but the results are thoroughly enjoyable, we definitely loved it.

In fact, R who usually tends to favor fried crunchy snacks loved this so much, he even extracted a promise from me that I would make this again and soon :) The best part about this snack, not only is it low fat and crunchy, it is also a really neat way to get some fiber ....cannot ask for more from a snack :) So the next time you are wondering what to make for the weekend movie, here's an idea you might want to consider. It won't make you feel too guilty for indulging the next day :)

Low Fat Crunchy Roasted Chickpeas- Masala chana

Click here for a printable version of this recipe

Ingredients and Method to make crunchy roasted chickpeas
1 1/4 cup cooked chickpeas rinsed, drained and patted dry
1/2 tsp salt (or to taste)
1/8 tsp red chili powder (or to taste) (optional)
1/4 tsp garam masala (or to taste) (can be substituted with any other curry powder)
1 tbsp olive oil

Spread the cooked and drained chickpeas on a kitchen tissue for a little while ( I usually keep it for about 15 minutes or so). When most of the moisture has been absorbed by the tissue, use another dry one to pat dry the beans before transferring them to a small bowl.

Pre heat oven to  400 deg F . Line a tray with aluminum foil or parchment paper and keep aside.
In another small bowl add oil and all the spices and mix well.

Pour the oil + spices on the cooked and dried chickpeas and mix well making sure that each chickpea is coated with a little oil + spice mixture.

Spread the chickpeas on the pre lined tray evenly and place in oven and bake for 30 to 35 minutes or until it turns golden and a little crunchy.
The copyright of this content belongs to Veginspirations.com
 
Cool to room temperature and enjoy this snack :)

Store the balance of the cooled roasted chickpeas in an air tight container and use within a few days.....if it lasts that long :)
Read more ...

Tuesday, March 27, 2012

Instant Low Fat Oats Paniyaram

In case you were wondering about my absence from this space, last week I was a little under weather and could not blog. But now I am better and hope to be blogging at my usual pace:)  Moving on to the post, the best way I can think of to describe paniyaram are savory cakes or pops that are shallow fried in the appa kaarai /Aebleskiver pan. To see a picture of my appa kaarai, check out this post . Usually this is made with traditional idli/ dosai batter + some additional seasoning and is served with variety of chutneys.

The first time I tasted paniyaram was surprisingly at a famous banana chip store in Coimbatore when I visited that city more than a year back. Even though dosai and idli would frequently appear on our tables when we were growing up, somehow I do not remember paniyarams ever being made with that batter. Anyway back to the paniyarams that I tasted in Coimbatore, those were served with three kinds of chutneys, one sweetish and two more traditional chutneys and it was just so delicious. After I left the place, I regretted that I hadn't asked the guy making the paniyarams the recipe for his chutneys :) 

 Instant Oats Paniyaram-Savory Oat Pops

I just had it that once, but I was hooked and always thought I would love to make paniyarams when I have some extra batter, but I never got around to making it. Then my friend Manju made some yum paniyarams for me when I visited her home a few months back and I was hooked again. I realized that I really, really love paniyarams and did not want to put off making my own version any more. My version is not made with the traditional batter, instead I used a combination of oat, wheat, flax and rice flour as the base ingredients for the batter. I have made this a few times now,  and everybody who has tasted  it so far have liked it. Whether they are made as a snack to go with tea, or as a  tiffin, or even just a light dinner, these paniyarams are nutritious, satisfying and pretty effortless :)

 Low Fat Instant Oat Paniyaram-Savory Oat Pops

Click here for a printable view of this recipe

Ingredients and Method to make Instant Oats Paniyaram
2 cups 1 min oats (quick oats) dry roasted until creamish color
1 cup whole wheat flour
1/2 cup rice flour
4 heaped tbsp flax seed meal (powdered flax seeds/alsi/ali virai)
salt to taste

4 Thai or Indian green chilies (or to taste)
1 inch piece of ginger
1/2 cup plain yogurt
4 tbsp grated coconut (fresh or frozen, if frozen thaw to room temperature)
water as needed to get the right consistency
1/2 tsp baking soda

Seasoning
1 tbsp oil
1 tsp mustard seeds
1/8 tsp asafoetida (hing/ perungayam) (optional but recommended)
7 to 8 curry leaves broken into small pieces (optional but recommended)

a few drops of oil to apply to the aebleskeever pan (appa kaarai)

Dry roast quick oats on low to medium low heat until oat turns a little creamy reddish color. Remove and cool to room temperature.
In a large bowl mix together roasted oatmeal, whole wheat flour, flax seed meal, rice flour and salt to taste. 
Grind green chilies and ginger with some water until smooth and add to the flour mixture. Add yogurt and mix well.

Finally add water as required to achieve required consistency, the consistency of the batter should be on the thicker side but the batter should be of dropping consistency. If you are familiar with idli batter, this batter has a similar consistency. When in doubt err on the side of thicker batter, you can always add water later to achieve correct consistency.

After adding the water, add grated coconut and mix well. Heat oil in a small pan, add mustard seeds, when the seeds begin to splutter add asafoetida and curry leaves. Caution curry leaves causes the oil to splutter, so keep your face and hands away, preferably keep a lid or splatter screen handy. After the leaves are done spluttering, remove and pour entire seasoning on the batter and mix well.
The copyright of this content belongs to Veginspirations.com

Keep the bowl closed and allow the batter to let sit for about 30 mins. Just before making the paniyaram, add some more water if required as the oat absorbs the water and makes it thicker and add the soda and mix well.

Heat ableskeever pan (appa kaarai) on medium or medium low heat, add a drop or two of oil to each mold. Or even more if you are one of the lucky ones not counting calories :). Spoon batter into each mold and cover with a lid and allow to cook until the lower side turns golden brown. Flip over with a spoon and cook the other side until it turns creamy golden. Remove from heat and serve hot with coconut chutney/ avocado coconut chutney.

Proceed with the rest of the batter in the same manner. Refrigerate the balance of the batter and use within a couple of days. If you make the paniyaram ahead of time, warm it in the microwave before serving as this tastes best when hot.

Notes
Make sure to keep the heat at a consistent medium to medium low heat, otherwise the outer part turns dark while the middle is still uncooked.
Read more ...

Thursday, April 14, 2011

Microwave Low Fat Crunchy Mung Bean Snack with no oil :-)

What can be better than a crunchy savory or spicy snack that you can dig into while watching movies, or tv or even at tea time?  The answer to that has to be a crunchy savory snack that is also guilt free, has no oil and is actually healthy. Crunchy snacks, as I have mentioned before, are a weakness of mine. So anytime I get to make something that is crunchy and guilt free, I am happy :-)

The story behind this snack?  I got the idea for this snack from my father in law, he saw something like this being made on a television show and mentioned it to me when we spoke the other day. The second he mentioned that it was made without a drop of oil, I was hooked. I knew that I would be making this asap and I did :-)  This snack was quick, crunchy and tasty. And my favorite part is that it is almost effortless, just soak, drain and cook in the microwave and you have a healthy,  tasty snack.....So if you are wondering what to make for your weekend movie night, maybe you might want to consider this mung bean snack :-)


Photobucket

Here is another pic.........................


 Low fat Crunchy mung bean snack

Click here for a printable view of this recipe

Ingredients and Method to make Mung bean snack
1 cup split mung bean lentil without skin ( mung dhal)
1/4 tsp turmeric powder (optional)
1/2 tsp red chili powder (or to taste) (can be substituted with cayenne )
salt to taste
pinch of asafoetida powder (hing/perungayam) (optional)

Soak split mung bean lentil for 6 to 8 hours in sufficient water. Drain thoroughly.

In a microwave safe bowl, mix together drained mung lentil and all the spices. Place in a microwave and microwave on high heat for18 minutes in 3 minute increments. Keep the bowl uncovered the entire time and make sure to remove and break down lumps if any and stir to get more even cooking every 3 minutes. Also in the last few minutes keep an eye to see that it does not over crisp or burn, remove frequently to check on it in the last few minutes.
The copyright of this content belongs to Veginspirations.com

When lentil is crunchy, then it is done , remove, cool to room temperature and store in an air tight container.
Enjoy with tea/ coffee or as an anytime, movie time or teevee time snack :-)

Notes:
Because of varying wattage in each microwave, cooking times will vary in different microwaves. Also if you use a slightly larger or smaller dish, it will also impact the cooking times. So please use the times given in this recipe only as a guide. It may take a little lesser or more time to cook depending on your microwave and your dish.

This snack is off to the Microwave Easy cooking event- Lunch box menu being hosted by Lataji, originally started by Srivalli

This snack is also off to the MLLA-34 event being hosted by Jaya originally started by Susan.
Read more ...