Wednesday, September 29, 2010

Oat Potato Cutlets

There are days when I am running late, have yet to start on dinner and have no clue what I am going to make for it. On such days, I wish that I could wave some type of magic wand and find dinner ready. I know....it is completely wishful thinking :-) Anyway the reason I mentioned this is because last week I had a few days like this, when I was running late and had to come up with something simple and quick for dinner.

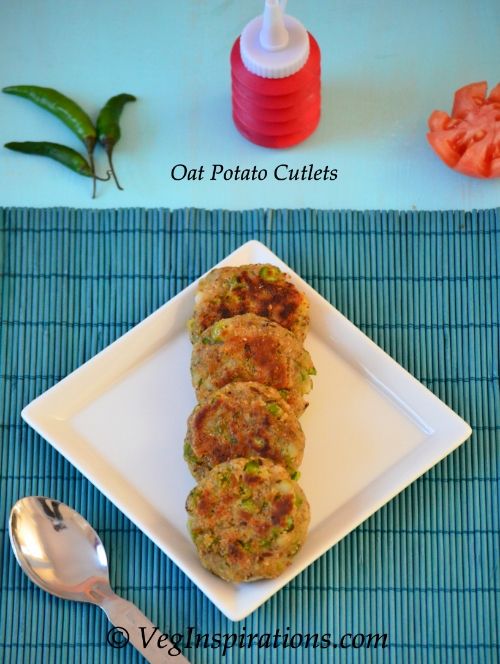
This oat potato cutlet was the result of my rushed preparations. I made this cutlet to use as a sandwich stuffing in a sandwich much like this one,  and it tasted awesome in the sandwich. It also tasted very good on its own too. You cannot make out that there is oatmeal in this cutlet making it ideal for those of you who want to sneak in oatmeal to picky eaters. Hmm......I never knew rushing around in the kitchen to get dinner ready could produce such yum results, maybe I should get late more often :-)

Oat Potato cutlets- Burger Patty/Sandwich stuffing


Click here for a printable view of this recipe

Ingredients and Method to make Oat Potato Cutlets
5 medium white potatoes (cooked until soft) or 7 slightly smaller potatoes
1/2 cup rolled oats
2 cups frozen peas (thawed to room temperature)
1 tbsp oil
3/4 tsp cumin seeds (jeera/ jeeragam)
4 Thai or Indian variety green chilies cut very fine (or to taste) (hara mirch/ pachai molagai)
1/2 tsp garam masala (or any other curry powder)You can find my recipe for garam masala here
1/2 tsp red chili powder (or to taste) (optional)
salt to taste

Dry roast and powder
1/2 tsp cumin seeds
3/4 tsp coriander seeds

a little extra oil to shallow fry the cutlets

Cook the potatoes, cool to room temperature, peel the skin, mash roughly and keep aside.

Dry roast rolled oats, cool to room temperature and grind to a fine powder. Keep this powder aside.

Dry roast cumin seeds and coriander seeds until aromatic, cool and grind to a fine powder. Keep this powder aside.

In a heavy bottomed pan heat oil, add cumin seeds to it. When the seeds begin to sizzle add green chilies, stir a couple of times, then quickly add green peas. Stir a few times, cover the pan with a lid and allow the green peas to cook until soft.
The copyright of this content belongs to Veginspirations.com 

Add garam masala, red chili powder and salt to taste and mix well.

Add the mashed potatoes and mix thoroughly.  Mash this mixture a little with a potato masher. Finally add powdered oats and mix well. At this point the mixture will get a bit thick and stiff. Cool the mixture to room temperature or until you can comfortably hold it in your hand. Shape into cutlets, heat a griddle/tawa/flat pan and place the cutlet on it. Add a few drops of oil and allow the lower side to cook until golden brown, flip over and cook the other side to golden brown as well.

Remove and serve hot with ketchup or any other sauce or use the cutlet as a sandwich stuffing.

Notes
I used this cutlet as a sandwich stuffing in a sandwich similar to this one, only without the chutney. Tasted awesome, in case you plan to make this as an appetizer or you plan to use spicy chutney in your sandwich, you can scale down the spice levels slightly if you want. In a sandwich without chutney, this level of spice worked out perfectly.
Read more ...

Monday, September 27, 2010

Red Swiss Chard In Lentil Coconut Gravy Curry ~ Kootu

After using red swiss chard in this roti and loving it so much, my mind was racing with ideas of other dishes that I would like to try with chard. This time I decided to try chard in a kootu. Kootu refers to a south Indian curry that is made with a lentil coconut gravy and is served with plain steamed rice. Kootu ranks pretty high on my list of favored curries, simply because of its taste and the fact that it combines lentils and veggies in one dish and is a quick way to get a little of both.

I read somewhere that chard stems are edible too, so I decided to use it in this curry along with the leaves. I am so glad I did, the chard stems retained a very slight crunch even after cooking and added an interesting dimension and some color to the curry. This chard kootu turned out to be delicious and  has now moved to the top of my favorite curry list, I cannot wait to make it again. 

Red Swiss Chard In Lentil coconut gravy curry~Kootu


Click here for a printable view of this recipe

Ingredients and Method to make Swiss Chard kootu
1 cup split pigeon peas (tur dhal/ tuvaram parappu) soaked in water for 30 minutes and cooked until soft
1/2 bunch of chard leaves + stem (yielded approximately 4 cups of cut leaves +stem) (see notes)
Salt to taste
1/2 cup fresh or frozen coconut (if frozen thaw to room temperature)
1 1/2 tsp split black gram lentil (udad dhal)
3 dry red chilies (or according to taste)
3/4 tsp cumin seeds (jeera/ jeeragam)
1/2 tsp oil

Seasoning
1 tsp oil (preferably coconut oil)
3/4 tsp mustard seeds (rai/kadagu)
1/8 tsp asafoetida powder (hing/ perungayam) (optional)
1 dry red chili broken into small pieces (optional or according to taste)

In 1/2 tsp of oil roast 1 1/2 tsp udad dhal until reddish and aromatic. Remove from heat, cool and grind along with coconut, cumin seeds and dry red chilies, adding water as required to form a smooth paste, keep it aside.

Cook the soaked pigeon peas (tur dhal) until soft and mushy. I used the microwave for it but it can be done in the pressure cooker or stove top.Mash the cooked lentils lightly adding a little water and keep aside.

If you have used the stove top or pressure cooker for cooking the lentils, then in a heavy bottomed pan, add cut chard leaves/ stem and a little water and allow it to cook. Once cooked, add the mashed lentils and the coconut paste, mix well. Add water as required to achieve required consistency, salt to taste and allow to simmer for a few minutes. (see notes)

Finally heat a little oil in a small pan, add mustard seeds to it. When the seeds begin to splutter add asafoetida powder and dry red chili and stir a couple of times. Pour the entire oil + seasoning mixture on the simmering lentil and chard and mix well.
The copyright of this content belongs to Veginspirations.com

Remove from heat and serve hot with plain steamed rice or rotis/phulkas(Indian flat bread)

Notes
I cooked the lentils in the microwave, so once the lentils were cooked and mashed, I added the chard to it and placed it back in the microwave until the chard got cooked. Then I added the coconut paste and allowed to cook for a couple minutes more and finally proceeded to season it.

Cut the ends off the chard stem, then proceed to cut the stem and leaves into small pieces

Suggested Variation:
In a pinch if you do not have the black gram lentil, you can skip it entirely and grind just coconut, cumin and whole red chilies and proceed with the rest of the recipe. This subtly alters the taste, but this version of the curry tastes pretty good too :) 
Read more ...

Thursday, September 23, 2010

Thattai ~ Gluten free rice crisps

Thattai refers to a crispy, savory, hand flattened, deep fried rice snack originating from south Indian cuisine, specifically Tamilian cuisine. It falls under the broad category of "bakshanam" a term used for all kinds of fried snacks. If you are already familiar with south Indian cuisine or have tasted this snack in the past, then you already know that this is one irresistible snack

Making thattai does not require very much skill or any special equipment, but it does require a lot of patience.  Usually when my mother in law and I are together we end up making stuff like thattai and murukku (another fried snack) . As a team effort, this snack gets made far more quickly and easily. One of us flattens the discs while the other fries them.

As I mentioned before I rarely make any kind of fried foods at home and especially something like thattai that I know is a little more time consuming. But recently when we were planning a long drive, I had a sudden craving for some thattai to take along on the drive. So I set aside some time, patted and fried and finally and most importantly....................enjoyed this indulgence.

Thattai ~ Gluten free Rice crisps

Click here for a printable view of this recipe

Ingredients and Method to make Thattai
4 cups rice flour
1/2 cup split black gram lentil flour (udad dhal flour)
handful split chick pea lentil (chana dhal) soaked in water for an hour or a little more
2 stalk of curry leaves cut into small pieces
3 tbsp unsalted butter melted
4 tbsp grated fresh or frozen coconut (if frozen thaw to room temperature)

salt to taste
1 tsp red chili powder (or to taste)
1/4 tsp asafoetida powder (hing)
Water as required (I used approximately 2 cups)

Oil as required to fry thattai.
A few spoons extra oil in a small bowl to help when patting the discs

Sieve both the flours and keep aside. In a large dry bowl, add rice flour,black gram lentil flour,  salt to taste, red chili powder and asafoetida powder and mix well.

Add curry leaves and mix well.  Add coconut, melted butter and mix into the flour mixture.

Drain the soaked chick pea lentil (chana dhal) and add to the flour. Add water as required to knead into a soft and non sticky dough.

Place the oil to deep fry thattai on low to medium heat
Place a large thin cloth, something like a muslin cloth on any work surface. Pinch a little dough, roll it into a small ball (the size of a gooseberry)  and place on the cloth.

Smear very little oil on your fingers and pat the ball into a thin even circle with your fingers ( I find that it works for me when I use a combination of patting it with my fingers and then make it more even by pressing gently with my palm) Proceed this way with the rest of the dough.

Once the disc is flattened out, gently prick the surface of the thattai with a fork all around, so that the thattai does not puff up.

A couple of  tips that I find make this process easier. Make about a dozen discs on the cloth, then fry that dozen, then continue with the rest of the dough. If you pat all the dough into shape and only then start frying, the first ones would dry up,  become brittle and might break when removing from the cloth. Alternatively if you have someone to assist you , then while you are patting the thattai, the other person can fry them.

If the dough feels a little dry and not as malleable, add a few drops of  water and re-knead it to make it soft and malleable again.

To test if oil is ready, just add a small piece of dough to it, if it rises to the top immediately then the oil is hot enough to fry the rest of the thattai. Keep the heat on medium throughout the frying process, other wise the surface turns brown well before the inner parts of the thattai.

Gently removing each thattai from the cloth slide it gently into the hot oil, one at a time or more if you are using a large container of oil. Allow it to turn golden brown evenly, flip over a few times to ensure even color.

Remove and place on kitchen tissue. After the thattai is cooled to room temperature, store in an air tight container. It will keep for a couple of weeks, if it lasts that long.
The copyright of this content belongs to Veginspirations.com

Enjoy your crispy thattais with tea/ coffee or as an anytime snack.

Notes:
This recipe can be easily halved if you want to make a smaller quantity.
Read more ...

Tuesday, September 21, 2010

Pasta with Roasted Red Bell Pepper Sauce and some humor.

Recently, I received an email with pictures of a lot of billboards and road signs. Not ordinary road signs, but ones that are unintentionally funny, some of them, downright hilarious. I posted a couple of them here. Notice the second one......that particular sign had me in splits. I think I am never going to look at lime juice in the same way ever again :-)

Pasta with Roasted Red Bell Pepper Sauce

Moving on,  I rarely make pasta sauce from scratch, but when I came across this idea I  was instantly intrigued. I tweaked the recipe a fair bit, customizing it to our taste. The end result was a sauce that tasted pretty awesome.I used to think that making pasta sauce would be a very time consuming job, but it really turned out to be quite simple and quick.

Roasted Red Bell Pepper Pasta Sauce

Baking the peppers does not require much supervision, and after removing it from the oven, the only other step is to puree all the ingredients.This sauce tastes delicious over just plain pasta too, but if you want to add more veggies to the pasta you can try this with mushrooms or green bell pepper or any other vegetable of choice. It tastes pretty good in all combinations :)

 photo bc9b457c-5775-46ea-9584-a7307bff6f10_zps5a4b3d12.jpg

Click here for a printable view of this recipe

Ingredients and Method to make Mushroom pasta with red bell pepper sauce

For the pasta
1 large onion sliced lengthwise
8 oz (approx 266 gms) of button mushrooms sliced thin (can be substituted with 1 large or 2 med green bell peppers (capsicum/kodamolagai) deseeded and cut into thin long strips.
3 cups of dry whole grain or multi grain pasta (of any variety. I have used penne/ elbow pasta for this recipe most often ) ( I use barilla) cooked as per manufacturers instructions.
red bell pepper sauce as required (recipe below)
1 tbsp extra virgin olive oil
1/2 tsp minced garlic (or to taste)
1 tsp crushed red pepper (or to taste)
salt to taste

For the sauce (see notes)
2 Large Red Bell peppers cut into thin strips
1/4 cup plain yogurt
1 dry red pepper/ dry red chili
1 tsp dried parsley
1/2 tsp salt

Pre heat oven to 450 deg F

Place red bell pepper strips on a foil lined cookie sheet or flat tray and bake in the oven for 20 minutes or until small brownish/blackish spots begin to appear on the bell peppers. Turn once in between. It may take a little more or less time depending on the thickness of the bell peppers.

Once it is done, remove bell peppers from the oven and cool to room temperature. Puree the bell peppers along with dry red pepper, parsley, salt to taste and the yogurt to a smooth paste. Add a few tsps of water if required and blend again. Keep this sauce aside. (I did not need any water for this sauce)

Prepare pasta as per manufacturers directions. Drain and place the pasta in a large bowl and keep aside 

Heat oil in a heavy bottomed pan. Add garlic and stir until the garlic has browned a little. Add onions and saute till transparent. Add mushrooms (or bell pepper if using that) and stir until  cooked and soft yet firm.
The copyright of this content belongs to Veginspirations.com

Add crushed red pepper, salt to taste and the pureed sauce and mix well. Allow the sauce to heat for a few minutes. Add this sauce on top of the pasta, mix well and serve immediately or place pasta on individual plates, and pour sauce as required over it and serve.

serves approximately 2 to 3

Notes:
If you like the flavor of roasted garlic and want a stronger garlic taste, you can place a clove or two of garlic along with the red bell pepper in the oven to roast a little and then puree along with the red bell pepper.

If you do not want any additional vegetables, this sauce can be served over plain pasta too. I've had it with sauce and a sprinkling of parsley and crushed red pepper, tastes good that way too :) 

Read more ...

Friday, September 17, 2010

Apple Apricot Chutney

Apples have some uncommonly rich health benefits,  setting them apart from all other fruits. Apples provide a range of health benefits, everything from support for good heart health to cancer protection to being a good source of antioxidants and fiber. One surprising fact about apples that I came across is that they are also said to lower asthma risk.

I always enjoy apples in their raw form and rarely ever think of using them in my cooking. The only exception is when I manage to get some green tart apples, then I cannot resist using it in this pachadi (chutney). This time around I had regular sweet apples in my fruit basket,  and I was in the mood to make some kind of chutney to go with my phulkas and curry.......... on an impulse I decided to make some apple apricot chutney.

I used some raisins to give this chutney some additional sweetness and balanced it out by adding lemon juice for tartness and red chili powder for heat. I loved how this slightly sweet, slightly tart and slightly spicy chutney turned out, it worked as a delightful side dish to the phulkas and curry :-)

Apple Apricot chutney

Click here for a printable view of this recipe

Ingredients and Method to make Apple Apricot chutney
1/2 apple peeled, cored and cut into 1/4 inch pieces (any sweet variety of apple works for this chutney) (yielded 3/4 cup of cut pieces)
1/2 cup of dried apricot pieces (cut apricot into 1/4 inch pieces)
1/4 cup dark raisins
1/4 tsp ground ginger (dry ginger/ soonth/sukku)
1/4 tsp salt (namak/ uppu)
2 tsp sugar (shakkar/sakkarai)
1/4 tsp red chili powder (or to taste) (mirch/thani molaga podi)
1 tsp fresh lemon juice (limbu)
water as required

In a heavy bottomed pan, add apple, apricot and dark raisins. Add ground ginger, salt, sugar, red chili powder and a little water and place on heat and allow to cook until both the apples and apricots get cooked and soft. Add water if required while the apple and apricot pieces are being cooked and stir frequently so that the fruit pieces at the bottom do not burn.

Cook until the fruits are cooked and soft and the mixture begins to thicken a little and most of the water has evaporated. Add lemon juice and simmer for a few more seconds.
The copyright of this content belongs to Veginspirations.com

Remove from heat and serve hot or cold as a side dish along with any Indian themed menu or as an accompaniment with phulkas/ rotis.
Read more ...

Wednesday, September 15, 2010

Rajma ~ Red Kidney Bean curry and a recycled cardboard remote tray

Some of you might be wondering what a recycled cardboard tray has in common with rajma. Nothing really....... it is just that I came across an idea recently, and I could not resist sharing it with my readers in this post. Cardboard boxes always got flattened and dispatched to the recycle bin in my home..... until recently, when I came across this idea to reuse carboard boxes in different avatars around the home.

Once this idea entered my head I could not shake it off and had to try it asap. Luckily for me, I had a few cardboard boxes that had managed to escape my recycle bin, and I tried making a few things with them. One of the items I made was this remote tray. All I used for this was a little glue and fabric scraps leftover from an earlier sewing project and voila...... the cardboard box got transformed into an environment friendly remote tray :-)

 DIY Remote Caddy

Moving on to rajma. Rajma refers to a classic red kidney beans curry from north Indian cuisine. There are many variations of this curry, but personally I prefer a simpler version of rajma. So I make mine with a minimum of spices so that the spices do not overwhelm the taste of the red kidney beans completely. This simple curry is very versatile, it works just as well for simple family dinners as it does for parties or entertaining guests.

Rajma ~ Red Kidney Bean Curry | Veg Inspirations

 Red Kidney Bean Curry~Rajma | Veg Inspirations

Click here for a printable view of this recipe

Ingredients and Method to make Rajma
2 cups dry red kidney beans soaked for 8 hours or so in plenty of water with a pinch of baking soda (soda is optional) (see notes)
1 large onion cut very fine (pyaaz)
5 small tomatoes (or 3 medium ones) cut very fine
1 tbsp oil
1/2 tsp minced ginger (adrak)
3 Thai or Indian variety of green chilies cut fine (or to taste)
1/2 tsp minced garlic (lehsun)
1/2 tsp red chili powder (or to taste)
1/2 tsp garam masala (or to taste)
to make your own garam masala check out this post
salt to taste
handful cilantro (coriander leaves) cut fine for garnish (optional) ( I did not use it this time)

Heat oil in a large heavy bottomed pan. Add onions and saute until transparent. Add green chilies, minced ginger and garlic and stir for a few seconds.

Add tomatoes and cook until soft and mushy. While the tomatoes are cooking, drain the bean soak water and keep the soaked beans aside.

Add garam masala and red chili powder to the cooked tomatoes and stir a few times.

Now add the soaked beans, water as required and bring to a boil. Lower heat and allow the beans to simmer and cook until soft but not mushy adding water if required (see notes). Add salt as required and allow to simmer for a few more minutes for the flavors to blend.

Garnish with finely cut cilantro leaves if using and serve hot with plain steamed rice or some Indian bread like rotis or naans.

Notes
If you want to know why I soak beans with a pinch of baking soda and the reason why I drain the bean soak water check out  this post .

In case you run short of time, you can soak the red kidney beans in water that is a little hotter than just warm for about 5 hours, it works just as well as the usual 8 hour soak.

You can also precook the beans in a pressure cooker or on the stove top and add to the pan after adding the garam masala and red chili powder. If you precook the beans, you can add salt immediately after adding beans to the onion+tomato mixture and then allow to simmer for a few more minutes, remove from heat and serve hot.

This curry with red kidney beans is off to the MLLA Event the 27th edition being hosted by Susan
Read more ...

Monday, September 13, 2010

Mashed Potato Curry~ Urilakizhangu Podimas and some updates.....

First the updates :-) For a while now, one of the tasks on my to do list has been to update my ever growing food blogger list so that it reflects the blogs that are currently on my reader. Finally  after being back burnered for a while, I got a chance to update the list. While I was at it, I went ahead and created an exclusive space for the blog list, so that it would be easy for me and others like me to keep track of the wonderful creations in some of my friends' kitchens. If you have a minute, do hop over and have a peek at the updated list here.

I think I mentioned in the past that from time to time I try and update pictures in some of my older posts. This time around,  I updated the picture in this Instant Oats Idli post  Okay now that I have updated you readers on these little changes to this site, let me move on to the irresistible potato podimas.

As I mentioned recently , potato podimas is a  traditional and classic curry that can take any meal to a whole different level, especially when combined with this pearl onion sambar. Made with mashed potatoes, this is one of the simplest curries in south Indian cuisine. Beyond cooking and mashing the potatoes, the only other step involved in making this curry is to season it. Yet this classic dish never disappoints and is a always well liked and well received
 
Mashed Potato Curry~Urilakizhangu Podimas

Click here for a printable view of this recipe

Ingredients and Method to make Potato curry (podimas)

9 medium sized white potatoes cooked until soft.
salt to taste

Seasoning
1 tbsp oil
1 1/2 tsp black gram lentil (udad dhal)
1 tsp mustard seeds
4 Thai or Indian variety green chilies cut fine (or to taste)
1/8 tsp asafoetida (hing)

Optional garnish
1 1/2 tbsp lemon or lime juice (or to taste) (optional)

Cook the potatoes either in a pressure cooker, stove top or microwave oven until soft.

Cool to room temperature, peel and mash the potatoes coarsely and keep aside.

In a heavy bottomed pan heat oil, add mustard seeds. When the seeds begin to crackle add black gram lentil and stir a few times. When the lentil begins to redden add finely cut green chilies and asafoetida powder and stir a few times.

Add the mashed potatoes, salt to taste and mix well.
The copyright of this content belongs to Veginspirations.com

If you plan to use lime or lemon juice, add it just before removing the potatoes from heat, mix well. Serve hot with some sambar/ rasam and plain steamed rice. As I mentioned before,  a classic combination with this curry is pearl onion sambar but you can serve it with any other type of sambar or rasam too 

Serves approximately 2 to 3
Read more ...

Thursday, September 9, 2010

Swiss Chard Roti (Indian Flat Bread)

Recently we took a road trip and the place we visited had among other things, this amazing, large kitchen garden. Obviously I could not resist walking through the garden and checking out the different fruits, vegetables and greens planted there. Everything looked so fresh, green and inviting. One thing that caught my eye and my interest was the Swiss chard.

It surprised me when I gave it some thought, that I had not used this interesting green in my cooking ever before. I decided to remedy that immediately, and after I returned one of the first things I did was to go and buy a bunch of chard to try. Chard belongs to the same family as beets and spinach and is said to have some amazing health benefits.  It is said to be an excellent source of  Magnesium, Potassium, Iron, fiber and Vitamins A, C and E.

I couldn't resist trying out chard in rotis first. In addition to some spices I also added some cilantro to the dough for additional flavor. We enjoyed this chard flavored roti a great deal and I am certain that chard is going to feature more prominently in my grocery list from now on :-)

 photo 76940a2b-00eb-4b92-a8da-d9cc35f130e1_zps2bde29ea.jpg

Click here for a printable view of this recipe

Ingredients and Method to make Swiss Chard roti
2 cups whole wheat flour
2 cups loosely packed cut swiss chard leaves (the chard I bought had red stalks)
1/4 cup loosely packed cut cilantro leaves (coriander leaves)

1/2 tsp Carom seeds (Ajwain/ Omam)
1/2 tsp garam masala (or any other curry powder) (or to taste)
salt to taste
1/2 tsp red chili powder or cayenne powder (or to taste)
1/2 tsp cumin powder
a few drops of oil/ ghee( clarified butter) (optional) (use oil for a vegan version)

In a large bowl add all the dry ingredients. Mix well. Add swiss chard leaves and cilantro and mix into the dry flour.

Add water as required,a little at a time and knead into a non sticky,  not too soft,  not too stiff dough ( I used almost 1 cup of water for this quantity of flour) Keep the dough covered and allow it to sit for about 30 mins to an hour.

The dough softens a little more in this time. Knead the dough gently one more time. Divide into equal lemon sized balls and with the help of a little flour roll out into as thin or thick a circle as required. Make sure to roll out the dough evenly.
The copyright of this content belongs to Veginspirations.com

Heat a flat pan/ tawa/griddle. When hot, place rolled out dough on it and allow the roti to cook until the lower side gets light brown spots. Flip over and cook the other side, if you plan to use ghee/clarified butter or oil spread a little on the top and a few drops around the circumference of the roti.

Remove when the other side begins to get brown spots too and serve hot with curry of choice.

I served it with this mushroom peas curry

I made 12 rotis with this quantity of dough. But yield will depend on the size of each roti.
Read more ...

Tuesday, September 7, 2010

Whole Wheat Bread Upma with Flax

Upma is a type of seasoned savory snack/breakfast/tiffin item from south Indian cuisine usually made with semolina and some vegetables. Just like other dishes there are many variations of upma, made with different ingredients. One such variation is bread upma. Bread upma is a great way to use up leftover bread and is one of the simplest and most basic dishes that can be prepared in a jiffy.

There are many variations to bread upma too......... this recipe here, is just my take on this dish. I have been making bread upma in more or less the same manner for quite a while now. The only change is that recently I started adding flax meal to it. I find that flax meal blends surprisingly well in this and is a nice way to sneak in a little extra omega 3 in our diet.......

Photobucket

Click here for a printable view of this recipe

Ingredients and Method to make wheat bread upma
Half of a loaf of day old or a little older whole wheat bread broken into small pieces (I used this bread) (see notes)
1 tbsp oil
3/4 tsp mustard seeds
3/4 tsp cumin seeds
3 Thai or Indian variety green chilies cut very fine (or to taste)
1 large onion cut fine
salt to taste (very little, since bread already has some salt in it)
1/8 tsp turmeric powder
2 tbsp flax meal (powdered flax seeds/alsi/ ali virai)
1/4 cup or less water (see below)
1/2 tsp red chili powder or cayenne powder (or to taste) (optional)

Make small pieces of half a loaf of day old or 2 day old bread and keep aside

Heat oil in a heavy pan, add mustard seeds. When the seeds begin to splutter, add cumin seeds. When the cumin seeds begin to sizzle add green chilies and stir a few times. Then add onions and saute until the onions turn tranparent.
The copyright of this content belongs to Veginspirations.com

Add turmeric powder and the bread pieces and mix well. Add flax meal, salt to taste, red chili powder if using and mix well again. Add a little water if the bread is too dry. Add just one tablespoon at a time and mix well. The upma should not be very moist and mushy, it needs to be just a little moist but mostly dry.

Serve hot with ketchup/ sauce or chutney. Serves approximately 2 to 3 

Notes
Breads like ciabatta / sourdough/ multi grain work great for this upma. Avoid using breads that are sweetish because it doesn't work well in this savory dish.
Read more ...