Monday, August 30, 2010

Pearl Onion Sambar ~ China Vengaya Sambar and a tip....

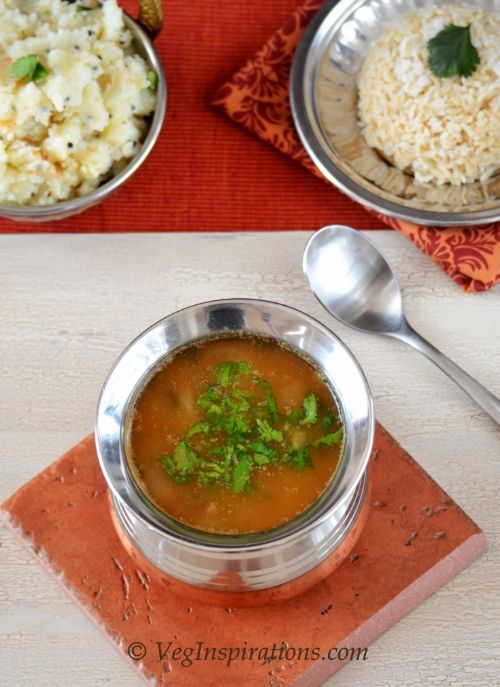
Sambar belongs to south Indian cuisine and can be easily described as a cousin to the more well known dhal. Among various types of sambar, there is a special place in my heart for pearl onion sambar. Soft and delicious pearl onions simmered and cooked in spiced tamarind water,  add so much flavor to sambar, taking it to a whole different level. And combine that with potato podimas (a type of mashed potato curry) and you have a classic combination that is difficult to resist.

My only reservation to using pearl onions in the past, was the amount of time it took to peel the onions.My friend B gave me this fabulous tip, which makes peeling pearl onions so very easy and quick. The idea is to soak pearl onions in hot water for about 10 to 15 minutes, then placing it in cold water. Cut of the root end and press the other end and out pops the onion. I used to hesitate to make pearl onion sambar, but after I tried out this tip from my friend, I make it far more often and in much less time :-)

Pearl Onion Sambar ~ China Vengaya Sambar

Click here for a printable view of this recipe

Ingredients and Method to make pearl onion sambar
3/4 cup split pigeon peas ( tur dhal/ tuvaram parappu) soaked in water for about 30 minutes
small lime or gooseberry sized piece of tamarind soaked in water for 30 minutes
10 oz (about 283 gms) pearl onions (yielded about 2 cups)
salt to taste
handful of cilantro (coriander leaves/hara dhania/kothamalli) cut very fine for garnish
8 to 10 curry leaves (kadipatha/karvapillai) torn into small pieces for garnish 

For the masala
Dry roast, cool to room temperature and powder
1/2 tbsp Split chick pea lentil (Chana dhal/ kadalai parappu)
2 tbsp Coriander seeds (Dhania/kothamalli virai)
3 dry red chilies (Lal mirch/molaga vathal) (or to taste)

Seasoning
1 tbsp oil
1 tsp mustard seeds (rai/kadagu)
1/8 tsp asafoetida (hing/perungayam)

Soak lentils in water for 30 minutes or so. Cook it in the pressure cooker or microwave or stove top until soft. ( I sometimes use the microwave, read more about cooking lentils here, and sometimes the cooker) . Mash the lentils well and keep aside

Soak tamarind  in just enough water to submerge the tamarind for about 30 minutes. Press the tamarind to extract juice from it, strain the tamarind juice and place in another bowl. Add some more water to the tamarind to extract juice from it. When all the juice is extracted, discard the pulp and seeds. Read this post on how to extract tamarind juice
The copyright of this content belongs to Veginspirations.com

In a large heat resistant bowl, place the pearl onions. Pour enough hot water over it to submerge the onions and allow the onions to sit for 10 to 15 minutes. Drain the hot water and fill the bowl with cold water. When the onions are cool enough to touch, cut off the root end and press the skin at the top. The onion just kind of pops out of its skin. Continue with all the onions, I got a yield of about 2 heaped cups of peeled onions)

Dry roast each of the ingredients separately until they turn aromatic. Cool to room temperature and grind to a fine powder. Keep this powder aside. You can even make this powder a couple of days prior to making the sambar and store in an airtight container.

Heat oil in a heavy bottomed pan, add mustard seeds. When the seeds begin to splutter add asafoetida powder. Stir a couple of times, then quickly add pearl onions and saute for a minute or two.  Add tamarind juice, salt to taste and allow it to boil until the tamarind loses its raw smell and the onions are cooked.

Add mashed cooked lentils and sambar powder and mix well. Add water as required to achieve required consistency and allow the sambar to simmer for a few minutes until all the flavors mingle. Garnish with cilantro and curry leaves and serve hot over a bed of plain steamed rice with a curry on the side.

For a classic combination, serve pearl onion sambar with potato podimas (a type of mashed potato curry) ( I will be posting my version of this curry soon )
Updated to add: My link for Potato Podimas can be found here.

Suggested variation
1 Tsp whole black pepper/peppercorn/miri/milagu can also be dry roasted and ground along with the masala, this adds a slightly different flavor. If you do add whole black pepper scale down the red chilies a tad bit, if you do not want to make the sambar too spicy.

Also 1/2 tsp of fenugreek seeds/methi dana/mendiyam can also be dry roasted until it turns slightly brownish and ground along with the other ingredients for the masala. 
Read more ...

Friday, August 27, 2010

Curried Carrot Coconut Soup

Soups usually appear frequently in my kitchen but for the last few months I have hardly made soups. I think I made some a couple of times in the last couple of months, which in itself has to be some type of record for me. I think all the hot weather we are having this year got me to skip soups for light salads and such. Anyway the other day when I was at the store I came across this lovely jalapeno cheese bread that looked really delicious. I bought it home with the idea of pairing it with some type of soup.

I got the idea to make curried carrot coconut soup here  and decided to give it a try. I tweaked the recipe a bit, added some more flavors, and cut down the coconut milk quite a bit. The coconut milk did not overwhelm the flavors of the soup, yet it gave the soup a lovely creaminess and a hint of the coconut milk taste. This soup turned out to be a winner, it was light, nourishing, creamy with a hint of heat.

Vegan Curried Carrot Coconut soup

Click here for a printable view of this recipe

Ingredients and Method to make Curried Carrot Coconut Soup
2 medium large onions cut fine
6 large carrots cut into 1/2 inch pieces

1 tbsp oil
1/2 tsp minced garlic
1 thin sliver of ginger minced

1 dry red chili (or to taste) (optional)
1/2 tsp coriander powder
1/2 tsp garam masala (or any other curry powder)
salt to taste
1/2 tsp red chili powder (or cayenne pepper) (or to taste)

1/2 cup coconut milk
water as required

Heat oil in a medium sized heavy bottomed pan. Add minced garlic and allow it to brown a little. Add onions and saute until transparent. Add minced ginger and stir for a few seconds.

Add carrots, coriander powder, garam masala, dry red chili if using, salt to taste and red chili powder if using and stir for a few seconds. Add water as required (not too much at this point) and allow the carrots to cook until soft.

Cool this to room temperature and puree in batches adding water if required until smooth.
The copyright of this content belongs to Veginspirations.com

Pour the pureed carrot mixture into the pan again and place on heat. Add water if required to achieve required consistency, adjust salt if required and mix well. When hot, add coconut milk and mix well and allow to simmer another couple of minutes for the flavors to blend well.

Remove and serve hot with any crusty bread ( I served this with wedges of jalapeno cheese bread)

Serves approximately 2 to 3

On an unrelated note, in case you have a minute hop on here to a clip of a song that features at the top of my "to play today " list today :-)
Read more ...

Wednesday, August 25, 2010

Brown Rice and Lentil Cutlets

Leftover rice can sometimes provide a bit of a challenge to me. Sufficient quantities of rice quickly get turned into a rice dish and consumed. But if there is very little leftover it cannot be used in rice dishes and I have to rack my brains trying to figure out what else I can make with it to use it up. Sometimes I use up the rice by making muthias, but this time around, I came up with the idea of making some cutlets with leftover rice.

I added some lentils and vegetables to make it more nutritive. I was a bit wary that the rice would stand out in the cutlet especially because I used brown rice. But surprisingly the ingredients blended together amazingly well, the rice did not stand out at all. We enjoyed these cutlets as a snack and equally enjoyed the cutlets stuffed in a sandwich. If you have been wanting to start using brown rice in your diet, this cutlet could be a great place to start.......

Photobucket

Click here for a printable view of this recipe

Ingredients and Method to make Brown Rice and Lentil cutlets

2 cups mixed vegetables ( I used a combination of carrots, peas, beans and corn)
1/2 cup split red lentil (masoor dhal) (see notes for substitutions)
3 cups pre cooked brown rice ( I used brown basmati)
1 cup loosely packed whole wheat bread crumbs (can be substituted with any other kind of bread)

1/2 tsp red chili powder (or cayenne pepper) (or to taste)
1/2 tsp coriander powder (dhania)
3/4 tsp cumin powder (jeera)
1/2 tsp garam masala (or any other curry powder)
2 pinches dried fenugreek leaves (kasuri methi ) (optional)
salt to taste
2 tbsp lemon juice (or to taste) (optional)
A few drops of oil to shallow fry the cutlets

Cook the vegetables in the microwave or the stove top, only adding water as required, until the veggies become soft but not mushy, keep aside.
Cook the lentils on the stove top or in the microwave, only adding water as required until the lentils are cooked and mushy.
 The copyright of this content belongs to Veginspirations.com

Place a medium/ large pan on heat. Add cooked vegetables, all the spices, salt to taste and mix well. Add precooked rice and lentils and mix well.
Add breadcrumbs and mix well. When the bread crumb is added it will make the entire mixture a little thick and firm. Add more breadcrumbs if required, I did not need any more this quantity worked perfectly.

Allow this mixture to cool to room temperature, then shape into cutlets. Heat a flat pan/griddle/tawa and place a few cutlets on it, add a few drops of oil and allow the cutlets to cook for a few seconds. When the lower side turns golden brown, flip over and cook the other side. When the other side is golden brown as well, remove and serve hot with ketchup/sauce as an appetizer or snack, or stuff in a sandwich or use in a burger or even serve it with some hearty soup to make a complete meal.
Yield will depend on the size and thickness of each cutlets.

Notes:
Red lentil can be substituted with split pigeon peas (tur dhal) or split mung bean lentil (moong dhal). The reason I chose red lentils was because it cooks really fast.
Read more ...

Monday, August 23, 2010

Javarsi Oats Dosai ~ Sabudana Oat Dosa ~ Savory Oat and Sago crepes

As I mentioned in this post, R and his family frequently talk about the sago dosais they tasted when they visited Bandipur park in south India. That dosai has become a legend in my home and the story of that dosai was my main inspiration to adding sago seeds to dosai for the first time. Sago seeds lend a great deal of softness to dosai, my only reservation with it is that, as far as I have been able to research it, sago seeds do not seem to have any great amount of nutrition in them. It seems to contain mainly starch and because of this I do not frequently use it, even in dosais.

  Javarsi Oat Dosai ~ Sabudana Oat Dosa ~ Savory Indian crepes made with oats and sago

On the other hand I really do enjoy the extra soft quality to dosais that comes from adding sago and from time to time feel tempted to try my hand at another variation of sago dosai.  This time around when I thought of adding sago seeds to dosai I decided to add some oatmeal to it too. The idea behind adding oatmeal was to add a bit of additional nutrition and I thought it would assauge my guilt over using both sago and white rice in this recipe. This dosai turned out to be "oh so soft" and was very delicate and lacy. I loved this version of dosai so much I could have happily had this for breakfast, lunch and dinner. I didn't............but I definitely could have....I loved it that much:-)

 Javarsi Oat Dosai ~ Sabudana Oat Dosa ~ Savory Indian crepes made with oats and sago


Click here for a printable view of this recipe

Ingredients and Method to make Oat Sago Dosai
1/2 cup brown rice ( I use brown basmati ) (can be substituted with white rice)
1 cup white raw rice
1 cup rolled oats
1/2 tsp fenugreek seeds (methi/ mendiyam)
1/2 cup black gram lentil (without skin)(whole udad dhal/ muzhu ulundhu) (can be substituted with split black gram lentil/ udad dhal/ ulatham parappu)
3/4 cup sago seeds (sabudana/ javarsi)

In a large bowl add all the ingredients except sago seeds. Mix well, fill with water and swirl with your hand and drain water. Fill with water about double the quantity of the grains and allow to soak for at least 3 to 4 hours.

In another bowl add sago seeds and fill with just enough water to submerge the seeds. Allow the seeds to soak for about 3 to 4 hours as well.
The copyright of this content belongs to Veginspirations.com

Using your blender/grinder, grind the grains and oatmeal in batches adding a little water until it forms a smooth batter. The batter should be a little thick and not too runny.

Grind sago seeds adding a little water until it turns to a smooth paste, this does not take very long, just a few turns in the blender. Add the ground sago seeds paste to the batter made from grains and mix gently. Add salt to taste, mix well.

Alternatively you can add sago seeds to the last batch of grains after it is a little smooth and add some more water and grind until sago seeds are smooth. This second method makes it easier for the sago seeds to blend in with the batter. Proceed as mentioned with salt etc

Keep the batter covered in a large container (at least twice the size of the batter) and keep in a warm place to ferment for about 7 to 8 hours.

After the batter is fermented, mix it well and you can store this batter in the refrigerator if you do not plan to use it immediately. It can be stored for 4 to 5 days.

When making dosais (crepes)heat griddle/tawa/ heavy flat pan,when hot, pour a little batter in the center and immediately spread into a thin circle. Pour a few drops of sesame oil around the circumference of the dosai. Allow the lower side to cook for a few seconds until it is evenly golden brown, then flip and cook the other side until it has brown spots.

Here is a video clip of the process...........................


Remove and serve hot with your choice of chutney/ sambar/ molaga podi/ potato masal curry or any combination of the above four.
Proceed with the rest of the batter in the same manner.

Notes
When adjusting the consistency of the batter, err on the side of making a little thicker batter, that can be corrected easily then when it is too runny. When adjusting the batter, remove a little batter in a bowl and add a little water and mix it in, this way if it is too thin you can add some more thicker batter to it and get the right consistency.
Read more ...

Thursday, August 19, 2010

Spinach Corn Rice and an amazing art clip

Recently my  cousin B shared this video clip of sand art with me. I was totally blown away when I saw it and could not resist sharing it with my readers. What an amazing and creative artist and how incredible that she can create such wonderful art with light, a glass table and some sand.Who would have thought sand could be  used in such an artistic and creative manner. Here is another clip from the same artist.....

Moving on, inspired by the tawa pulao I made this spinach corn rice as a quick dish for dinner last week. Tawa pulao is a famous street food from Bombay and the special thing about it is that pav bhaji masala is used to flavor this rice giving it a very distinctive and unique flavor.Unlike the usual tawa pulao I gave this dish a slight twist and a different feel by seasoning it with some cumin seeds and chilies. This simple and quick rice turned out to be very flavorful and all it needed was a little raita to make it a complete meal.


Photobucket

Click here for a printable view of this recipe

Ingredients and Method to make Spinach Corn Rice
1 1/2 cups of brown basmati soaked in 2 1/2 cups of water for at least 30 minutes (see notes)
1 1/2 cup corn kernels
9 oz spinach chopped  (approximately 5 cups of packed spinach leaves)
1 onion cut fine
2 Thai or Indian green chilies cut lengthwise
1 tbsp oil
1 tsp cumin seeds
2 tsp pav bhaji masala (or to taste)(available in most Indian groceries)  (can be substituted with any other curry powder)
salt to taste

Soak brown basmati in the container from the rice cooker for at least 30 minutes.
The copyright of this content belongs to Veginspirations.com

In a small pan, heat oil add cumin seeds, when seeds sizzle add green chilies. Stir for a few seconds. When the chilies begin to change color, add onions and saute until onions turn transparent. Add corn, spinach, salt to taste, pav bhaji masala and stir for a minute or so. Remove and pour this entire mixture on the soaked brown rice.

Set the rice cooker to the brown rice setting. When done, mix the rice with the vegetables gently taking care not to break it, adjust salt if required and serve hot with raita or curry of choice and papad or chips

Notes:
You can substitute white basmati in place of brown basmati in this recipe.
Read more ...

Tuesday, August 17, 2010

Thai Green Curry

As I mentioned earlier Janet hosted a Tried and Tasted event with Veg Inspirations as her theme. When she first let me know about it, I felt simultaneously elated, honored and nervous. I was nervous because I was not sure how all the recipes tried by others would work out, and if it would be well liked and appreciated. Frankly I did not feel very different from when I used to nervously wait for the results from an important examination.

Well in this case the results are in  and it looks like I got a passing grade :-). Thanks to all of you who have participated in this event, tried the recipes and have given your feedback. My schedule has been a little crazy lately and I haven't gotten a chance to visit  you all individually and thank you, I hope you read this post and know that I appreciate all your efforts and feedback.

Moving on to the other reason for this post, Thai green curry. I tried green curry in a restaurant for the first time and have been wanting to make it at home ever since. Unlike Thai red curry, green curry tends to be a little more mild making it ideal for those who do not like very fiery hot food.  Thai cuisine appears much more often in my kitchen these days, mostly because it is quick and simple and uses a lot of the same vegetables that is usually stocked in my refrigerator. In addition, just having plain steamed rice or Thai fried rice to go with the curry is enough to make a complete and delicious meal 


Photobucket

Click here for a printable view of this recipe

Ingredients and Method to make Thai Green Curry
3 carrots cut into 1/2 inch pieces
2 green bell peppers (capsicum/simla mirch/ koda molagai) deseeded and cut into 1/2 inch pieces
2 large sweet potatoes peeled and cut into 3/4 inch pieces
4 to 5 small Indian eggplants cut into 1/2 inch pieces
20 to 25 green beans cut into 1 inch pieces
one handful Thai basil cut fine (optional)
1 inch piece of ginger minced
1/2 tsp minced garlic
1 tbsp oil
salt to taste
1 tsp sugar
1 tbsp vegan Thai green curry paste ( I used Thai kitchen brand)
1/2 cup coconut milk

Heat oil in a large heavy bottomed pan. Add ginger and garlic and stir for a few seconds. Add all the vegetables, stir for a few seconds. Add salt to taste, sugar, Thai curry paste and a little water and allow the vegetables to cook until soft but not mushy.

Add coconut milk, water as required to achieve required consistency and simmer for a few minutes.
The copyright of this content belongs to Veginspirations.com
Garnish with basil leaves and serve hot with plain steamed rice or Thai fried rice to make a complete meal.

Serves approximately 2 to 3

Notes:
Some types of Thai sauces available in the markets have some type of fish sauces in them. So if you are a vegetarian or vegan you might want to read through the labels to make sure that the one you buy does not contain fish sauce
Read more ...

Sunday, August 15, 2010

Mango Lassi ~ Mango Yogurt Smoothie

Lassi is the term used for a yogurt based drink originating from North Indian cuisine. It is made in both sweet and salty versions. Most Indian restaurants in India and in other countries usually offer at least some types of lassi in their menu and a lot of the ones here offer mango lassi in their menu.  Initially I resisted the idea of trying mango lassi simply because I used to love the plain sweet version and did not want anything.........not even one of  my favorite fruits mixed into it.

But despite my resistance to it, once I tried mango lassi, I really got hooked on to it. Of course like so many other dishes, I always find the restaurant version a little too sweet and sugary for my taste and prefer to make it at home myself. And instead of using canned pulp which I find too sweet as well, I usually try it with fresh fruit, the lassi tastes much more fresher and better this way. Since mango season is underway right now, I was not able to resist using these golden beauties for a quick and delicious weekend treat :-)

  Mango Lassi ~ Mango Yogurt Smoothie

Click here for a printable view of this recipe

Ingredients and Method to make Mango Lassi
2 cups mango pieces ( I used Kent mangoes and used approximately 1 1/2 mangoes)
1/2 cup milk (doodh/ paal)
1 cup plain yogurt (curds/ dahi/ yogurt)
6 tsp sugar (shakkar/ sakkarai) (or to taste)
pinch of cardamom powder (elaichi/ elakkai) (optional )
pinch of saffron (kesar) (optional)

Blend together mango, yogurt and milk. Add sugar,  cardamom powder if using, saffron if using and blend a few more seconds.If you feel the lassi is very thick you can add a little bit of drinking/ filtered water to achieve required consistency
The copyright of this content belongs to Veginspirations.com

Chill and serve cold.
Serves approximately 2 to 3
Read more ...

Thursday, August 12, 2010

Vegan Whole Wheat Sandwich Bread

Regular readers of this site have probably noticed that basic whole wheat sandwich bread has been in my upcoming posts for months. I am not quite sure why I procrastinated so long to post this. There always seemed to be just one other post that had to be posted first and somehow this bread had to wait this long :-(
Some of you expressed an interest in seeing this post soon, so I decided that I would not put it off any more and finally got to it.

Using flour with the right amount of protein is very important to give bread a good rise and good texture. That is why cake flours and some other type of flours cannot be used in bread making on its own because they lack protein content. Gluten is a substance made up of proteins that gives bread its structure, texture and strength. I was aware that vital wheat gluten was available in stores and could be added to bread to give it a good rise. This bread is the first one that I experimented with adding wheat gluten to it. It really does make a difference, the bread rose beautifully.

I have made this bread many times since the first time and even made it once with white wheat flour instead of whole wheat flour ( read more about white wheat flour in this post). If you have used white wheat flour, you know that it does not have much protein and tends to be light. Yet adding gluten to that bread helped so much that I got a really soft yet well risen bread with good texture. I have included a picture of the white wheat version below the whole wheat version picture, so you can compare and see how it worked out with each flour.

 Vegan Whole Wheat Sandwich Bread | Veg Inspirations


This is how the bread turned out when I tried it with white wheat flour.....

 Vegan White Wheat Sandwich bread | Veg Inspirations

Click here for a printable view of this recipe 

Ingredients and Method to make Basic whole wheat bread
3 cups whole wheat flour ( I used regular whole wheat flour )
1/4 cup all purpose flour (maida)
3 tbsp vital wheat gluten (optional see notes)
1 1/2 tsp salt
1 1/2 tbsp active dry yeast
1 tbsp sugar
1 cup warm water + 1/2 cup warm water
1/4 cup oil + 1 tsp oil

In a large bowl, add whole wheat flour, salt, vital wheat gluten, all purpose flour and mix well.
Grease a loaf pan and keep aside. 

To half cup of warm water add sugar and active dry yeast and allow the yeast to rise for about 5 to 10 minutes.

Add yeast water completely to the dry flour and then the other 1 cup of warm water a little at a time and knead to form a non sticky dough.Add oil and continue to knead for another few minutes. Knead the dough for at least 7 to 10 mins, as this helps to strengthen the gluten which gives the bread structure and texture.  Keep bowl covered and allow the dough to rise for about an hour.
The copyright of this content belongs to Veginspirations.com

Gently flatten the dough, folding it down a few times and place in the loaf pan.Cover with tea towel or damp kitchen cloth or tissue and allow to rise for another hour. 

Pre heat oven to 375 deg F. Remove the tea towel/cloth and place the loaf pan in pre heated oven and bake for 35 to 40 minutes or until browned on top and sounds hollow when you tap it. I used a 5 X 9 size glass loaf pan.

Cool, slice and serve. Tastes best fresh or within a day or two of baking.

Notes
If you have flour that is specially marked as bread flour then you can skip the gluten if you choose, since bread flour usually has higher content of protein and does not need the additional gluten. If you use half all purpose flour and half whole wheat bread flour, then you can use half the quantity of gluten specified above since all purpose flour has lesser protein content than whole wheat flour.

If you use white wheat flour or any other lighter flours with less protein content, than use the entire quantity of wheat gluten so that it gives you a good rise and good texture.

If you want to make this bread in the bread machine, you can follow the instructions of the bread machine manufacturer for the order, mine says liquids first, then flours, then salt, sugar and yeast. Just substitute bread machine yeast for active dry yeast. If you do not like the hole that the bread machine leaves at the bottom of your bread, just use the dough cycle and place in a pre greased loaf tin and bake in pre heated oven as mentioned above.


Read more ...

Tuesday, August 10, 2010

Potato with Anaheim pepper curry ~ Aloo ki subzi

Peppers of all kinds makes our food interesting don't you think?  Even imagining food without any kind of peppers seems boring. But peppers do more than lend flavor to food, here are some cool facts about peppers that might surprise you....

Peppers of all kinds are rich in vitamins A,C and K. Specifically with regard to hot peppers, the substance that gives hot peppers their heat is known as capsaicin. The capsaicin in hot peppers has been to shown to reduce blood cholesterol and triglycerides and boost immunity. Both hot and sweet peppers have been shown to increase body's heat production and oxygen conyumption for twenty minutes after eating which means that it helps the body to burn more calories

Cool huh? Usually I use a lot of bell peppers in my cooking, in everything from pastas to curries. But I cannot remember if I have ever used anaheim peppers in any sort of cooking. In fact I am pretty sure that I haven't. This time too, these peppers made it into my grocery cart only because of R. He egged me on to pick these up when we saw it in the store and I did....... without having any idea of what I would make with it when I got home. On an impulse I decided to use it in a curry......and loved how the curry tasted. Now I know I am going to go look for these peppers the next time I go grocery shopping. Hmm...maybe I should ask R to go grocery shopping with me more often :-)

 Potato with anaheim pepper curry ~ Aloo ki subzi

Click here for a printable view of this recipe

Ingredients and Method to make Potato with pepper curry
5 to 6 medium white potatoes (aloo/ urilakizhangu) cooked until soft (peeled and cut into 1 inch pieces) (yielded approx 4 and 1/2 cups of potatoes
2 to 3 large Anaheim peppers deseeded and cut into 1/2 inch pieces (yielded approx 1 and 1/2 cups of pieces) (can be substituted with banana peppers/or any other type of bajji molagai, see notes)
1 large onion cut fine

1 Tbsp oil
3/4 tsp cumin seeds (jeera/ jeeragam)
1/4 tsp turmeric powder (haldi/ manjal podi)
1/2 tsp chili powder (lal mirch/ molaga podi) (or to taste)
salt to taste (namak/ uppu)
1/2 tsp cumin powder (jeera/ jeeragam)
1/2 tsp coriander powder (dhania)
1 tsp lemon juice (limbu/ elumbichampazham) (or to taste)

Cook potatoes until soft. Cool, peel the skin and cut into 1/2 inch pieces and keep aside.

Heat oil in a large heavy bottomed pan, add cumin seeds. When the seeds begin to splutter, add onion and saute until onions are transparent. Add turmeric powder and stir a couple of times.
The copyright of this content belongs to Veginspirations.com

Add Anaheim peppers, cumin powder, coriander powder and stir. Keep stirring until the peppers are cooked yet a little firm and a little crisp.

Add cooked potatoes, salt to taste, red chili powder if using and mix well.
Remove from heat, add lemon juice, mix well and serve hot with rotis/phulkas or use as a stuffing in sandwiches like this one
Serves approximately 2 to 3

Notes
Anaheim peppers have a fair level of heat/ spice in them, so keep that in mind when you are adding red chili powder. If you do not want a very spicy curry just skip the red chili powder

Anaheim peppers can also be substituted with banana peppers or even bell peppers/ capsicum. If you do use banana peppers (bajji molagai) or bell peppers (Capsicum/ simla mirch/ koda molagai) these kind of peppers tend to be much milder than anaheim so make adjustments to the red chili powder to achieve required spiciness/ heat.
Read more ...

Friday, August 6, 2010

Kesar Pista Kulfi updated with slow cooker directions.(Saffron and Pistachio flavored Indian Ice Cream)

Can there be anything better than enjoying a cold frozen treat on a hot summery afternoon when the heat index is topping all kinds of records. I sure cannot think of anything :-) This summer we have had far more heat than previous years and the idea of making frozen treats has become so very appealing. In addition ever since I bought these popsicle molds I have been wanting to try using them to make some kulfi. I finally got a chance to make some kulfi a few weeks back and it turned out to be a perfect weekend treat.

Kulfi or Indian Ice Cream is different from regular ice cream in the sense that when making kulfi there is no need to incorporate air into the ice cream. It is made by boiling down milk and then freezing it solid.So it is simpler to make and is great choice for those who do not have ice cream makers and have to manually whisk ice cream every hour to achieve the right texture. The only tricky part with kulfi is if you do not boil down the milk sufficiently it may result in some water crystallization which will impact the taste. Other than that,  this is a simple and quick dessert that is very hard to resist :-)

UPDATE : One of the subsequent times I made this, I used the slow cooker and loved how easy and effortless it turned out to be, and I have updated my recipe below with the slow cooker directions for those of you interested in trying this dessert with the slow cooker.
KesarPistaKulfi2 resized

Click here for a printable view of this recipe

Ingredients and Method to make Pista Kulfi
4 cups whole milk
1/2 cup non fat dry milk (milk powder)
1/4 cup sweetened condensed milk
1/4 cup sugar or according to taste
2 pinches of good quality saffron
5 cardamon seeds powdered fine
2 1/2 tbsp unsalted pistachio powdered
1 tsp corn starch (known as corn flour in India)

Powder pistachios coarsely or finely as per your preference and keep aside.(I prefer a slightly coarse powder because I like the texture it lends the kulfi) Powder cardamom seeds and keep aside.
The copyright of this content belongs to Veginspirations.com

In a large heavy bottomed preferably non stick pan, add milk, dry milk, sweetened condensed milk and sugar and heat on low to medium heat, stirring frequently making sure the milk does not burn.

When the milk comes to a boil, lower heat. Add saffron and pistachio powder and simmer for a little while stirring continuously  (it took me about 15 to 20 minutes).

When the milk has more than halved, add cardamom seed powder and mix well. Remove a little of the milk in a separate container and add cornstarch to it and mix well making sure there are no lumps. Add this milk+cornstarch mixture back to the simmering milk. Allow to simmer for a few minutes, it will become thick and have a custard like feel at this point. Remove from heat, cool thoroughly pour into kulfi molds if you have them or in popsicle molds (like I did) and freeze. If you have neither of these, just pour them into small freezable dessert cups and cover with cling film/ or lids and place in the freezer. 

I got approximately 1 1/2 cups of custard like milk mixture which fit into four popsicle molds. When serving remove place the popsicle molds under hot water for a few seconds to help in removing the kulfi easily.

Suggested Variation

Instead of only milk,  replace 2 cups of milk with equal quantity of half & half to get a more creamier and richer kulfi.

UPDATE (07/18/2012)

Slow cooker directions to make this dessert

Place milk (or milk and half & half is using) in the slow cooker along with condensed milk and sugar and set on high heat for 4 hours. Stir a few times in between. Around the 3 hour mark, remove a little milk and mix with cornstarch, Make sure there are no lumps and add back to the simmering mixture. Add dry milk, saffron, cardamom and pistachio to the milk and allow to simmer for the next hour. When the milk has more than halved, (it took me a total of 4 hours from start to finish) switch off the slow cooker and allow the milk to cool completely. When cooled to room temperature, pour into kulfi molds/ popsicle molds or into small freezable dessert cups as suggested above and freeze.
Read more ...

Wednesday, August 4, 2010

Microwave Mixed Vegetable Gravy Curry

One day last week I was running behind schedule and had very little time to get dinner ready. Deciding to use frozen vegetables instead of fresh ones, I started out to make this microwave curry. But since I was very short on time I did not even get a few moments to look up this recipe. I decided to make it up as I go and had absolutely no plans to post this recipe on this site....... until I tasted the curry.

Once I did,  I loved it so much that I quickly wrote down the recipe post dinner :-)  The combination of caraway seeds and coriander seeds added such an unique and intriguing taste to this curry and the cashews added a touch of creaminess that was just right without making it heavy or too rich. I served this curry with some phulkas, but I am sure that it would taste equally good even with some plain steamed rice/ jeera rice/ or pulao.

The best thing about this curry, other than it's taste, is that it is so quick to make, the entire curry can be made in under 20 minutes, maybe a few minutes longer if you have to prep fresh vegetables. And with microwave cooking it is easy to make and serve in the same dish, so clean up is a breeze too :-)


 photo f985e998-2015-4409-95cc-8ba737d3d29e_zps5285f2bc.jpg

Click here for a printable view of this recipe

Ingredients and Method to make Microwave Mixed vegetable gravy curry
1 large onion cut fine
1 large tomato cut fine
Approximately 4 cups of mixed vegetables (like carrots, peas, beans, corn kernels, mushrooms, or other vegetables of choice)
2 pinches Kasuri methi (dried fenugreek leaves) (Optional but recommended)
salt to taste
1/2 tsp chili powder (or to taste)
1/2 cup milk
1 tbsp oil

Masala
1/2 tsp Caraway seeds (shah jeera)
3/4 tsp coriander seeds (dhania)
2 handfuls cashew nuts(see notes)

Grind the items mentioned under masala in a spice grinder. Grind the caraway seeds and coriander seeds first, as fine as can be done, then add cashews and using short bursts of power grind fine.

In a large glass  dish, or any other microwave safe dish (I use a glass dish), add oil, place in the microwave and heat on high for a minute

Add onions and place in the microwave and heat on high for 1+1 minute or until the onions turn transparent. Be sure to stir them every minute to ensure even cooking.
The copyright of this content belongs to Veginspirations.com

Add tomatoes and stir well, place in microwave and cook on high for about 3 minutes in 1 minute increments The tomatoes need to be cooked until soft and mushy. Stir every minute to ensure even cooking.

Add the mixed vegetables, a few drops of water and cook on high for approximately five to seven minutes in one minute increments or until the vegetables are cooked, slightly soft yet firm.Stir every minute to ensure even cooking.

Add salt to taste, chili powder, the ground masala, kasuri methi if using and a little water. Place in microwave and cook on high for 1 minute.

Add milk, mix well and cook on high for another 2 minutes in 1 minute increments.

Serve hot with phulkas/ rotis/ or plain steamed rice.

Notes
Because of varying wattage in each microwave, cooking times will vary in different microwaves. Use the times given in this recipe only as a guide. It may take a little lesser or more time to cook depending on your microwave.

If you like a more thicker and creamier gravy double the quantity of cashews in this recipe, with the quantity used, this curry has a very light gravy which is how we like this curry :)

This curry does not take very long to make on the stove top too.Heat oil in a heavy bottomed pan, add onions saute until transparent, add tomatoes and stir until soft and mushy.Then add vegetables and some water and cook until vegetables are soft but firm. Add salt, spices, ground powder a little more water and milk and simmer for a few minutes until the flavors blend.

Read more ...

Monday, August 2, 2010

Raw Banana ~ Plantain Curry ~ Vazhakkai Podimas ~ Kache kele ki sabzi ~ With Stepwise pictures

Podimas refers to a type of curry from south Indian cuisine, where the vegetable is cooked and crumbled to very small pieces and then seasoned. Podi literally means powder in Tamil (an Indian language). Growing up the only type of podimas I really cared about was of the potato kind.  I was not even aware of podimas made with plantain until my mother in law introduced me to it. R and his entire family are very fond of this plantain podimas and it is a favored Sunday lunch menu item when the family is together.

Raw Banana/ Plantain curry ~ Vazhakkai podimas ~ Kache kele ki subzi ~ With stepwise pics

The tricky part about this curry is to cook the plantains correctly. If overcooked it will result in an unattractive mush and under cooked will taste raw. But once this part is done, the curry is really simple to put together with a minimum of items required. Pair this with a sambar or rasam and some plain steamed rice and you have an traditional south Indian meal that is both comforting and delicious :-)

 Raw Banana Curry ~ Plantain Curry ~ Vazhakkai Podimas ~ Kache kele ki subzi

Click here for a printable view of this recipe

Ingredients and Method to make Plantain Podimas
3 large raw plantains/vazhakkai cut into 3 inch pieces with skin or 6 to 7 small plantains
salt to taste
3 tbsp fresh grated coconut (can use frozen, just thaw to room temperature first)

Seasoning
2 Tbsp oil (preferably coconut, but any other oil is also fine)
1 tsp mustard seeds (rai/ kadagu)
1 tsp split black gram lentil (udad dhal/ ulatham parappu)
1/8 tsp asafoetida powder (hing)
1/8 tsp turmeric powder (optional)
4 Thai or Indian green chilies cut very fine ( or to taste)
1 inch piece of ginger grated fine (adrak/inji) (optional)
 a few additional drops of oil

In a large heavy bottomed pan, place the plantain pieces along with skin. Fill with water enough to submerge the plantain, add a few drops of  sesame oil or any other oil and place container on heat. Allow the plantain to cook for 10 to 15 minutes. To know if done, remove one piece of plantain , place on a plate (remember it is very hot, so allow it to cool on the plate for a couple of minutes at least) and press the skin with your finger, if the skin feels a little soft means it is done. Remove all the plantain pieces and place on the plate and allow it to cool. (if you allow the plantains to sit in the water it is cooked in, for too long, it becomes dark, hence the need to remove from the water and place on plate)


After the plantains have cooled to room temperature, peel the skin. Grate plantain. If the plantain is cooked right, it will give you soft grated plantain at this point, if over cooked it will turn to mush between your fingers.Continue until all the plantain has been grated. ( I got about 6 cups of heaped loosely packed grated plantain)
The copyright of this content belongs to Veginspirations.com


Heat oil in a large heavy bottomed pan, add mustard seeds and split black gram lentil. When the mustards seeds begin to pop and black gram lentil begins to turn reddish, add green chilies, grated ginger and stir a few times. Quickly add asafoetida powder and turmeric powder, stir a couple of time and add grated plantain to this seasoning. Lower heat and add salt to taste and mix well.


Finally garnish with grated coconut, mix well, remove from heat and serve hot along with plain steamed rice and sambar or rasam as a side dish.


Read more ...